
'2020/05'에 해당되는 글 5건
- 2020.05.15 :: Springboot - reactive mongo driver 사용시 ClusterSettings 시 유의사항
- 2020.05.14 :: Java - jdk 14 record(레코드) 란?! Data class(데이터 클래스)
- 2020.05.03 :: gRPC - Protobuf란? 구글 프로토콜 버퍼(protocol buffers)
- 2020.05.03 :: gRPC - java gRPC 간단한 사용법
- 2020.05.02 :: gRPC - gRPC란 무엇인가?

MongoDbConfig를 작성할때, 몽고디비 서버 호스트관련하여 ClusterSettings.Builder를 작성해줘야하는데, mongo host에 모든 클러스터 서버 호스트를 명시하지 않고, 하나의 DNS(여러 서버를 하나로 묶은) 혹은 여러 서버 리스트 중 하나의 primary 호스트(ex. primary host를 명시하면 밑에 예외는 발생하지 않지만, 읽기 부하분산이 안된다.)만 명시한경우에는 반드시 multiple mode를 명시해주어야 한다. 내부적으로 host의 갯수를 보고 single mode인지 multiple mode인지 판단하기 때문이다. 해당 코드는 아래와 같다.
private ClusterSettings(final Builder builder) {
        // TODO: Unit test this
        if (builder.srvHost != null) {
            if (builder.srvHost.contains(":")) {
                throw new IllegalArgumentException("The srvHost can not contain a host name that specifies a port");
            }

            if (builder.hosts.get(0).getHost().split("\\.").length < 3) {
                throw new MongoClientException(format("An SRV host name '%s' was provided that does not contain at least three parts. "
                        + "It must contain a hostname, domain name and a top level domain.", builder.hosts.get(0).getHost()));
            }
        }

        if (builder.hosts.size() > 1 && builder.requiredClusterType == ClusterType.STANDALONE) {
            throw new IllegalArgumentException("Multiple hosts cannot be specified when using ClusterType.STANDALONE.");
        }

        if (builder.mode != null && builder.mode == ClusterConnectionMode.SINGLE && builder.hosts.size() > 1) {
            throw new IllegalArgumentException("Can not directly connect to more than one server");
        }

        if (builder.requiredReplicaSetName != null) {
            if (builder.requiredClusterType == ClusterType.UNKNOWN) {
                builder.requiredClusterType = ClusterType.REPLICA_SET;
            } else if (builder.requiredClusterType != ClusterType.REPLICA_SET) {
                throw new IllegalArgumentException("When specifying a replica set name, only ClusterType.UNKNOWN and "
                                                   + "ClusterType.REPLICA_SET are valid.");
            }
        }

        description = builder.description;
        srvHost = builder.srvHost;
        hosts = builder.hosts;
        mode = builder.mode != null ? builder.mode : hosts.size() == 1 ? ClusterConnectionMode.SINGLE : ClusterConnectionMode.MULTIPLE;
        requiredReplicaSetName = builder.requiredReplicaSetName;
        requiredClusterType = builder.requiredClusterType;
        localThresholdMS = builder.localThresholdMS;
        serverSelector = builder.packServerSelector();
        serverSelectionTimeoutMS = builder.serverSelectionTimeoutMS;
        maxWaitQueueSize = builder.maxWaitQueueSize;
        clusterListeners = unmodifiableList(builder.clusterListeners);
    }
ClusterSettings.Builder.build 메서드의 일부인데, mode를 set하는 부분에 mode를 명시적으로 넣지 않았다면 작성된 호스트 갯수를 보고 클러스터 모드를 결정한다. 만약 MonoDb 서버 여러개를 하나의 도메인으로 묶어 놓았다면, 보통 DNS하나만 설정에 넣기 마련인데, 이러면 write 요청이 secondary에 들어가게 되면 아래와 같은 에러가 발생하게 된다.(먄약 실수로 secondary host를 넣었다면 쓰기요청에 당연히 아래 예외가 계속 발생한다.)
MongoNotPrimaryException: Command failed with error 10107 (NotMaster): 'not master' on server bot-meta01-mongo1.dakao.io:27017.
왠지, SINGLE모드일때는 secondary로 write요청이 들어왔을때 primary로 위임이 안되는듯하다.(이건 조사해봐야할듯함, 왠지 싱글모드이면 당연히 프라이머리라고 판단해서 그럴듯?..) 그렇기 때문에 클러스터는 걸려있고, 서버 리스트를 여러 서버를 묶은 DNS 하나만 작성한다면 반드시 ClusterSetting에 "MULTIPLE"을 명시해서 넣야야한다 !
'Web > Spring' 카테고리의 다른 글
| Spring Data - MongoDB&queryDsl 예제 (1) | 2020.06.25 |
|---|---|
| Spring Data - 여러 spring data module을 사용할때 레퍼런스 (0) | 2020.06.25 |
| Spring - application.yaml(.properties) 파일 로드 규칙 및 순서 (0) | 2020.04.29 |
| Springboot - Spring webflux handler test(웹플럭스 핸들러 테스트), WebTestClient (0) | 2020.03.20 |
| Springboot - @CacheEvict 사용시 주의점, Spring cache(@Cacheable,@CacheEvict) (1) | 2020.03.03 |

오늘 다루어볼 내용은 java 14에서 도입된 record 타입의 클래스입니다.
record란?
레코드(record)란 "데이터 클래스"이며 순수하게 데이터를 보유하기 위한 특수한 종류의 클래스이다. 코틀린의 데이터 클래스와 비슷한 느낌이라고 보면 된다. 밑에서 코드를 보겠지만, record 클래스를 정의할때, 그 모양은 정말 데이터의 유형만 딱 나타내는 듯한 느낌이다. 훨씬더 간결하고 가볍기 때문에 Entity 혹은 DTO 클래스를 생성할때 사용되면 굉장히 좋을 듯하다.
sample code
간단하게 샘플코드를 살펴보자.
|
1
2
3
4
5
6
7
8
9
10
11
12
13
14
15
16
17
18
19
20
21
22
23
|
public class SampleRecord {
private final String name;
private final Integer age;
private final Address address;
public SampleRecord(String name, Integer age, Address address) {
this.name = name;
this.age = age;
this.address = address;
}
public String getName() {
return name;
}
public Integer getAge() {
return age;
}
public Address getAddress() {
return address;
}
}
|
cs |
위와 같은 코드가 있다고 가정하자. 해당 클래스는 모든 인스턴스 필드를 초기화하는 생성자가 있고, 모든 필드는 final로 정의되어 있다. 그리고 각각 필드의 getter를 가지고 있다. 이러한 클래스 같은 경우는 record 타입의 클래스로 변경이 가능하다.
|
1
2
3
4
5
|
public record SampleRecord(
String name,
Integer age,
Address address
) {}
|
cs |
엄청 클래스가 간결해진 것을 볼 수 있다. 이 record 클래스에 대해 간단히 설명하면 아래와 같다.
- 해당 record 클래스는 final 클래스이라 상속할 수 없다.
- 각 필드는 private final 필드로 정의된다.
- 모든 필드를 초기화하는 RequiredAllArgument 생성자가 생성된다.
- 각 필드의 getter는 getXXX()가 아닌, 필드명을 딴 getter가 생성된다.(name(), age(), address())
만약 그런데 json serialize가 되기 위해서는 위와 같이 선언하면 안된다. 아래와 같이 jackson 어노테이션을 붙여줘야한다.
|
1
2
3
4
5
|
public record SampleRecord(
@JsonProperty("name") String name,
@JsonProperty("age") Integer age,
@JsonProperty("address") Address address
) {}
|
cs |
record 클래스는 static 변수를 가질 수 있고, static&public method를 가질 수 있다.
|
1
2
3
4
5
6
7
8
9
10
11
12
13
14
15
16
17
|
public record SampleRecord(
@JsonProperty("name") String name,
@JsonProperty("age") Integer age,
@JsonProperty("address") Address address
) {
static String STATIC_VARIABLE = "static variable";
@JsonIgnore
public String getInfo() {
return this.name + " " + this.age;
}
public static String get() {
return STATIC_VARIABLE;
}
}
|
cs |
또한 record 클래스의 생성자를 명시적으로 만들어서 생성자 매개변수의 validation 로직등을 넣을 수도 있다.
|
1
2
3
4
5
6
7
8
9
10
11
12
13
14
15
16
17
18
19
20
21
22
23
|
public record SampleRecord(
@JsonProperty("name") String name,
@JsonProperty("age") Integer age,
@JsonProperty("address") Address address
) {
public SampleRecord {
if (name == null || age == null || address == null) {
throw new IllegalArgumentException();
}
}
static String STATIC_VARIABLE = "static variable";
@JsonIgnore
public String getInfo() {
return this.name + " " + this.age;
}
public static String get() {
return STATIC_VARIABLE;
}
}
|
cs |
이러한 record 클래스를 spring의 controller와 연계해서 사용하면 더 간결한 injection이 가능해지기 때문에 훨씬 깔끔한 컨트롤러 클래스작성이 가능하다.
|
1
2
3
4
5
6
7
8
9
10
11
12
13
14
15
16
17
18
19
20
21
22
23
24
25
26
27
28
29
30
31
32
33
34
35
36
37
38
39
40
41
42
43
44
45
46
47
48
49
|
======================================================================================
public record SampleRecord(
@JsonProperty("name") String name,
@JsonProperty("age") Integer age,
@JsonProperty("address") Address address
) {
static String STATIC_VARIABLE = "static variable";
@JsonIgnore
public String getInfo() {
return this.name + " " + this.age;
}
public static String get() {
return STATIC_VARIABLE;
}
}
======================================================================================
public record Address(
@JsonProperty("si") String si,
@JsonProperty("gu") String gu,
@JsonProperty("dong") String dong
) {}
======================================================================================
@Service
public class SampleRecordService {
public Mono<SampleRecord> sampleRecordMono(SampleRecord sampleRecord) {
return Mono.just(sampleRecord);
}
}
======================================================================================
@RestController
public record SampleController(SampleRecordService sampleRecordService) {
@PostMapping("/")
public Mono<SampleRecord> sampleRecord(@RequestBody SampleRecord sampleRecord) {
System.out.println(sampleRecord.getInfo());
return sampleRecordService.sampleRecordMono(sampleRecord);
}
}
======================================================================================
|
cs |
여기까지 간단하게 jdk 14의 new feature인 record 클래스에 대해 간단하게 다루어 보았다. 모든 코드는 아래 깃헙을 참고하자.
yoonyeoseong/jdk_14_record_sample
Contribute to yoonyeoseong/jdk_14_record_sample development by creating an account on GitHub.
github.com
참조 : https://dzone.com/articles/jdk-14-records-for-spring-devs
JDK 14 Records for Spring - DZone Java
In this article, we'll discuss several use cases for JDK 14 Records to write cleaner and more efficient code.
dzone.com
'프로그래밍언어 > Java&Servlet' 카테고리의 다른 글
| Java - Reactor switchIfEmpty 사용시 주의점(Lambda, 람다 Lazy Evaluation) (2) | 2020.07.29 |
|---|---|
| Java - 자바 클로져(Closure) & 커링(currying) (0) | 2020.07.22 |
| Java - Model(Object) mapping을 위한 Mapstruct (맵스트럭트)! (0) | 2020.04.29 |
| Java - 중첩이 많은 Stream 처리 Tip ! (0) | 2020.04.21 |
| Java - CopyOnWriteArraySet 클래스 (0) | 2019.12.19 |

이전 포스팅에서는 grpc를 이용하여 간단하게 client-server 애플리케이션을 작성하였다. 간단하게 감을 익혀봤으니, 세세한 부분을 스터디 해본다. 오늘은 Protobuf(proto3)에 대해 다루어본다.
메시지 유형 정의
간단한 예를 보자. 검색 요청 메시지이며, 쿼리 문자열과 페이징을 위한 필드를 가지고 있다.
syntax = "proto3";

message SearchRequest {
  string query = 1;
  int32 page_number = 2;
  int32 result_per_page = 3;
}
첫 줄은 proto3 syntax를 사용하고 있음을 지정한다. default는 proto2이다. 그리고 message SearchRequest를 정의한다. message는 자바로 비교하면 하나의 dto(model) 클래스라고 생각하면 좋다. 그리고 해당 message안에 필요한 필드를 선언한다. 위의 모든 필드는 scala type으로 지정되어 있지만, enum 및 다른 message 유형을 참조하여 복합 유형을 지정할 수도 있다.
그리고 하나의 proto 파일에 여러 message 유형을 정의할 수 있다.
필드 번호
message의 각 필드에는 번호가 할당되어 있다. 이 필드 번호는 message가 이진형식으로 직렬화될때 필드를 식별하는데 사용되는 번호이다.
주석
proto 파일은 아래와 같이 주석 작성이 가능하다.
syntax = "proto3";

/*
검색 요청을 위한 요청 객체를 표현하는 message 정의
 */
message SearchRequest {
  string query = 1; //쿼리 문자열
  int32 page_number = 2;
  int32 result_per_page = 3;
}
Scala value types
스칼라 타입 유형은 아래와 같이 지원하고 있다.
|
TYPE |
Notes |
Java |
Python |
|
double |
|
double |
float |
|
float |
|
float |
float |
|
int32 |
Uses variable-length encoding. Inefficient for encoding negative numbers – if your field is likely to have negative values, use sint32 instead. |
int |
int |
|
int64 |
Uses variable-length encoding. Inefficient for encoding negative numbers – if your field is likely to have negative values, use sint64 instead. |
long |
int/long[3] |
|
uint32 |
Uses variable-length encoding. |
int[1] |
int/long[3] |
|
uint64 |
Uses variable-length encoding. |
long[1] |
int/long[3] |
|
sint32 |
Uses variable-length encoding. Signed int value. These more efficiently encode negative numbers than regular int32s. |
int |
int |
|
sint64 |
Uses variable-length encoding. Signed int value. These more efficiently encode negative numbers than regular int64s. |
long |
int/long[3] |
|
fixed32 |
Always four bytes. More efficient than uint32 if values are often greater than 228. |
int[1] |
int/long[3] |
|
fixed64 |
Always eight bytes. More efficient than uint64 if values are often greater than 256. |
long[1] |
int/long[3] |
|
sfixed32 |
Always four bytes. |
int |
int |
|
sfixed64 |
Always eight bytes. |
long |
int/long[3] |
|
bool |
|
boolean |
bool |
|
string |
A string must always contain UTF-8 encoded or 7-bit ASCII text, and cannot be longer than 232. |
String |
str/unicode[4] |
|
bytes |
May contain any arbitrary sequence of bytes no longer than 232. |
ByteString |
str |
Default Value
messagefmf deserialize할때, 값이 없다면 각 타입에 대해 아래와 같은 기본 값을 가진다.
| Type | Default Value |
| string | "" |
| bytes | empty bytes |
| boolean | false |
| numeric | 0 |
| enums | 첫번째 정의된 enum value(must be 0) |
Enum Type
protobuf에서도 자바와 같은 Enum 타입을 생성할 수 있다.
syntax = "proto3";

/*
검색 요청을 위한 요청 객체를 표현하는 message 정의
 */
message SearchRequest {
  string query = 1; //쿼리 문자열
  int32 page_number = 2;
  int32 result_per_page = 3;
  Corpus corpus = 4;
}

enum Corpus {
  UNIVERSAL = 0;
  WEB = 1;
  IMAGES = 2;
  LOCAL = 3;
  NEWS = 4;
  PRODUCTS = 5;
  VIDEO = 6;
}
열거형은 반드시 시작을 0으로 시작해야한다. 그래야 역직렬화할때, 값이 존재하지 않을경우 0에 할당된 값을 기본값으로 쓰기 때문이다.
다른 message 유형 사용
다른 message 타입을 필드 타입으로 사용할 수 있다.
message SearchResponse {
  SearchResult results = 1;
}

message SearchResult {
  string url = 1;
  string title = 2;
}
그렇다면 다른 .proto 파일에 있는 message 타입을 사용하려면 어떻게 해야할까?
#SearchResult.proto
syntax = "proto3";

option java_multiple_files = true;
option java_outer_classname = "SearchResultProto";
option java_package = "com.levi.yoon.proto";

package grpc.sample;

message SearchResult {
  string url = 1;
  string title = 2;
}

#SearchProto.proto
syntax = "proto3";
import "SearchResult.proto";

option java_multiple_files = true;
option java_outer_classname = "SearchProto";
option java_package = "com.levi.yoon.proto";

package grpc.sample;

/*
검색 요청을 위한 요청 객체를 표현하는 message 정의
 */
message SearchRequest {
  string query = 1; //쿼리 문자열
  int32 page_number = 2;
  int32 result_per_page = 3;
  Corpus corpus = 4;
}

enum Corpus {
  UNIVERSAL = 0;
  WEB = 1;
  IMAGES = 2;
  LOCAL = 3;
  NEWS = 4;
  PRODUCTS = 5;
  VIDEO = 6;
}

message SearchResponse {
  SearchResult results = 1;
}
import 문을 통해서 다른 .proto 파일을 가져와서 사용할 수 있다.
중첩 타입
message 타입을 중첩해서 사용가능하다. 마치 자바에서 클래스 안에 클래스를 가지듯 !
syntax = "proto3";

message SearchResponse {
  message Result {
    string url = 1;
    string title = 2;
  }
  repeated Result results = 1;
}
Map type
필드 타입으로 Map을 사용할 수 있다.
syntax = "proto3";

option java_multiple_files = true;
option java_outer_classname = "ExampleRequestProto";
option java_package = "com.levi.yoon.proto";

package grpc.sample;

message ExampleRequest {
  map<string, string> requests = 1;
}
해당 필드를 set/get 할때는 아래와 같은 메서드를 지원한다.
ExampleRequest exampleRequest = ExampleRequest.newBuilder()
        .putRequests("a", "a")
        .putRequests("b", "b")
        .build();
exampleRequest.getRequestsMap();
exampleRequest.getRequestsOrDefault("a", "defaultValue");
exampleRequest.getRequestsOrThrow("a");
주의해야할 점은 Map 타입은 repeated를 사용할 수 없다.
Package
protobuf message 타입간 이름 충돌을 피하기 위해 파일에 선택적으로 package 지정자를 추가할 수 있다.
#ExampleRequestProto1.proto
syntax = "proto3";

package grpc.sample1;

message ExampleRequest {
  map<string, string> requests = 1;
}

#ExampleRequestProto2.proto
syntax = "proto3";

package grpc.sample2;

message ExampleRequest {
  map<string, string> requests = 1;
}
서비스 정의
client에서 stub 객체로 호출할 원격 프로시져(서비스)를 정의할 수 있다.
service SearchService {
  rpc Search (SearchRequest) returns (SearchResponse);
}
우리가 정의한 SearchRequest message를 매개변수로 받고, 응답으로 SearchResponse를 반환하는 서비스를 정의하였다. 해당 interface를 gRPC server에서 override하여 구현하고, client는 Stub 객체 안에 해당 서비스이름의 메서드를 콜하여 원격 gRPC service를 호출하게 된다.
기타 옵션
option java_multiple_files = true; -> proto 파일안의 message와 enum, service 등이 각 java 파일로 생성된다.
option java_outer_classname = "SearchProto"; -> 생성될 자바코드의 클래스명이 된다.
option java_package = "com.levi.yoon.proto"; -> 생성된 자바코드의 package 경로가 된다.
여기까지 간단하게 Protobuf에 대한 기능들 몇가지를 다루어보았다. 미쳐 다루지 못한 것은 실제 grpc 실습에서 다루어본다.
'Web > gRPC' 카테고리의 다른 글
| gRPC - convert proto generate java to jsonString (0) | 2020.07.15 |
|---|---|
| gRPC - java gRPC 간단한 사용법 (0) | 2020.05.03 |
| gRPC - gRPC란 무엇인가? (0) | 2020.05.02 |

이번 포스팅은 gRPC의 세세한 기능을 다루기 이전에 간단하게 java로 gRPC 서버와 클라이언트 코드를 작성해보고 감을 익혀보는 포스팅이다. 오늘 구성할 프로젝트 구조는 아래와 같다.
- grpc-common : .proto 파일을 이용하여 client와 server가 공통으로 사용할 소스를 generate한 프로젝트. client와 server에서 submodule로 추가할 프로젝트이다.
- grpc-server : server역할을 할 gRPC 서버 애플리케이션이다.
- grpc-client : client역할을 할 gRPC 클라이언트 애플리케이션이다.
grpc-common
모든 소스코드는 아래 깃헙 주소를 참고하면 된다.
yoonyeoseong/grpc-common
Contribute to yoonyeoseong/grpc-common development by creating an account on GitHub.
github.com
우선 gradle 프로젝트를 생성해준다. 그 이후 build.gradle을 아래와 같이 세팅한다.
|
1
2
3
4
5
6
7
8
9
10
11
12
13
14
15
16
17
18
19
20
21
22
23
24
25
26
27
28
29
30
31
32
33
34
35
36
37
38
39
40
41
42
43
44
45
46
47
48
49
50
51
|
buildscript {
repositories {
mavenCentral()
}
dependencies {
classpath 'com.google.protobuf:protobuf-gradle-plugin:0.8.8'
}
}
plugins {
id 'java'
}
apply plugin: 'com.google.protobuf'
group 'org.example'
version '1.0-SNAPSHOT'
repositories {
mavenCentral()
}
dependencies {
/**
* gRPC
*/
compile group: 'io.grpc', name: 'grpc-netty-shaded', version: '1.21.0'
compile group: 'io.grpc', name: 'grpc-protobuf', version: '1.21.0'
compile group: 'io.grpc', name: 'grpc-stub', version: '1.21.0'
implementation "com.google.protobuf:protobuf-java-util:3.8.0"
compile group: 'com.google.protobuf', name: 'protobuf-java', version: '3.8.0'
testCompile group: 'junit', name: 'junit', version: '4.12'
}
protobuf {
protoc {
artifact = "com.google.protobuf:protoc:3.7.1"
}
plugins {
grpc {
artifact = 'io.grpc:protoc-gen-grpc-java:1.21.0'
}
}
generateProtoTasks {
all()*.plugins {
grpc {}
}
}
}
|
cs |
gRPC를 위한 의존서을 추가해주었고, .proto 파일에 작성된 리소스를 자바코드로 generate하기 위한 설정들이 들어가있다.
이제 src/main/proto 디렉토리를 하나 생성해준다. 그 이후에 아래와 같은 .proto 파일을 작성해준다.
syntax = "proto3";

option java_multiple_files = true;
option java_outer_classname = "SampleProto";
option java_package = "com.levi.yoon.proto";

package grpc.sample;

message SampleRequest {
  string userId = 1;
  string message = 2;
}

message SampleResponse {
  string message = 1;
}

service SampleService {
  rpc SampleCall (SampleRequest) returns (SampleResponse) {}
}
아직은 해당 파일에 대한 세세한 내용은 다루지 않는다. 추후에 다루어 볼것이니 일단 몰라도 넘어가자. proto 파일을 생성해주었으면 generateProto task를 실행시켜준다. 이후 소스가 잘 생성되었는지 확인하자.

grpc-server
yoonyeoseong/grpc-server
Contribute to yoonyeoseong/grpc-server development by creating an account on GitHub.
github.com
이제는 grpc 서버 역할을 할 애플리케이션을 작성한다. 우선 바로 위에서 생성한 프로젝트를 submodule로 추가해준다.
> git submodule add <grpc-common 깃 주소>
필자는 spring의 injection을 사용하기 위해서 스프링부트 프로젝트로 생성해주었다. 일반 gradle 프로젝트도 상관없으니 편할대로 생성해주면 될듯하다.
build.gradle에 grpc-common에 생성된 소스를 sourceSets로 넣는 설정을 하나 넣어준다. 그리고 필요한 dependency를 추가한다. 물론 grpc-server에 필요하지 않은 의존성이 있긴하지만 우선 추가하자.
buildscript {
    repositories {
        mavenCentral()
    }
    dependencies {
        classpath 'com.google.protobuf:protobuf-gradle-plugin:0.8.8'
    }
}

plugins {
    id 'org.springframework.boot' version '2.2.6.RELEASE'
    id 'io.spring.dependency-management' version '1.0.9.RELEASE'
    id 'java'
}

apply plugin: 'com.google.protobuf'

group = 'com.levi'
version = '0.0.1-SNAPSHOT'
sourceCompatibility = '14'

configurations {
    compileOnly {
        extendsFrom annotationProcessor
    }
}

repositories {
    mavenCentral()
}

dependencies {
    /**
     * gRPC
     */
    compile group: 'io.grpc', name: 'grpc-netty-shaded', version: '1.21.0'
    compile group: 'io.grpc', name: 'grpc-protobuf', version: '1.21.0'
    compile group: 'io.grpc', name: 'grpc-stub', version: '1.21.0'
    implementation "com.google.protobuf:protobuf-java-util:3.8.0"
    compile group: 'com.google.protobuf', name: 'protobuf-java', version: '3.8.0'

    implementation 'org.springframework.boot:spring-boot-starter-webflux'
    compileOnly 'org.projectlombok:lombok'
    annotationProcessor 'org.projectlombok:lombok'
    testImplementation('org.springframework.boot:spring-boot-starter-test') {
        exclude group: 'org.junit.vintage', module: 'junit-vintage-engine'
    }
    testImplementation 'io.projectreactor:reactor-test'
}

test {
    useJUnitPlatform()
}

sourceSets {
    main {
        java {
            srcDirs += [
                    'grpc-common/build/generated/source/proto/main/grpc',
                    'grpc-common/build/generated/source/proto/main/java'
            ]
        }
    }
}
이제 우리가 정의한 service를 구현해보자.
|
1
2
3
4
5
6
7
8
9
10
11
12
13
14
15
|
@Slf4j
@Service
public class SampleServiceImpl extends SampleServiceGrpc.SampleServiceImplBase {
@Override
public void sampleCall(SampleRequest request, StreamObserver<SampleResponse> responseObserver) {
log.info("SampleServiceImpl#sampleCall - {}, {}", request.getUserId(), request.getMessage());
SampleResponse sampleResponse = SampleResponse.newBuilder()
.setMessage("grpc service response")
.build();
responseObserver.onNext(sampleResponse);
responseObserver.onCompleted();
}
}
|
cs |
단순히 우리가 정의한 service(sampleCall)을 구현하는 것 뿐이다. 요청으로 SampleRequest 객체를 받고, 응답으로 SampleResponse를 내보내주면 된다. 비즈니스 로직은 없고 단순히 로그를 찍고 SampleResponse를 리턴하는 단순한 로직이다. 사실 client-server 통신 방법은 크게 4가지가 있는데, 4가지중 "client : server = 1 : 1" 로 통신하는 구조로 만들었다.
gRPC 서버를 구동하기 위한 클래스를 하나 작성한다. 뭐 여러가지 튜닝할 요소가 있을지는 모르겠지만, 우선 띄우는 것에 집중하자. gRPC-server로 결국은 server이다. 포트를 할당 받아서 서버형태로 띄운다.
|
1
2
3
4
5
6
7
8
9
10
11
12
13
|
@Component
public class GrpcRunner implements ApplicationRunner {
private static final int PORT = 3030;
private static final Server SERVER = ServerBuilder.forPort(PORT)
.addService(new SampleServiceImpl())
.build();
@Override
public void run(ApplicationArguments args) throws Exception {
SERVER.start();
}
}
|
cs |
이제 spring application을 실행시키면 grpc server가 구동된다.
grpc-client
yoonyeoseong/grpc-client
Contribute to yoonyeoseong/grpc-client development by creating an account on GitHub.
github.com
마지막으로 grpc-server와 통신할 grpc-client이다. grpc-common 프로젝트를 submodule로 추가한다.
> git submodule add <grpc-common 깃 주소>
이제 build.gradle을 작성하자. grpc-server와 같이 필요없는 의존성이 있을 수 있지만 일단 추가하자.
buildscript {
    repositories {
        mavenCentral()
    }
    dependencies {
        classpath 'com.google.protobuf:protobuf-gradle-plugin:0.8.8'
    }
}

plugins {
    id 'org.springframework.boot' version '2.2.6.RELEASE'
    id 'io.spring.dependency-management' version '1.0.9.RELEASE'
    id 'java'
}

apply plugin: 'com.google.protobuf'

group = 'com.levi'
version = '0.0.1-SNAPSHOT'
sourceCompatibility = '14'

configurations {
    compileOnly {
        extendsFrom annotationProcessor
    }
}

repositories {
    mavenCentral()
}

dependencies {
    /**
     * gRPC
     */
    compile group: 'io.grpc', name: 'grpc-netty-shaded', version: '1.21.0'
    compile group: 'io.grpc', name: 'grpc-protobuf', version: '1.21.0'
    compile group: 'io.grpc', name: 'grpc-stub', version: '1.21.0'
    implementation "com.google.protobuf:protobuf-java-util:3.8.0"
    compile group: 'com.google.protobuf', name: 'protobuf-java', version: '3.8.0'

    implementation 'org.springframework.boot:spring-boot-starter-webflux'
    compileOnly 'org.projectlombok:lombok'
    annotationProcessor 'org.projectlombok:lombok'
    testImplementation('org.springframework.boot:spring-boot-starter-test') {
        exclude group: 'org.junit.vintage', module: 'junit-vintage-engine'
    }
    testImplementation 'io.projectreactor:reactor-test'
}

sourceSets {
    main {
        java {
            srcDirs += [
                    'grpc-common/build/generated/source/proto/main/grpc',
                    'grpc-common/build/generated/source/proto/main/java'
            ]
        }
    }
}

test {
    useJUnitPlatform()
}
이제 stub 객체를 이용하여 grpc-server의 원격 메서드를 호출하는 client 코드를 간단하게 작성한다.
|
1
2
3
4
5
6
7
8
9
10
11
12
13
14
15
16
17
18
19
20
21
22
23
24
25
26
27
28
29
30
31
32
33
34
35
36
|
@Slf4j
@Service
public class GrpcClient {
private static final int PORT = 3030;
public static final String HOST = "localhost";
private final SampleServiceGrpc.SampleServiceStub asyncStub = SampleServiceGrpc.newStub(
ManagedChannelBuilder.forAddress(HOST, PORT)
.usePlaintext()
.build()
);
public String sampleCall() {
final SampleRequest sampleRequest = SampleRequest.newBuilder()
.setUserId("levi.yoon")
.setMessage("grpc request")
.build();
asyncStub.sampleCall(sampleRequest, new StreamObserver<SampleResponse>() {
@Override
public void onNext(SampleResponse value) {
log.info("GrpcClient#sampleCall - {}", value);
}
@Override
public void onError(Throwable t) {
log.error("GrpcClient#sampleCall - onError");
}
@Override
public void onCompleted() {
log.info("GrpcClient#sampleCall - onCompleted");
}
});
return "string";
}
}
|
cs |
우선 client에서는 크게 2가지가 등장한다. (Stub & Channel)
- Stub : Remote procedure call을 하기 위한 가짜 객체라고 생각하면 된다. 마치 자신의 메서드를 호출하는 듯한 느낌이지만, 실제 원격(grpc-server) 메서드를 호출한다. Stub에는 async, blocking, future등 여러 스텁 종류가 존재하지만, 우리는 asyncStub을 이용한다.
- Channel : 결국 Stub도 원격 서버의 메서드를 호출한다. 그렇기 때문에 grpc-server와 통신할 channel을 정의해준다.
우리가 정의한 service의 스텁 객체를 생성해주고, 매개변수로 Channel을 생성해서 넣어준다. 우리가 띄울 grpc-server의 host와 port를 넣는다.
.proto로 message를 정의하면 java에서 사용할 수 있는 빌더패턴의 메서드, setter&getter등을 만들어준다. 요청을 위한 SampleRequest 객체를 만들었다. 이제 stub의 sampleCall(우리가 정의한 서비스)를 호출한다. 그런데 매개변수로 StreamObserver가 들어가는데, 해당 Stub은 asyncStub이기 때문에 callback 객체를 넣어주는 것이다. 간단히 로그를 찍는 callback 로직을 넣어주었다.
|
1
2
3
4
5
6
7
8
9
10
11
12
13
14
15
16
17
|
@RestController
@SpringBootApplication
@RequiredArgsConstructor
public class GrpcApplication {
private final GrpcClient grpcClient;
public static void main(String[] args) {
SpringApplication.run(GrpcApplication.class, args);
}
@GetMapping("/")
public Mono<String> test() {
return Mono.just(grpcClient.sampleCall());
}
}
|
cs |
위는 간단하게 요청을 받을 controller를 하나 정의하였다.
실행
이제 grpc-server와 grpc-client를 띄우고 요청을 보내보자.
> curl http://localhost:9090/

#grpc-server
2020-05-03 13:59:18.781  INFO : SampleServiceImpl#sampleCall - levi.yoon, grpc request

#grpc-client
2020-05-03 13:57:09.014  INFO : GrpcClient#sampleCall - message: "grpc service response"
2020-05-03 13:57:09.032  INFO : GrpcClient#sampleCall - onCompleted
와우 ! client-server 간의 통신이 잘 이루어졌고, 우리가 찍었던 로그가 잘 보인다. 지금까지 간단하게 java 기반의 grpc를 다루어보았다. 사실 다룰 내용이 훨씬 많다. 그렇지만 이렇게 한번 간단하게 사용해보면 추후에 세세한 부분을 공부할때, 더 수월할 수도 있을 것 같다.
'Web > gRPC' 카테고리의 다른 글
| gRPC - convert proto generate java to jsonString (0) | 2020.07.15 |
|---|---|
| gRPC - Protobuf란? 구글 프로토콜 버퍼(protocol buffers) (0) | 2020.05.03 |
| gRPC - gRPC란 무엇인가? (0) | 2020.05.02 |

오늘은 gRPC가 무엇인지 알아본다. 그동안 스터디한다고 마음만 먹고 매일 미루기만 했는데, 황금연휴에 맘잡고 gRPC에 대해 다루어 볼 것이다.
개요
gRPC를 사용하면 클라이언트 애플리케이션에서 마치 자신의 메서드를 호출하는 것처럼 원격서버(gRPC서버)의 메서드를 직접 호출 할 수 있으므로 MSA환경의 서비스를 보다 쉽게 만들 수 있다. 여타 다른 RPC와 마찬가지로 gRPC는 IDL(Interface Definition Language)를 이용하여 서비스를 정의하고 페이로드를 정의하며 gRPC서버는 이 인터페이스를 구현하고 클라이언트 호출을 처리하기 위해 gRPC서버를 실행한다. 클라이언트 측에서 클라이언트는 서버와 동일한 인터페이스를 가지는 스텁 객체를 가지고 있다.
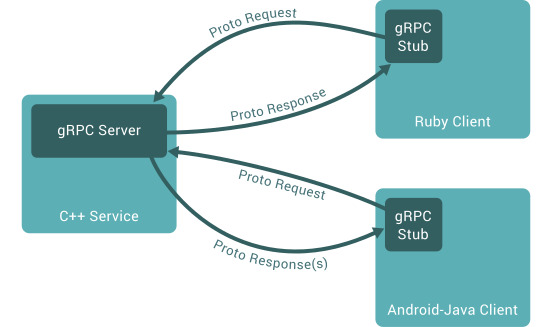
ProtoBuf
gRPC는 기본적으로 구조화된 데이터를 직렬화하기 위해 Google의 ProtoBuf를 사용한다.
ProtoBuf로 작업할 때는 첫번째로 .proto 파일에 직렬화하려는 데이터의 구조를 정의한다. 메시지라는 오브젝트(?)로 구성되며, 각 메시지는 데이터 타입과 key&value쌍을 이루는 필드를 하나이상 가지고 있다.
message Person {
  string name = 1;
  int32 id = 2;
  bool has_ponycopter = 3;
}
그 이후 protoc를 사용하여 원하는 언어로 컴파일이 가능하다. 컴파일된 소스는 각 필드에 대한 간단한 setter/getter를 제공한다. 또한 .proto 파일을 이용하여 위 proto message가 매개변수, 리턴 값으로 사용된 service를 정의할 수 있다.
// The greeter service definition.
service Greeter {
  // Sends a greeting
  rpc SayHello (HelloRequest) returns (HelloReply) {}
}

// The request message containing the user's name.
message HelloRequest {
  string name = 1;
}

// The response message containing the greetings
message HelloReply {
  string message = 1;
}
일반 RPC와 다를게 없을 수도 있는데, gRPC가 왜 좋은가?
성능
gRPC 메시지는 효율적인 이진 메시지 형식인 ProtoBuf를 사용하여 직렬화된다. protobuf는 서버와 클라이언트에서 엄청 빠르게 직렬화된다. 또한 적은 용량의 페이로드로 형성되어 있어, 제한된 대역폭에서 아주 중요한 역할을 한다.
코드 생성
모든 gRPC 프레임워크는 코드 생성에 대한 최고 수준의 지원을 제공한다. gRPC 개발에 대한 핵심 파일은 gRPC 서비스 및 메시지의 계약을 정의하는 .proto file이다. 이 파일에서 gRPC 프레임워크는 서비스 기본 클래스, 메시지 및 전체 클라이언트를 코드 생성한다.
서버와 클라이언트 간에 proto 파일을 공유하여 메시지와 클라이언트 코드를 종단 간에 생성할 수 있다. 클라이언트의 코드 생성은 클라이언트와 서버에서 메시지의 중복을 제거하고 강력한 형식의 클라이언트를 만든다. 클라이언트를 작성하지 않아도 되므로 많은 서비스를 갖춘 응용 프로그램의 개발 시간이 상당히 절감된다.
엄격한 사양
일반적으로 JSON을 주고 받는 HTTP는 엄격한 사양이 존재하지 않는다. 그래서 개발자끼리 URL, HTTP payload, 응답코드 등을 논의해야한다. 하지만 gRPC는 gRPC가 따라야하는 명확한 형식이 있기 때문에 HTTP와 같이 큰 논의가 필요없다. 단순히 생성된 코드를 사양에 맞게 사용하면 된다.
그렇다면 gRPC는 어떠한 상황에서 사용하는 것이 좋을까?
- 마이크로 서비스 - gRPC는 대기 시간이 짧고 처리량이 높은 통신을 위해 설계되었습니다. gRPC는 효율성이 중요한 경량 마이크로 서비스에 적합합니다.
- gRPC – 지점 간 실시간 통신은 양방향 스트리밍을 위한 뛰어난 지원 기능을 제공합니다. gRPC 서비스는 폴링을 사용하지 않고 실시간으로 메시지를 푸시할 수 있습니다.
- Polyglot 환경 – gRPC 도구는 널리 사용되는 모든 개발 언어를 지원하며, 따라서 gRPC는 다중 언어 환경에 적합합니다.
- 네트워크 제한 환경 – gRPC 메시지는 경량 메시지 형식인 Protobuf를 사용하여 직렬화됩니다. gRPC 메시지는 항상 해당하는 JSON 메시지보다 작습니다.
여기까지 gRPC가 무엇이고, 어떠한 특징을 가지며 장점이 무엇인지 다루어보았다. 다음 포스팅부턴 제대로된 실습을 해본다.
'Web > gRPC' 카테고리의 다른 글
| gRPC - convert proto generate java to jsonString (0) | 2020.07.15 |
|---|---|
| gRPC - Protobuf란? 구글 프로토콜 버퍼(protocol buffers) (0) | 2020.05.03 |
| gRPC - java gRPC 간단한 사용법 (0) | 2020.05.03 |