
'인증'에 해당되는 글 6건
- 2019.10.12 :: Springboot - Custom Annotation(커스텀 어노테이션)과 Interceptor를 이용한 컨트롤러 인증.(컨트롤러 전처리, 후처리)
- 2019.05.04 :: Spring Security OAuth2.0 파헤치기! - 3(authorization server + resource server + client) 2
- 2019.04.29 :: Spring Security OAuth2.0 파헤치기! - 2(Authorization Server + Resource Server) 6
- 2019.04.28 :: Spring Security OAuth2.0 파헤치기! - 1(Authorization Server) 9
- 2019.04.21 :: Algorithm - JWT 위변조를 알아내는 HMAC이란?
- 2019.04.17 :: Spring boot - Spring Security(스프링 시큐리티) 란? 완전 해결! 14

이번에 다루어볼 포스팅은 커스텀 어노테이션과 인터셉터를 이용하여 특정 컨트롤러의 매핑 메서드에 전처리(인증 등)를 하는 예제이다. 즉, 커스텀하게 어노테이션을 정의하고 컨트롤러 혹은 컨트롤러 메서드에 어노테이션을 붙여(마치 @RequestMapping과 같은) 해당 컨트롤러 진입전에 전처리(인증)을 하는 예제이다. 물론, Allow Ip 같은 것은 필터에서 처리하는 것이 더 맞을 수 있지만, 어떠한 API는 인증이 필요하고 어떠한 것은 필요없고 등의 인증,인가 처리는 인터셉터가 더 적당한 것 같다. 이번 포스팅을 이해하기 위해서는 Spring MVC의 구동 방식을 개념정도는 알고 하는 것이 좋을 듯하다. 아래 포스팅을 확인하자.
spring의 다양한 intercept 방법 (Servlet Filter, HandlerInterceptor, PreHandle, AOP)
1. 다양한 intercept 방법들과 주 사용처 Servlet Filter : 인코딩, 인증, 압축, 변환 등 HandlerInterceptor : 세션, 쿠키, 검증 등 AOP : 비즈니스단 로깅, 트랜잭션, 에러처리 등 2. Servlet Filter 와 Handler..
sjh836.tistory.com
개발 방향은 컨트롤러에 인증을 뜻하는 어노테이션을 커스텀하게 붙이고, 인터셉터에서 어노테이션의 유무를 판단하여 인증을 시도한다. 특별히 어려운 코드는 없어 간략한 설명만 하고 넘어가겠다.
|
1
2
3
4
5
6
7
8
9
10
11
12
13
14
15
16
17
18
19
20
21
22
23
24
25
26
27
28
29
30
31
32
33
34
35
36
37
38
39
40
41
42
43
44
45
46
47
48
49
50
51
52
53
54
55
56
57
58
59
60
61
62
63
64
65
66
67
68
69
70
71
72
73
74
75
76
77
78
79
80
81
82
83
84
85
86
87
88
89
90
91
92
|
public enum Auth {
NONE,AUTH
}
@Target({ElementType.TYPE, ElementType.METHOD})
@Retention(RetentionPolicy.RUNTIME)
public @interface IsAuth {
Auth isAuth() default Auth.NONE;
}
@Slf4j
@Component
public class CommonInterceptor implements HandlerInterceptor {
private Map<String,User> userMap = new HashMap<>();
@PostConstruct
public void setup() {
User user = new User("","yeoseong_gae",28);
userMap.put("yeoseong-gae",user);
}
@Override
public boolean preHandle(HttpServletRequest request, HttpServletResponse response, Object handler) throws Exception {
log.info("interceptor");
String userId = request.getParameter("userId");
IsAuth annotation = getAnnotation((HandlerMethod)handler, IsAuth.class);
Auth auth = null;
if(!ObjectUtils.isEmpty(annotation)){
auth = annotation.isAuth();
//NONE이면 PASS
if(auth == Auth.AUTH){
if(ObjectUtils.isEmpty(userMap.get(userId))){
log.info("auth fail");
throw new AuthenticationException("유효한 사용자가 아닙니다.");
}
}
}
return true;
}
private <A extends Annotation> A getAnnotation(HandlerMethod handlerMethod, Class<A> annotationType) {
return Optional.ofNullable(handlerMethod.getMethodAnnotation(annotationType))
.orElse(handlerMethod.getBeanType().getAnnotation(annotationType));
}
@Data
@AllArgsConstructor
@NoArgsConstructor
public class User{
private String id;
private String name;
private int age;
}
}
@Slf4j
@RestControllerAdvice
public class CtrlAdvice {
@ExceptionHandler(value = {Exception.class})
protected ResponseEntity<String> example(Exception exception,
Object body,
WebRequest request) throws JsonProcessingException {
log.debug("RestCtrlAdvice");
return ResponseEntity.status(HttpStatus.INTERNAL_SERVER_ERROR).body("message:"+exception.getMessage());
}
}
@RestController
public class AuthController {
@IsAuth(isAuth = Auth.AUTH)
@GetMapping("/auth")
public boolean acceptUser(@RequestParam String userId){
return true;
}
@IsAuth
@GetMapping("/nonauth")
public boolean acceptAll(@RequestParam String userId){
return true;
}
}
|
cs |
마지막으로 인터셉터를 등록하기 위한 Config 클래스이다.
|
1
2
3
4
5
6
7
8
9
10
11
|
@RequiredArgsConstructor
@Configuration
public class InterceptorConfig implements WebMvcConfigurer {
private final CommonInterceptor commonInterceptor;
@Override
public void addInterceptors(InterceptorRegistry registry) {
registry.addInterceptor(commonInterceptor);
}
}
|
cs |
커스텀한 어노테이션을 정의하고, 컨트롤러 매핑 메서드중 인증을 하고 싶은 곳에 어노테이션을 등록해준다. 그리고 인터셉터에서 현재 찾은 핸들러의 핸들러메서드에 우리가 등록한 커스텀한 어노테이션이 있는지 혹은 해당 핸들러메서드의 클래스에 붙어있는지 등을 리플렉션을 이용하여 확인한다. 만약 있다면 유효한 사용자인지 판단한다. 참고로 인터셉터에서는 디스패처 서블릿 더 뒷단에서 구동하기 때문에 현재 매핑된 핸들러 메서드의 접근이 가능하다.
마지막으로 인증이 실패한다면 예외를 발생시키고, 컨트롤러 어드바이스를 이용하여 예외를 처리한다. 참고로 인터셉터는 앞에서 말한 것과 같이 디스패처 서블릿 뒷단에서 구동되기때문에 ControllerAdvice 사용이 가능하다.
현재 다루고 있는 예제는 하나의 예시일 뿐이다. 사실 스프링 시큐리티를 사용한다면 굳이 필요없는 예제일수 있다. 하지만 인증뿐아니라 여러가지로 사용될수 있기에 응용하여 사용하면 될듯하다. 해당 코드는 절대 실무에선 사용될 수없는 로직을 갖고 있다.(예제를 위해 간단히 작성한 코드이기에) 컨셉을 갖고 더 완벽한 코드로 완성해야 한다. 만약 해당 코드가 필요하다면 밑의 깃헙에 소스를 올려놓았다.
yoonyeoseong/useAnnotationAndInterceptorAuth
Contribute to yoonyeoseong/useAnnotationAndInterceptorAuth development by creating an account on GitHub.
github.com
'Web > Spring' 카테고리의 다른 글
| Springboot - java.lang.IllegalArgumentException: 'Content-Type' cannot contain wildcard type '*' (0) | 2019.10.23 |
|---|---|
| Spring - ResponseBodyAdvice를 이용한 응답값 가공! (0) | 2019.10.18 |
| Springboot - Springboot MVC Test(JUnit) (0) | 2019.10.10 |
| Spring - Spring Cache 추상화(스프링 캐시 추상화),@Cacheable,@CacheEvict,@CachePut (0) | 2019.09.11 |
| Spring - Model Validation 방법!(파라미터 Validation),@Valid (0) | 2019.09.10 |
오늘 포스팅은 길지 않은 포스팅이 될 것같다. 오늘 포스팅할 내용은 이전 OAuth2.0 Authorization Server,Resource Server에 대하여 포스팅했던 내용에 Client 애플리케이션 소스코드를 추가한 최종 소스를 예제로 넣은 포스팅이다. 이전 포스팅들과 조금 달라진 소스가 있지만 아마 그대로 받아서 사용하면 간단한 OAuth2.0(Authorization Code Grant) 플로우를 테스트 해볼 수 있다. 혹시나 이전 포스팅을 보지 못했다면 밑 링크를 참고하자.
Spring Security OAuth2.0 파헤치기!(Authorization Server)
내부 챗봇 솔루션을 개발하면서, OAuth2.0을 이용하여 자체 인증서버를 구축할 일이 생겼다. 최근에 웹 또는 앱을 보면서 자주 접하게 되는 인증 방식이 OAuth2.0 방식이다. 대표적으로 네아로(네이버 아이디로..
coding-start.tistory.com
Spring Security OAuth2.0 파헤치기!(Authorization Server + Resource Server)
오늘은 이전 포스팅에서 다 마치지 못했던 Authorization Server와 나머지 Resource Server,Client 애플리케이션에 대해 포스팅 할 것이다. 사실 대부분 소스설명은 생략하였다. 사실 소스 설명이라고 할건 Sprin..
coding-start.tistory.com
오늘은 소스를 GitHub에 모두 업로드 해놓았다. 프로젝트의 구조에 대하여 조금 설명하자면, 전체 프로젝트 구성은 Maven Multi Module 프로젝트로 구성되어있다.
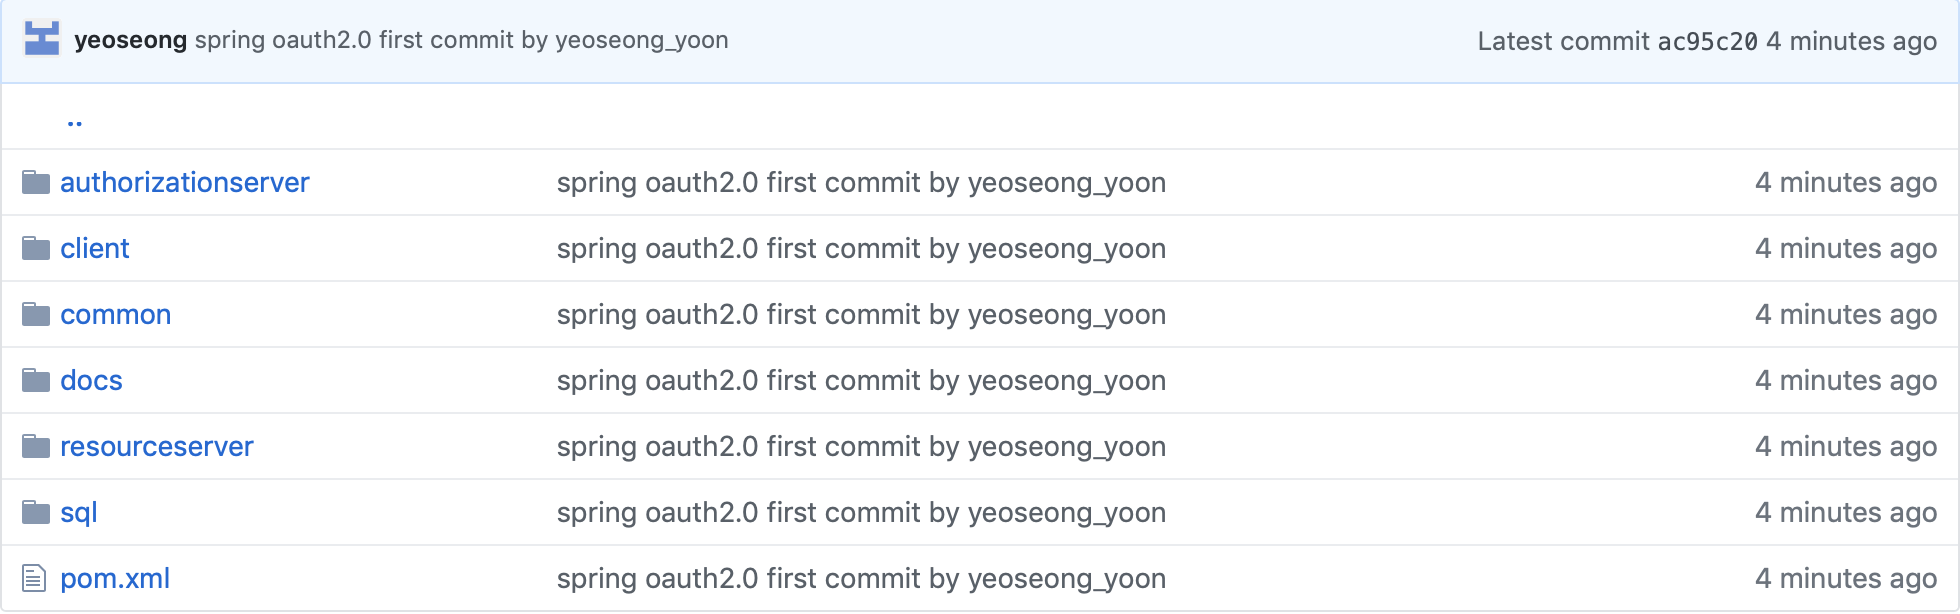
<깃헙 주소>
yoonyeoseong/spring-oauth2.0
Contribute to yoonyeoseong/spring-oauth2.0 development by creating an account on GitHub.
github.com
<Git Repository>
authorizationserver module은 인증서버를, resourceserver는 리소스서버,client는 클라이언트 애플리케이션 프로젝트이다. common은 공통적으로 사용할 소스코드를 위한 모듈이지만 아마 아무것도 들어가있지 않을 것이다. 추후에 이 소스를 활용한다면 사용할 수도 있을 모듈이다.(공통적인 DB 액세스 클래스등) sql 폴더는 필요한 Oracle DB schema가 있다. 혹시나 메이븐 멀티 모듈 프로젝트를 잘모른다면 이전 포스팅들중 메이븐 멀티모듈 프로젝트에 대한 포스팅을 참고하자.
메이븐 멀티프로젝트(maven multi module) & SVN
maven multi module project 만드는 방법과 해당 프로젝트를 SVN에 올리고 다른 개발환경에서 checkout하는 방법 모든 환경은 Mac OS 환경입니다. 오늘 설명 할것은 maven multi module project를 만드는 방법과..
coding-start.tistory.com
Spring boot - Maven Multi Module project 만들기
오늘 다루어볼 포스팅 내용은 Maven Multi Module을 이용한 Spring Boot Project 만들기입니다. 우선 Maven Multi Module 프로젝트란 하나의 부모 Maven Project를 생성하고 그 밑으로 자식 Maven Module들을 가..
coding-start.tistory.com
내가 작성한 프로젝트들을 어느 다른 OAuth2.0 포스팅들처럼 PostMan 같은 툴을 사용하지 않는다. 왜냐하면 클라이언트 애플리케이션이 존재하기 때문에 직접 인증코드를 받고 액세스 토큰을 받을 일이 없기때문이다. 만약 직접 인증 코드와 액세스 토큰을 받는 플로우 테스트를 하고 싶다면 직접 툴을 이용해 Authorization Server와 Resource Server에게 요청을 보내보자. 소스 코드 중에서 하나 중요하게 집고 넘어갈 것이 하나 있다. 바로 클라이언트 프로젝트 소스코드이다.
|
1
2
3
4
5
6
7
8
9
10
11
12
13
14
15
16
17
18
19
20
21
22
23
24
25
26
27
28
29
30
31
|
@SpringBootApplication
public class ClientApplication implements CommandLineRunner, ServletContextInitializer
{
@Autowired private ResourceOwnerRepository repository;
@Autowired private PasswordEncoder passwordEncoder;
public static void main( String[] args )
{
SpringApplication.run(ClientApplication.class, args);
}
@Override
public void run(String... args) throws Exception {
ResourceOwner user = new ResourceOwner();
user.setId(1l);
user.setUsername("1223yys@naver.com");
user.setPassword(passwordEncoder.encode("password"));
user.setRole(UserRole.ROLE_USER);
repository.save(user);
}
@Override
public void onStartup(ServletContext servletContext) throws ServletException {
servletContext.getSessionCookieConfig().setName("clientsession");
}
}
|
cs |
ServletContextInitializer를 구현하고 있는 부분이다. 메소드를 보면 HttpSession을 위한 Cookie 이름을 바꿔서 사용하고 있다. 그 이유는 우리는 Authorization Server와 Client 애플리케이션을 같은 localhost로 사용하고 있다. 그런데 두 애플리케이션 모두 HttpSession을 Security에서 사용하고 있다. 즉, 둘다 HttpSession을 위한 쿠키이름을 같은 걸 사용하면 계속 덮어쓰게 될 것임으로 Client애플리케이션의 쿠키이름을 바꾼것이다. 만약 추후 별도의 도메인을 갖는다면 해당 설정을 필요없다.
모든 프로젝트를 실행시켰다면 http://localhost:9000/ 로 접속하자 그러면 아마 클라이언트 애플리케이션의 화면이 하나 나올 것이고, 보호된 리소스를 사용하는 대시보드로 이동하는 링크가 하나 존재할 것이다. 클릭 이후 대시보드로 이동하며 OAuth2.0에 필요한 모든 과정을 OAuth2RestTemplate이 담당해준다. 모든 인증과 액세스 토큰 발급이 완료되면 Client 애플리케이션의 User DB스키마에는 액세스 토큰이 저장되어 있을 것이다. 그리고 해당 토큰을 이용해 Resource Server의 API를 사용하게 되는 것이다.
혹시나 해당 프로젝트 분석 중 궁금한 부분이나 잘못된 부분이 있다면 댓글 혹은 Git Issue에 글을 남겨주길 꼭 부탁드린다.
'Web > Spring Security&OAuth' 카테고리의 다른 글
| Spring Security OAuth2.0 파헤치기! - 2(Authorization Server + Resource Server) (6) | 2019.04.29 |
|---|---|
| Spring Security OAuth2.0 파헤치기! - 1(Authorization Server) (9) | 2019.04.28 |
| Spring boot - Spring Security(스프링 시큐리티) 란? 완전 해결! (14) | 2019.04.17 |

오늘은 이전 포스팅에서 다 마치지 못했던 Authorization Server와 나머지 Resource Server,Client 애플리케이션에 대해 포스팅 할 것이다. 사실 대부분 소스설명은 생략하였다. 사실 소스 설명이라고 할건 Spring Security 포스팅에서 다루었던 클래스들이다. 이전 포스팅에서는 Authorization Server 설정과 토큰 발급까지 다루었다. 이번 포스팅은 동적 클라이언트 등록에 관한 설명으로 시작할 것이다. 다들 페이스북, 구글의 어떠한 기능을 우리의 애플리케이션에서 사용하기 위하여 앱등록을 해본 경험자들이 있을 것이다. 앱을 등록하면 ClientId와 Client Secret이라는 것을 발급받게 된다. 그것은 바로 OAuth2.0에서 나의 애플리케이션을 인증하고, 보호된 리소스를 사용하기 위한 Token을 발급받기위한 인증 정보인 것이다. 바로 예제로 들어간다.
https://coding-start.tistory.com/158
Spring Security OAuth2.0 파헤치기!(Authorization Server)
내부 챗봇 솔루션을 개발하면서, OAuth2.0을 이용하여 자체 인증서버를 구축할 일이 생겼다. 최근에 웹 또는 앱을 보면서 자주 접하게 되는 인증 방식이 OAuth2.0 방식이다. 대표적으로 네아로(네이버 아이디로..
coding-start.tistory.com
|
1
2
3
4
5
6
7
8
9
10
11
12
13
14
15
16
17
18
19
20
21
22
23
24
25
26
27
28
29
30
31
32
33
34
35
36
37
38
39
40
41
42
43
44
45
46
47
48
49
50
51
52
53
54
55
|
@Controller
@RequestMapping("/client")
public class ClientController {
@Autowired private ClientRegistrationService clientRegistrationService;
@GetMapping("/register")
public ModelAndView registerPage(ModelAndView mav) {
mav.setViewName("client/register");
mav.addObject("registry", new RegisterClientInfo());
return mav;
}
@GetMapping("/dashboard")
public ModelAndView dashboard(ModelAndView mv) {
mv.addObject("applications",
clientRegistrationService.listClientDetails());
return mv;
}
@PostMapping("/save")
public ModelAndView save(@Valid RegisterClientInfo clientDetails,ModelAndView mav ,BindingResult bindingResult) {
if(bindingResult.hasErrors()) {
return new ModelAndView("client/register");
}
ClientDetailsImpl client = new ClientDetailsImpl();
client.addAdditionalInformation("name", clientDetails.getName());
client.setRegisteredRedirectUri(new HashSet<>(Arrays.asList("http://localhost:9000/callback")));
client.setClientType(ClientType.PUBLIC);
client.setClientId(UUID.randomUUID().toString());
client.setClientSecret(Crypto.sha256(UUID.randomUUID().toString()));
client.setAccessTokenValiditySeconds(3600);
client.setScope(Arrays.asList("read","write"));
clientRegistrationService.addClientDetails(client);
mav.setViewName("redirect:/client/dashboard");
return mav;
}
@GetMapping("/remove")
public ModelAndView remove(
@RequestParam(value = "client_id", required = false) String clientId) {
clientRegistrationService.removeClientDetails(clientId);
ModelAndView mv = new ModelAndView("redirect:/client/dashboard");
mv.addObject("applications",
clientRegistrationService.listClientDetails());
return mv;
}
}
|
cs |
동적클라이언트 등록에 사용될 컨트롤러 클래스이다. 클라이언트 아이디와 시크릿은 랜덤하게 생성하였고, 해당 애플리케이션의 scope는 하드코딩하여 넣어주었다. 그리고 액세스토큰의 유효시간은 한시간으로 설정해주었고, 인증코드와 토큰을 받기위한 리다이렉트 Url을 설정해준 후에 클라이언트를 저장하였다.
|
1
2
3
4
5
6
7
8
9
10
11
12
13
14
15
16
17
18
19
20
21
22
23
24
25
26
27
28
29
30
31
32
33
34
35
36
37
38
39
40
41
42
43
44
45
46
47
48
49
50
51
52
53
|
/**
*
* @author yun-yeoseong
*
*/
@Slf4j
@Primary
@Service
public class ClientDetailsServiceImpl extends JdbcClientDetailsService{
public ClientDetailsServiceImpl(DataSource dataSource) {
super(dataSource);
}
@Override
public ClientDetails loadClientByClientId(String clientId) throws ClientRegistrationException {
log.info("ClientDetailsServiceImpl.loadClientByClientId :::: {}",clientId);
return super.loadClientByClientId(clientId);
}
@Override
public void addClientDetails(ClientDetails clientDetails) throws ClientAlreadyExistsException {
log.info("ClientDetailsServiceImpl.addClientDetails :::: {}",clientDetails.toString());
super.addClientDetails(clientDetails);
}
@Override
public void updateClientDetails(ClientDetails clientDetails) throws NoSuchClientException {
log.info("ClientDetailsServiceImpl.updateClientDetails :::: {}",clientDetails.toString());
super.updateClientDetails(clientDetails);
}
@Override
public void updateClientSecret(String clientId, String secret) throws NoSuchClientException {
log.info("ClientDetailsServiceImpl.updateClientSecret :::: {},{}",clientId,secret);
super.updateClientSecret(clientId, secret);
}
@Override
public void removeClientDetails(String clientId) throws NoSuchClientException {
log.info("ClientDetailsServiceImpl.removeClientDetails :::: {}",clientId);
super.removeClientDetails(clientId);
}
@Override
public List<ClientDetails> listClientDetails() {
List<ClientDetails> list = super.listClientDetails();
log.info("ClientDetailsServiceImpl.listClientDetails :::: count = {}",list.size());
return list;
}
}
|
cs |
실제 비지니스로직이 담기는 서비스 클래스이다. JdbcClientDetailsService를 상속하여 사용하였다.
|
1
2
3
4
5
6
7
8
9
10
11
12
13
14
15
16
17
18
19
20
21
22
23
24
25
26
27
28
29
30
31
32
33
34
35
36
37
38
39
40
41
42
43
44
45
46
47
48
|
<!DOCTYPE html>
<html lang="en" xmlns:th="http://www.thymeleaf.org">
<head>
<title>oauth2server</title>
<link href="../webjars/bootstrap/3.3.5/css/bootstrap.min.css" rel="stylesheet" media="screen"></link>
<link href="/bootstrap-select.min.css" rel="stylesheet"></link>
</head>
<body>
<br/>
<div class="container">
<div class="jumbotron">
<h1>OAuth2 Provider</h1>
</div>
<h2>Registered applications</h2>
<div th:if="${applications != null}">
<table class="table">
<tr>
<td>Application name</td>
<td>client type</td>
<td>client ID</td>
<td>client secret</td>
<td>Delete app</td>
</tr>
<tr th:each="app : ${applications}">
<td th:text="${app.additionalInformation['name']}"></td>
<td th:text="${app.additionalInformation['client_type']}"></td>
<td th:text="${app.clientId}">client_id</td>
<td th:text="${app.clientSecret}">client_secret</td>
<td><a class="btn btn-danger" href="#" th:href="@{/client/remove(client_id=${app.clientId})}">Delete</a></td>
</tr>
</table>
</div>
<a class="btn btn-default" href="/client/register">Create a new app</a>
</div>
</body>
<script src="/jquery.min.js"></script>
<script src="/bootstrap-select.min.js"></script>
<script src="../webjars/bootstrap/3.3.5/js/bootstrap.min.js"></script>
</html>
|
cs |
클라이언트 리스트가 뿌려질 Dashboard 클라이언트 소스이다.
|
1
2
3
4
5
6
7
8
9
10
11
12
13
14
15
16
17
18
19
20
21
22
23
24
25
26
27
28
29
30
31
32
33
34
35
36
37
38
39
40
41
42
43
44
45
46
47
48
49
50
51
52
53
54
55
56
57
58
59
60
61
62
63
64
65
|
<!DOCTYPE html>
<html lang="en" xmlns:th="http://www.thymeleaf.org">
<head>
<title>oauth2server</title>
<link href="../webjars/bootstrap/3.3.5/css/bootstrap.min.css"
rel="stylesheet" media="screen"></link>
<link href="/bootstrap-select.min.css" rel="stylesheet"></link>
</head>
<body>
<br />
<div class="container">
<div class="jumbotron">
<h1>OAuth2 Provider</h1>
</div>
<h2>Create your application (client registration)</h2>
<form action="#" th:action="@{/client/save}" th:object="${registry}"
method="post">
<div class="form-group">
<label for="nome">Name:</label> <input class="form-control"
id="name" type="text" th:field="*{name}" />
<div th:if="${#fields.hasErrors('name')}" th:errors="*{name}">application
name</div>
</div>
<div class="form-group">
<label for="redirectUri">Redirect URL:</label> <input
class="form-control" id="redirectUri" type="text"
th:field="*{redirectUri}" />
<div th:if="${#fields.hasErrors('redirectUri')}"
th:errors="*{redirectUri}">Callback URL to receive the
authorization code</div>
</div>
<div class="form-group">
<label for="clientType">Type of application:</label>
<div>
<select id="clientType" class="selectpicker"
th:field="*{clientType}">
<option value="PUBLIC">Public</option>
<option value="CONFIDENTIAL">Confidential</option>
</select>
</div>
</div>
<div class="form-group">
<button class="btn btn-primary" type="submit">Register</button>
<button class="btn btn-default" type="button"
onclick="javascript: window.location.href='/'">Cancel</button>
</div>
</form>
</div>
</body>
<script src="/jquery.min.js"></script>
<script src="/bootstrap-select.min.js"></script>
<script src="../webjars/bootstrap/3.3.5/js/bootstrap.min.js"></script>
</html>
|
cs |
클라이언트 등록화면 소스이다.
http://localhost:8080/client/dashboard로 접속해보자. Authorization Server 설정을 생각해보자. 우리는 로그인과 로그아웃 말고는 모두 인증된 사용자만 접근할 수 있게 Spring Security 룰을 정해주었다. 그렇다면 대시보드로 접속하면 로그인화면이 뜨고 로그인을 해주어야한다. 로그인이 완료되었다면 보이는 화면이다.

필자는 미리 클라이언트 몇개를 만들어놓았다. Create a new app을 눌러보자.
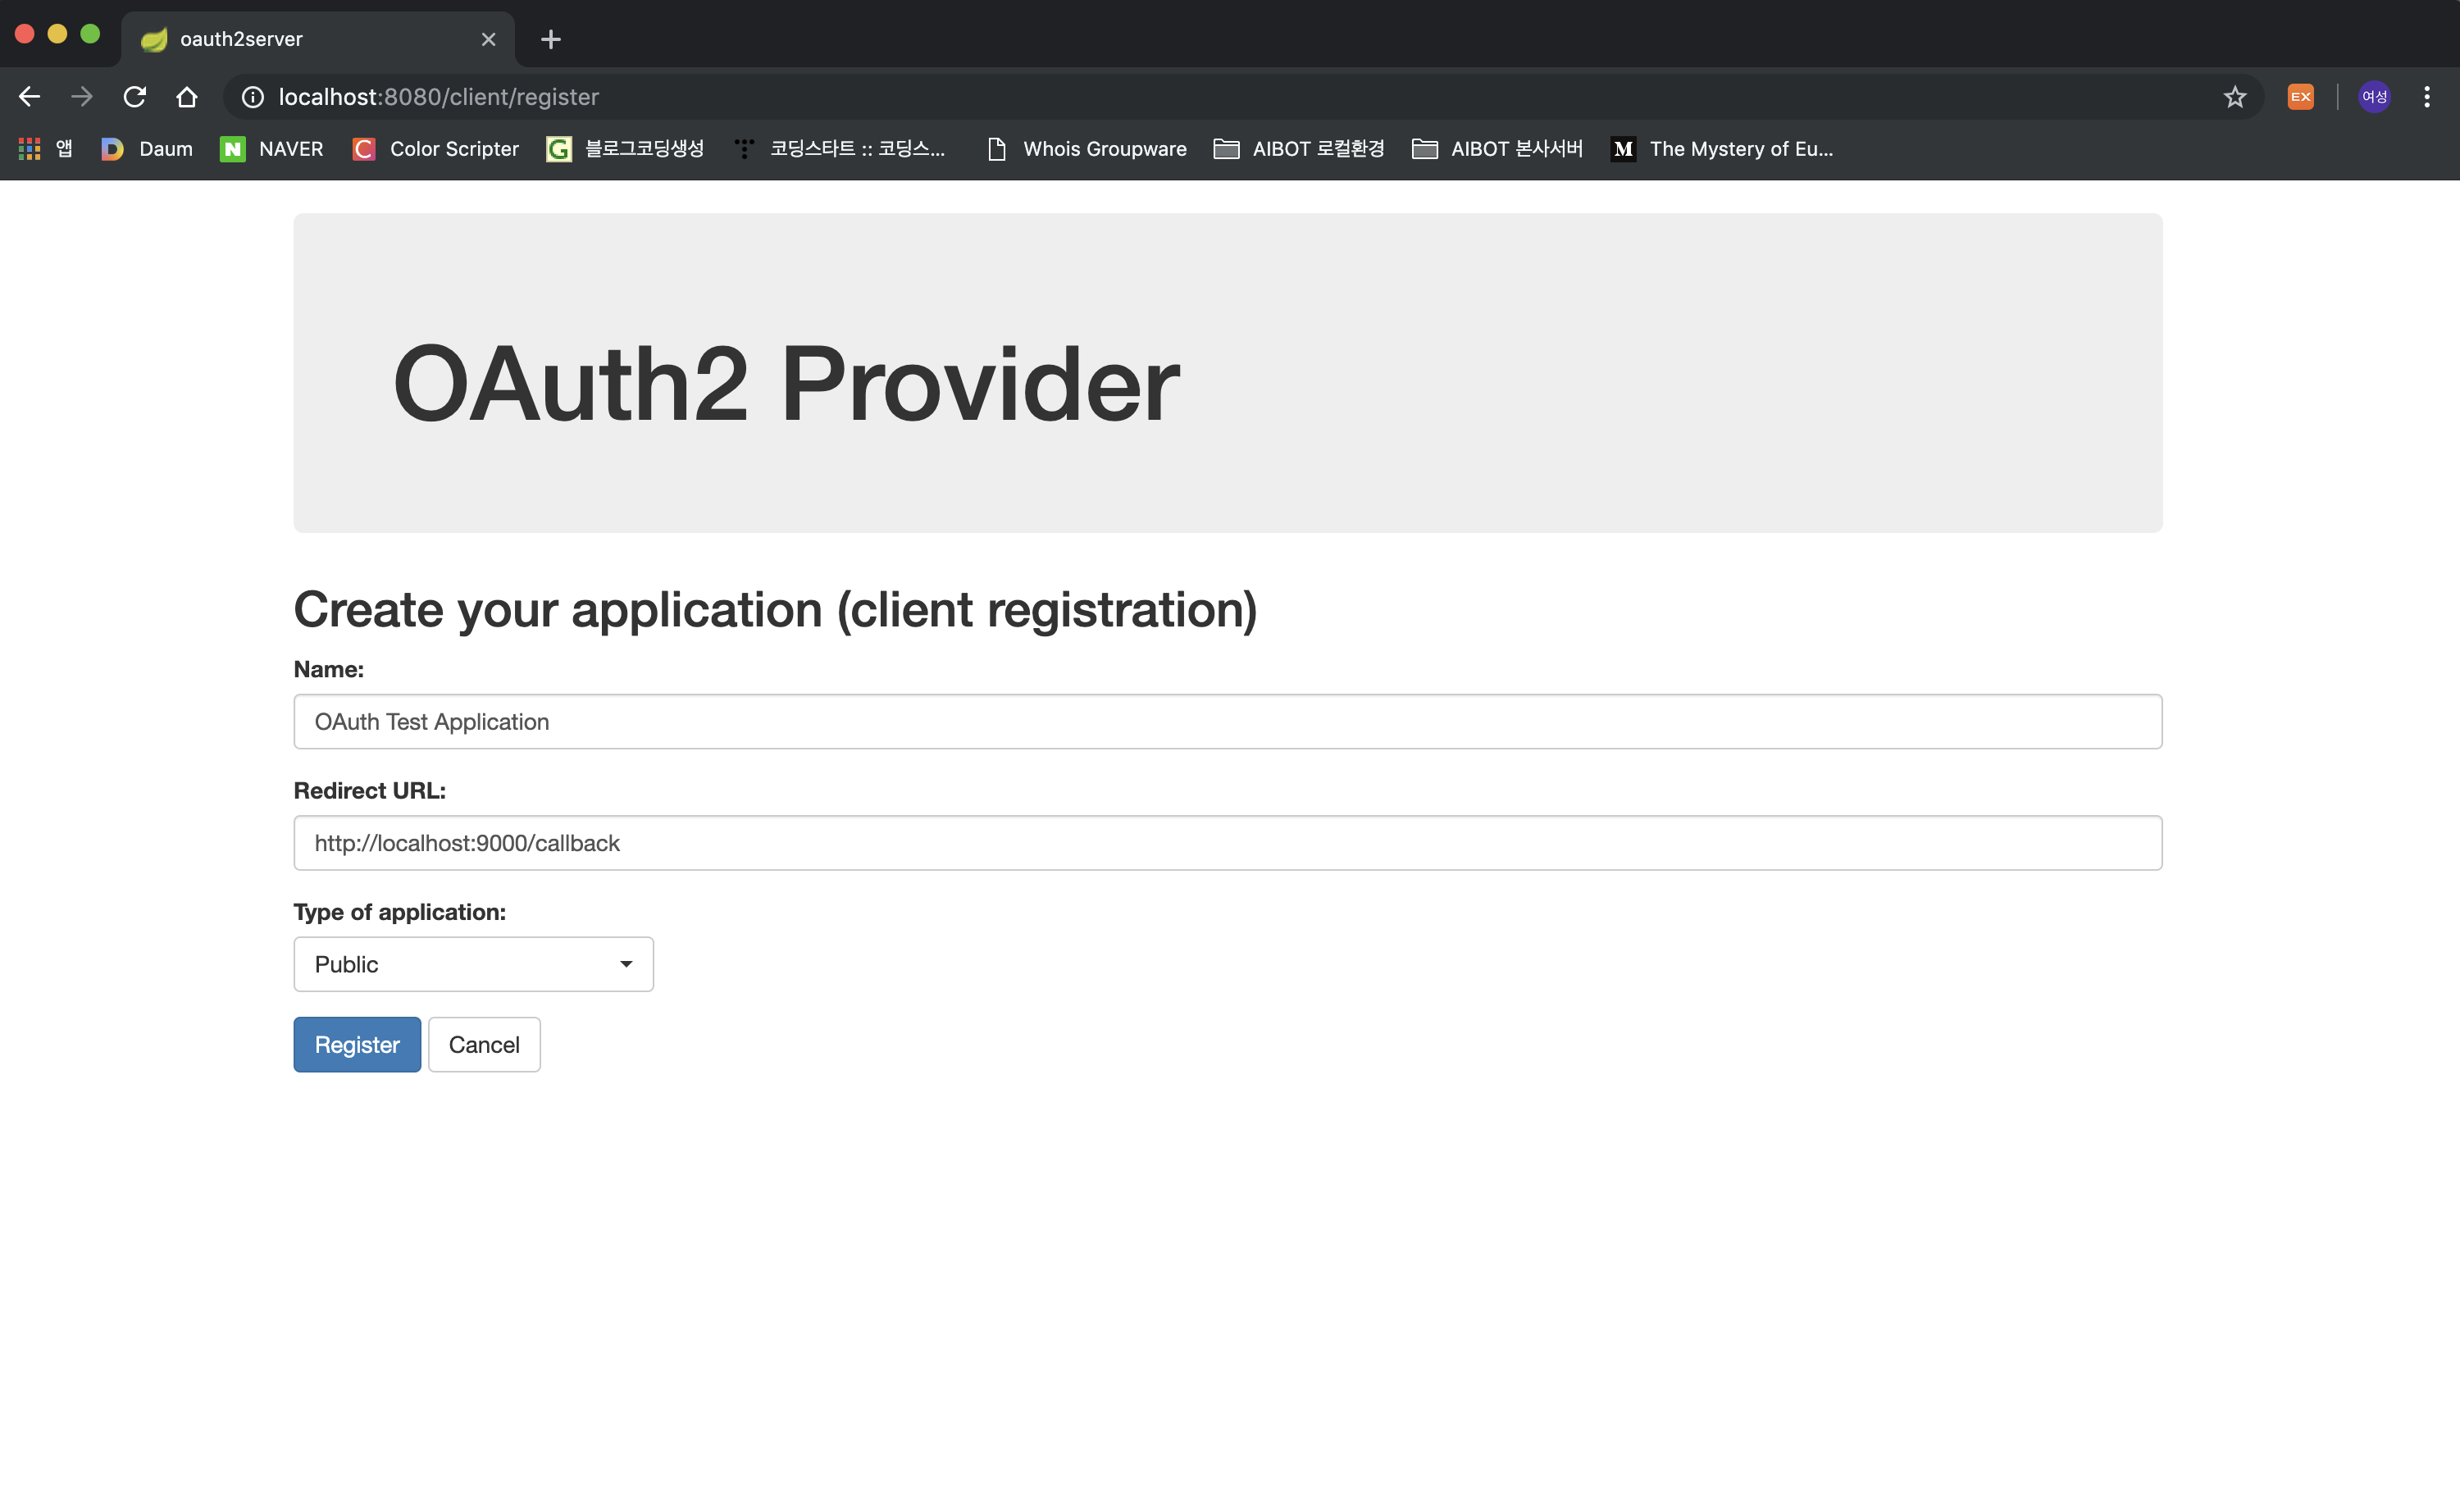
리다이렉트 Url은 다음 예제를 위해 동일하게 설정해준다. Register 버튼을 누른다.

클라이언트 등록이 완료되었다. 저번 포스팅에서 필자가 미리 등록한 클라이언트로 토큰 발급을 해보았는데, 이번 포스팅에서 우리가 직접 만든 클라이언트로 토큰을 만들어보자.
client_id에는 방금 생성한 client의 아이디를 넣어준다. 그리고 scope는 컨트롤러에서 하드코딩된 read를 넣어주고, 리다이렉트 Url 또한 방금 등록한 Url과 동일하게 넣어준다.
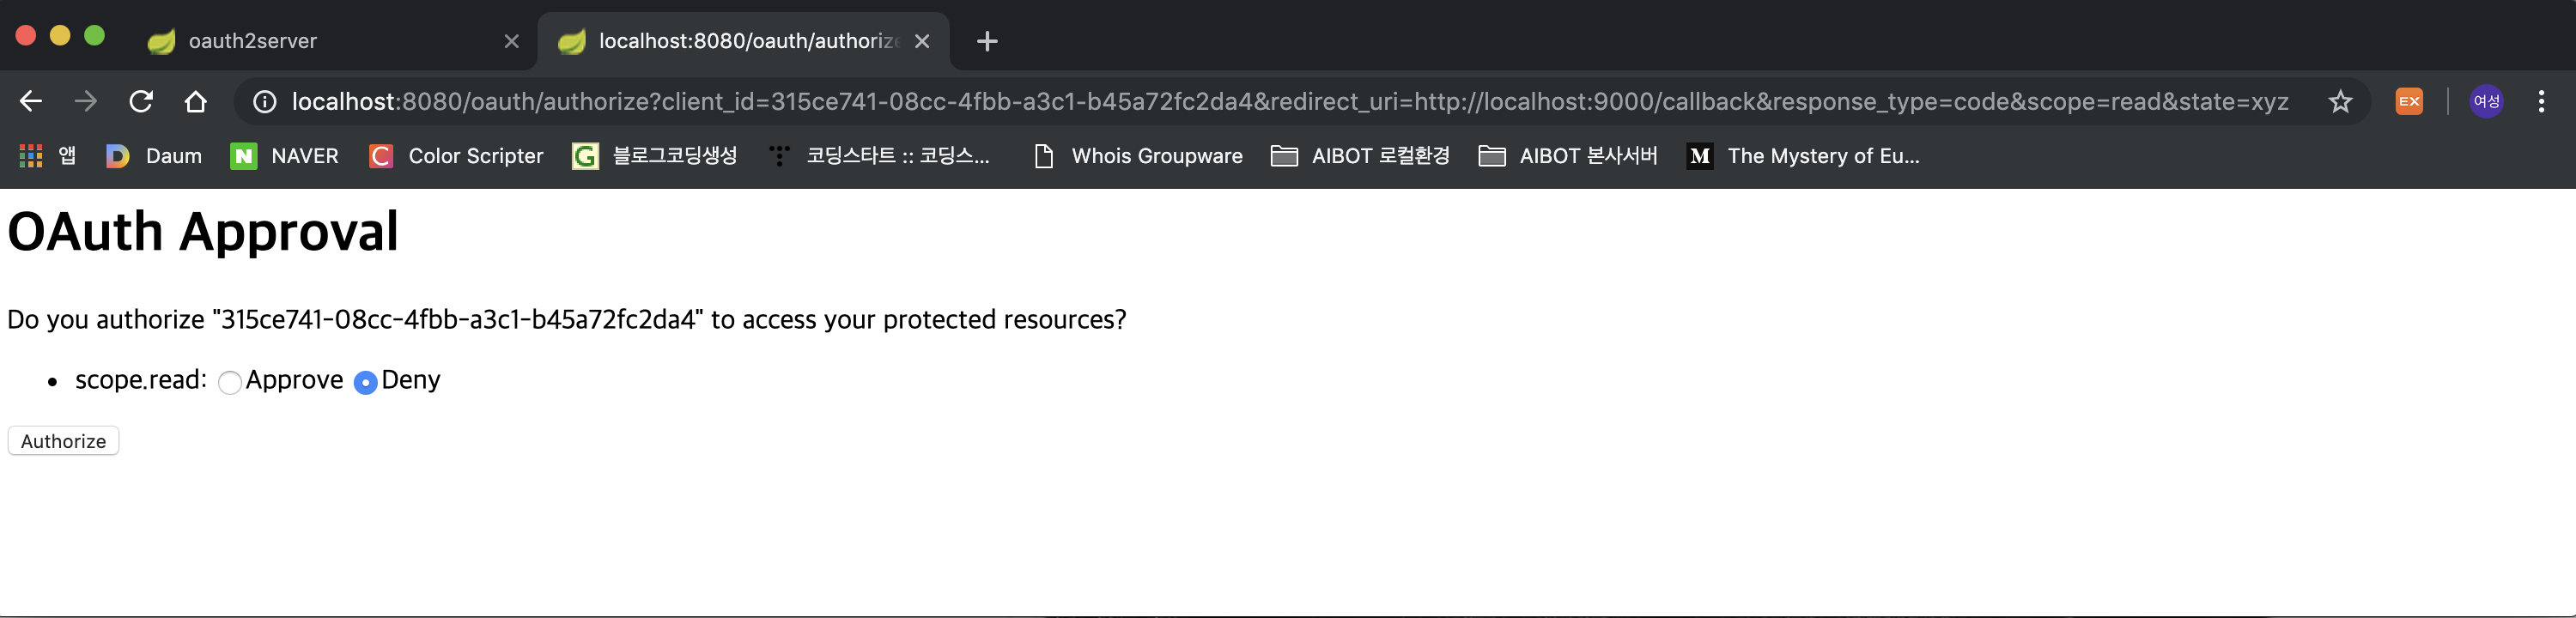
우리는 방금 로그인을 한후에 클라이언트를 등록하였기 때문에 별도 로그인 창은 뜨지 않을 것이다. 이 애플리케이션이 리소스를 사용할 수 있도록 Approval해준다. 그러면 리다이렉트된 Url에 code가 삽입되어 있을 것이다. 그리고 DB의 OAUTH_APPROVALS 테이블과 OAUTH_CODE 테이블을 확인해보자. 데이터가 삽입된 것을 확인할 수 있다. 중요한 것은 오라클을 사용중이라면 OAUTH_CODE의 authentication 칼럼은 blob으로 설정해주어야한다.
->http://localhost:9000/callback?code=sIqzvL&state=xyz
해당 인증코드를 복사 한 후에 토큰을 요청해보자.
Basic Auth : username - 315ce741-08cc-4fbb-a3c1-b45a72fc2da4 / password - e2c5128a-cdd4-464c-a812-43dcd890642d
Headers : Content-Type - application/x-www-form-urlencoded
Method : POST
Url : http://localhost:8080/oauth/token?code=sIqzvL&grant_type=authorization_code&scope=read_profile&redirect_uri=http://localhost:9000/callback
<결과>
|
1
2
3
4
5
6
7
8
|
{
"access_token": "eyJhbGciOiJIUzI1NiIsInR5cCI6IkpXVCJ9.eyJleHAiOjE1NTY1NTE0OTIsInVzZXJfbmFtZSI6IjEyMjN5eXMiLCJhdXRob3JpdGllcyI6WyJST0xFX1VTRVIiXSwianRpIjoiMDk0MzAwMjMtMDcwNC00MTYzLWJhOGEtYmEyOTFhZjZlODEwIiwiY2xpZW50X2lkIjoiMzE1Y2U3NDEtMDhjYy00ZmJiLWEzYzEtYjQ1YTcyZmMyZGE0Iiwic2NvcGUiOlsicmVhZCJdfQ.HlxTqzftR9Bc75gRANgXiZHgROGoBH-fGje0D3Uhlcs",
"token_type": "bearer",
"refresh_token": "eyJhbGciOiJIUzI1NiIsInR5cCI6IkpXVCJ9.eyJ1c2VyX25hbWUiOiIxMjIzeXlzIiwic2NvcGUiOlsicmVhZCJdLCJhdGkiOiIwOTQzMDAyMy0wNzA0LTQxNjMtYmE4YS1iYTI5MWFmNmU4MTAiLCJleHAiOjE1NTkxMzk4OTIsImF1dGhvcml0aWVzIjpbIlJPTEVfVVNFUiJdLCJqdGkiOiI2NTIxZjUyMC1kNTJkLTRhZmMtYTA4MC1hZTE3ZWI0NjBhN2UiLCJjbGllbnRfaWQiOiIzMTVjZTc0MS0wOGNjLTRmYmItYTNjMS1iNDVhNzJmYzJkYTQifQ.HtvEB6MgTrIGg0EtVM6MBWCQq_rVXYxuWoIf4zzdlLM",
"expires_in": 3599,
"scope": "read",
"jti": "09430023-0704-4163-ba8a-ba291af6e810"
}
|
cs |
토큰이 발급되었다. 이제는 토큰을 이용하여 Resource Server의 API를 호출하는 예제를 진행해보자.
Resource Server
설정이 Authorization Server보다 적다. 코드를 바로 보자.
|
1
2
3
4
5
6
7
8
9
10
11
12
13
14
15
16
17
18
19
20
21
22
23
24
25
26
27
28
29
30
31
32
33
34
35
36
37
38
39
40
41
42
43
44
45
46
47
48
49
50
51
52
53
54
55
56
57
58
59
60
61
62
63
64
65
66
67
68
69
70
71
72
73
74
75
76
77
78
79
80
|
/*
* ResourceServerConfigurerAdapter를 상속받아 구현하고, @EnableResourceServer를 선언함으로써
* OAuth2AuthenticationProcessingFilter를 추가하는 몇 가지 설정이 임포트되어 리소스 서버의 액세스토큰
* 유효성 검증이 수행된다.
*
* OAuth2AuthenticationProcessingFilter는 "/**"패턴과 매칭되는 엔드포인트에 대한
* 액세스 토큰 유효성 검사 프로세스 시작을 담당하는 필터이다.(헤더에서 Bearer 토큰을 분리하여 인증한다.)
* Authorization 헤더(bearer)에서 토큰을 추출하여 없으면 QueryString(access_token)을 뒤져본다.
* 토큰을 찾았으면 Token value를 principal, "" 빈문자열을 credentials로 넣은 Authentication객체를
* 리턴한다. 그리고 HttpServletRequest에 Token Type : Bearer Token value : token string을 넣어
* tokenvalue,tokentype,사용자remoteaddress,http sessionid 등의 정보를 담은 OAuth2AuthenticationDetails객체에
* 넣어서 AbstractAuthenticationToken객체의 details Object에 넣어준다. 그리고 해당 객체를 매개변수로
* AuthenticationManager.authenticate 메소드로 토큰의 유효성을 검증한다.(jwt 토큰이라면 자체 검증)
* 만약 토큰 유효성 검사에서 실패하면 별도 리다이렉트 없이 예외 정보가 담긴 응답을 받는다.
*/
@Configuration
@EnableResourceServer
public class OAuth2ResourceServerConfig extends ResourceServerConfigurerAdapter{
/*
* 리소스 서버 엔드포인트 보호를 위한 보안 룰 적용
*/
@Override
public void configure(HttpSecurity http) throws Exception {
// TODO Auto-generated method stub
http.authorizeRequests()
.anyRequest().authenticated()
.and()
//OAuth2.0 토큰 인증을 받아야하는 요청들 규칙정리
.requestMatchers().antMatchers("/**")
;
}
/*
* ResourceTokenService는 Resource Server가 액세스 토큰의 유효성을 검사하기 위해
* 사용된다. 해당 서비스 클래스는 tokenStore()에 어떠한 스토어가 설정되냐에 의존적으로 수행된다.
*/
@Override
public void configure(ResourceServerSecurityConfigurer resources) throws Exception {
resources
.tokenStore(tokenStore())
// .tokenExtractor(new BearerTokenExtractor())
// .authenticationManager(new OAuth2AuthenticationManager())
.authenticationEntryPoint(new AuthenticationEntryPoint() {
@Override
public void commence(HttpServletRequest request, HttpServletResponse response,
AuthenticationException authException) throws IOException, ServletException {
PrintWriter writer = response.getWriter();
writer.println("requeired token !");
}
})
.accessDeniedHandler(new AccessDeniedHandler() {
@Override
public void handle(HttpServletRequest request, HttpServletResponse response,
AccessDeniedException accessDeniedException) throws IOException, ServletException {
PrintWriter writer = response.getWriter();
writer.println("Access Denied !");
}
});
}
@Bean
public JwtAccessTokenConverter jwtAccessTokenConverter() {
JwtAccessTokenConverter converter = new JwtAccessTokenConverter();
converter.setSigningKey("non-prod-signature");
return converter;
}
@Bean
public TokenStore tokenStore() {
JwtTokenStore tokenStore = new JwtTokenStore(jwtAccessTokenConverter());
return tokenStore;
}
}
|
cs |
HttpSecurity http를 매개변수로 받는 메소드는 Spring Security에서 설정했던 것과 동일하다. 리소스를 보호하기 위한 ant 패턴식을 적용한다. 두번째 ResourceServerSecurityConfigurer를 매개변수로 갖는 메소드는 토큰을 어떠한 종류의 토큰을 사용할 것인지?(tokenStore) 권한이 부족했을때의 행동(accessDeniedHandler), 토큰이 유효하지 않았을 때(authenticationEntryPoint)의 행동 등을 정의하는 설정이다. Authorization Server와 동일하게 사용할 토큰의 TokenStore를 지정해주면 토큰의 유효성을 검사할때 해당 토큰으로 인증을 진행한다. 우리는 Jwt Token을 사용할 것임으로 JwtTokenStore와 JwtAccessTokenConverter를 빈으로 등록해주었다. 권한이 부족하거나 토큰이 유효하지 않을때는 단순히 메시지를 뿌려주도록 설정하였다. 여기서 하나 집고 넘어가야할 것은 Jwt 토큰 유효성 검사이다. 사실 일반 토큰을 사용한다면 Resource Server는 토큰의 유효성을 검사하기 위하여 Authorization Server와 DB를 공유하여 DB에 담긴 토큰을 가져와 비교하던가 혹은 check-token 요청을 Authorization Server에 보내 토큰의 유효성을 검사한다. 하지만 Jwt는 자체적으로 유효성검사가 가능하기 때문에 Authorization Server에 다녀올 필요가 없다. 만약 Jwt 인증 방법에 대해 모른다면 이전 포스팅 Jwt 포스팅을 확인하자.
|
1
2
3
4
5
6
7
8
9
10
11
12
13
14
15
16
17
18
19
20
21
22
23
24
25
26
27
28
29
30
31
32
33
34
35
36
37
38
39
40
41
42
43
44
45
46
|
@RestController
@SpringBootApplication
public class OauthResourceServerApplication {
public static void main(String[] args) {
SpringApplication.run(OauthResourceServerApplication.class, args);
}
@GetMapping
public String test() {
return "test";
}
@GetMapping("/api/profile")
public ResponseEntity<UserProfile> myProfile() {
String username = (String) SecurityContextHolder.getContext()
.getAuthentication().getPrincipal();
String email = username + "@mailinator.com";
UserProfile profile = new UserProfile(username, email);
return ResponseEntity.ok(profile);
}
static class UserProfile{
private String name;
private String email;
public UserProfile(String name, String email) {
super();
this.name = name;
this.email = email;
}
public String getName() {
return name;
}
public String getEmail() {
return email;
}
}
}
|
cs |
간단히 보호된 리소스를 등록했다. 이제 아까 받은 액세스 토큰을 이용하여 접근해보자.
GET - http://localhost:8081/api/profile
Headers : Authorization Bearer eyJhbGciOiJIUzI1NiIsInR5cCI6IkpXVCJ9.eyJleHAiOjE1NTY1NTE0OTIsInVzZXJfbmFtZSI6IjEyMjN5eXMiLCJhdXRob3JpdGllcyI6WyJST0xFX1VTRVIiXSwianRpIjoiMDk0MzAwMjMtMDcwNC00MTYzLWJhOGEtYmEyOTFhZjZlODEwIiwiY2xpZW50X2lkIjoiMzE1Y2U3NDEtMDhjYy00ZmJiLWEzYzEtYjQ1YTcyZmMyZGE0Iiwic2NvcGUiOlsicmVhZCJdfQ.HlxTqzftR9Bc75gRANgXiZHgROGoBH-fGje0D3Uhlcs
이렇게 요청을 보내게 되면 아래와 같은 결과를 얻을 수 있다.
{
"name": "1223yys",
"email": "1223yys@mailinator.com"
}
만약 토큰을 변조해서 보내보면 어떨까? 토큰 문자열의 일부를 지워본 후 요청을 보내보자.
"requeired token !" 라는 결과가 보일 것이다. 토큰이 유효하지 않아서 우리가 Resource Server 설정에 넣었던 authenticationEntryPoint가 동작하여 문자열을 리턴하였다.
이제는 권한이 없을 상황을 시뮬레이션 해보자. 우선 Resource Server 설정 클래스에 @EnableGlobalMethodSecurity(prePostEnabled=true) 어노테이션을 달아준다. 그리고 우리가 호출할 @GetMapping에 @PreAuthorize("#oauth2.hasScope('write')") 어노테이션을 달아본 후에 API을 호출해보자
"Access Denied !" 라는 결과가 보일 것이다. 토큰은 유효하지만 권한이 부족하여 우리가 등록한 accessDeniedHandler가 작동하였다.
여기까지 Resource Server를 간단하게 다루어보았다. 마지막으로 Client 애플리케이션이다. 우린 지금 수동으로 인증코드를 얻어오고, 토큰을 발급 받은 후에 직접 API를 호출하였다. 이제는 직접 Client 애플리케이션을 만들어서 OAuth2.0 인증을 사용해 보자!
<깃헙 주소>
yoonyeoseong/spring-oauth2.0
Contribute to yoonyeoseong/spring-oauth2.0 development by creating an account on GitHub.
github.com
'Web > Spring Security&OAuth' 카테고리의 다른 글
| Spring Security OAuth2.0 파헤치기! - 3(authorization server + resource server + client) (2) | 2019.05.04 |
|---|---|
| Spring Security OAuth2.0 파헤치기! - 1(Authorization Server) (9) | 2019.04.28 |
| Spring boot - Spring Security(스프링 시큐리티) 란? 완전 해결! (14) | 2019.04.17 |

내부 챗봇 솔루션을 개발하면서, OAuth2.0을 이용하여 자체 인증서버를 구축할 일이 생겼다. 최근에 웹 또는 앱을 보면서 자주 접하게 되는 인증 방식이 OAuth2.0 방식이다. 대표적으로 네아로(네이버 아이디로 로그인), 페이스북으로 로그인, 구글아이디로 로그인 등등이 지금부터 설명하게 될 OAuth2.0 인증방식이다. 그렇다면 왜 OAuth2.0을 사용하게 되었을까? 사실 많은 이유가 있겠지만 페이스북을 예제로 보면 3rd-party 애플리케이션이 페이스북의 특정 기능(3rd-party 애플리케이션 사용자의 리소스)을 사용하게 되면 사용자의 동의를 받아야한다.그러면 사용자의 페이스북 인증정보를 3rd-party 애플리케이션에도 가지고 있어야할까? 아니다 ! 인증은 페이스북에서 하는 것이고 3rd-party 애플리케이션은 페이스북에게 접근을 허가할 액세스 토큰을 발급받고 그 토큰으로 사용자의 리소스를 페이스북에게 요청하여 사용하는 것이다. 이런저런 이유로 각광받고 있는 OAuth2.0이다. 제 3자에게 인증을 받는다? 정말 특이한 놈이다. 물론 OAuth2.0이 완벽하고 빈틈없는 인증방식은 아닐 것이다. 무조건 믿고 사용하는 것은 일을 그릇칠 수 있기에 OAuth2.0을 포함하여 많은 보안취약점을 보완해야 할것같다. 우선 예제 코드를 짜기에 앞서 OAuth2.0의 용어를 짚고 넘어가야 한다.
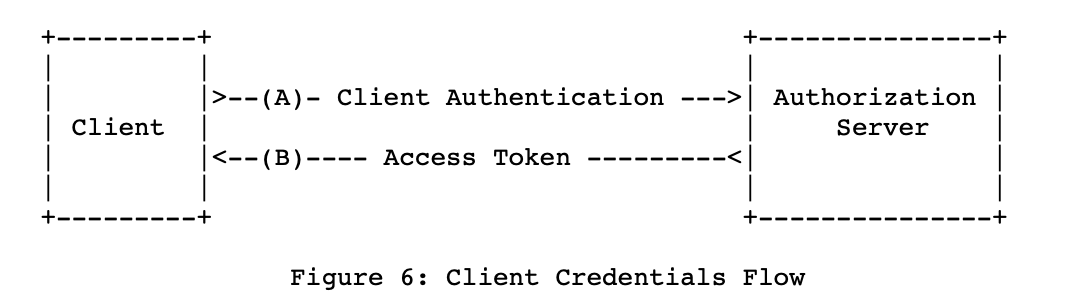
위 그림은 RFC6749 표준 문서에 나와있는 그림이다.(https://tools.ietf.org/html/rfc6749)
RFC 6749 - The OAuth 2.0 Authorization Framework
[Docs] [txt|pdf] [draft-ietf-oaut...] [Tracker] [Diff1] [Diff2] [IPR] [Errata] Updated by: 8252 PROPOSED STANDARD Errata Exist Internet Engineering Task Force (IETF) D. Hardt, Ed. Request for Comments: 6749 Microsoft Obsoletes: 5849 October 2012 Category:
tools.ietf.org
지금 설명할 서로 각자의 Role이 있는 주체들의 인증,인가 흐름이다.
필자가 생각한 용어 설명
- Resource Owner(자원소유자) : 자신의 리소스를 사용할 수 있게 Third-party Application(인증 서버 입장에서 Client Application)에게 사용을 허가하는 Third-party Application 사용자.
- Resource Server(리소스 서버) : Resource Owner의 리소스를 가지고 있으며, 해당 리소스를 보호하는 Application. Client Application은 Authorization Server에게 발급받은 토큰을 이용하여 Resource Server에게 사용자 리소스를 받아 사용한다.
- Authorization Server(인증서버) : Client Application이 Resource Owner의 리소스를 사용하기 위하여 Client Application에게 인가(토큰발급)해주는 역할을 하는 Application.
- Client(클라이언트 애플리케이션) : Resource Server에 유지되고 보호되고 있는 Resource Owner의 리소스를 사용하는 Application. Authorization Server에게 적절한 인증을 통하여 토큰을 발급받고 해당 토큰을 이용해 Resource Server에서 보호된 Resource Owner의 리소스를 사용한다. 이 Application은 실제로 Resource Owner가 접속하여 사용중인 Application이며, 단순 Javascript Application 일수도 있고, Server로 기동되고 있는 Application일수도 있다.
사실 처음 용어를 접하게 되면 이해가 힘든 부분들이 있다. Client? 우리가 생각하는 Client는 사용자 인데, OAuth2.0에서는 어떠한 애플리케이션이다. 물론 잘생각하면 Client가 맞다. 왜냐하면 Resource Server 입장에서 Third-party Application은 클라이언트니까.. 뭐 최대한 이해를 돕기 위하여 나름 고심해서 내린 용어 설명이다.
RFC6749에 명시된 용어설명
- Resource Owner(자원소유자) : 보호된 자원에 대한 액세스 권한을 부여할 수 있는 엔티티. 리소스 소유자가 사람인 경우 리소스 소유자는 최종 사용자.
- Resource Server(리소스 서버) : 보호된 자원을 호스팅하는 서버. 액세스 토큰을 사용하여 보호된 리소스 요청에 응답.
- Client(클라이언트) : 애플리케이션을 대신하여 보호된 리소스 요청을 하는 애플리케이션. 응용 프로그램 서버, 데스크톱 등이 될 수 있다.
- Authorization Server(권한 서버) : 클라이언트에게 액세스 토큰을 발급하는 서버. 자원 소유자를 인증하고 리소스 접근 권한을 클라이언트에게 임명한다.
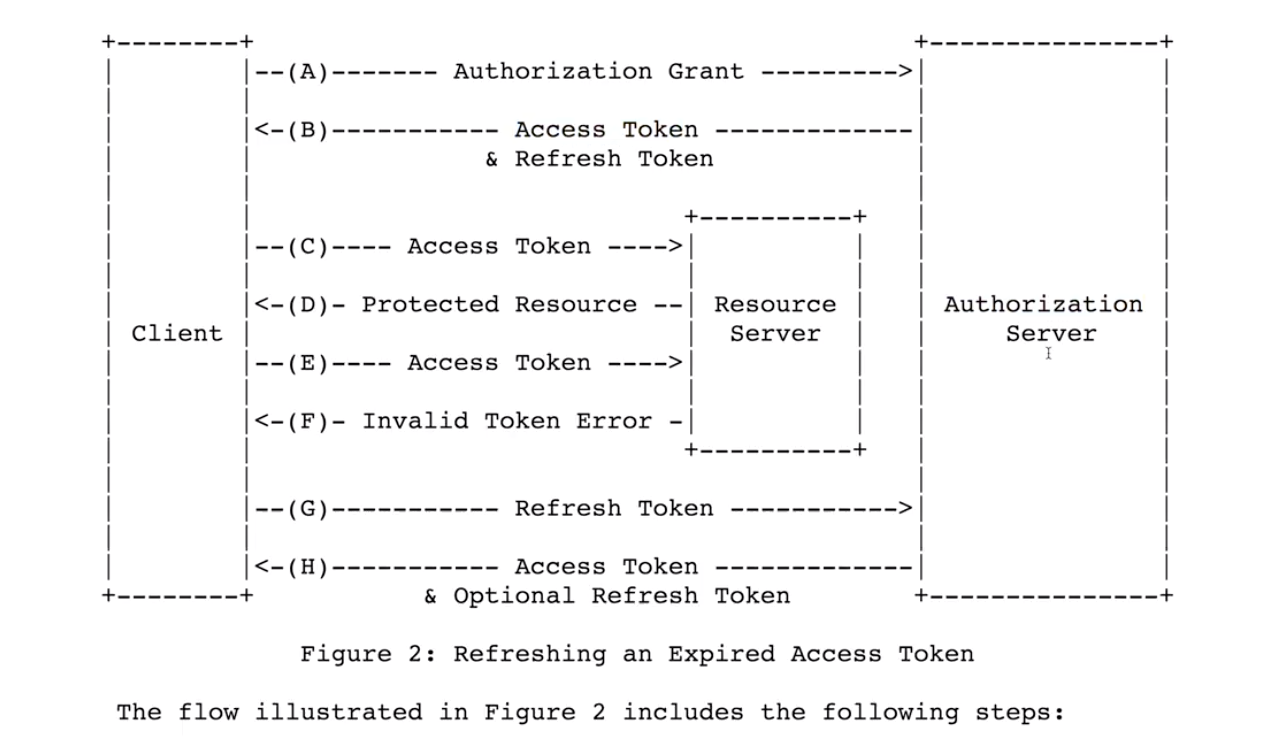
다음은 OAuth2.0에서 사용하는 인증 Grant Type이다. 인증 Grant Type이란 Client가 액세스토큰을 발급받기 위한 플로우라고 보면 된다. 총 4개의 Grant Type이 있다.(사실 Refresh_token이라는 Grant Type도 있지만, 인증 Grant Type으로 넣어야하나 애매한 부분이 있다.)
- Authorization Code Grant : OAuth2.0 Grant Type에서 가장 잘 알려진 인가 코드 그랜트 타입은 중요한 보안 이점을 제공하는 방법이다. 클라이언트는 토큰을 발급 받기 전에 인증코드라는 것을 사전에 리소스 소유자에 의해서 받게 되고 그 인증코드(권한 부여코드)를 가지고 인증서버에 요청을 보내야 토큰을 발급받을 수 있다.
- Implicit Grant : 암시적 그랜트 타입은 서버가 없는 단순 웹 브라우저에서 직접 실행되는 자바스크립트 웹 애플리케이션 클라이언트에게 적당한 권한 부여 방법이다. 별다른 인증방법없이 클라이언트가 요청을 보내면 리소스 소유자의 Authentication(+사용자 동의 과정) 과정만 거치고 바로 토큰을 발급해준다. 이 그랜트 타입은 클라이언트가 토큰을 안전하게 보관할 방법이 없기때문에 리프레시 토큰을 발급해주지 않는다.
- Resource Owner Password Credentials : 사용자 패스워드 자격증이다. 이 그랜트 타입은 클라이언트와 OAuth프로바이더(Resource Server + Authorization Server)가 전혀다른 애플리케이션일때는 이 그랜트 타입이 사용자의 자격증명 정보를 요구하기 때문에 가능하면 사용하지 않는 것이 좋다. 하지만 클라이언트와 OAuth2.0 프로바이더(간단히 Resource Server+Authorization Server)가 동일한 솔루션에 속할 때는 안전하게 사용될 수도 있다. 그리고 반드시 입력받은 리소스 소유자의 자격증명 정보는 보관하지 않고 즉시 폐기해야한다.
- Client Credentials Grant : 애플리케이션이 리소스 소유자의 리소스 대신 자체적인 리소스에 대한 접근이 필요할 때 사용할 수 있는 그랜트 타입이다. 이전에는 서드파티 애플리케이션이 리소스 소유자 대신 리소스 소유자의 리소스에 접근하는 형태였지만, 클라이언트 자격증명 그랜트 타입은 인증서버에 등록된 클라이언트이기만 하면 리소스에 접근할 수 있는 특별한 형태의 그랜트 타입이다. 또한 사용자와의 연관이 존재하지 않기 때문에 리프레시 토큰을 발급하지 않는다. 토큰이 만료되면 자체적으로 새로운 액세스 토큰을 발급받는다.
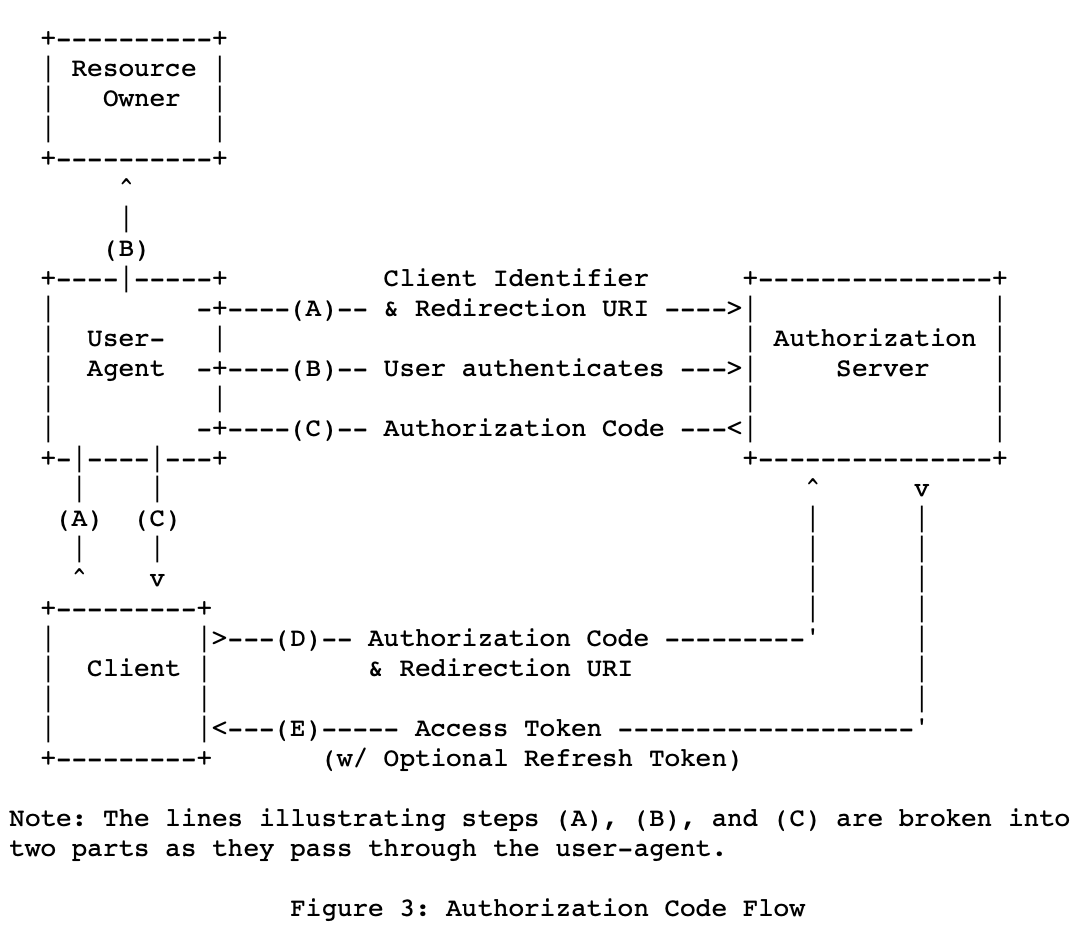
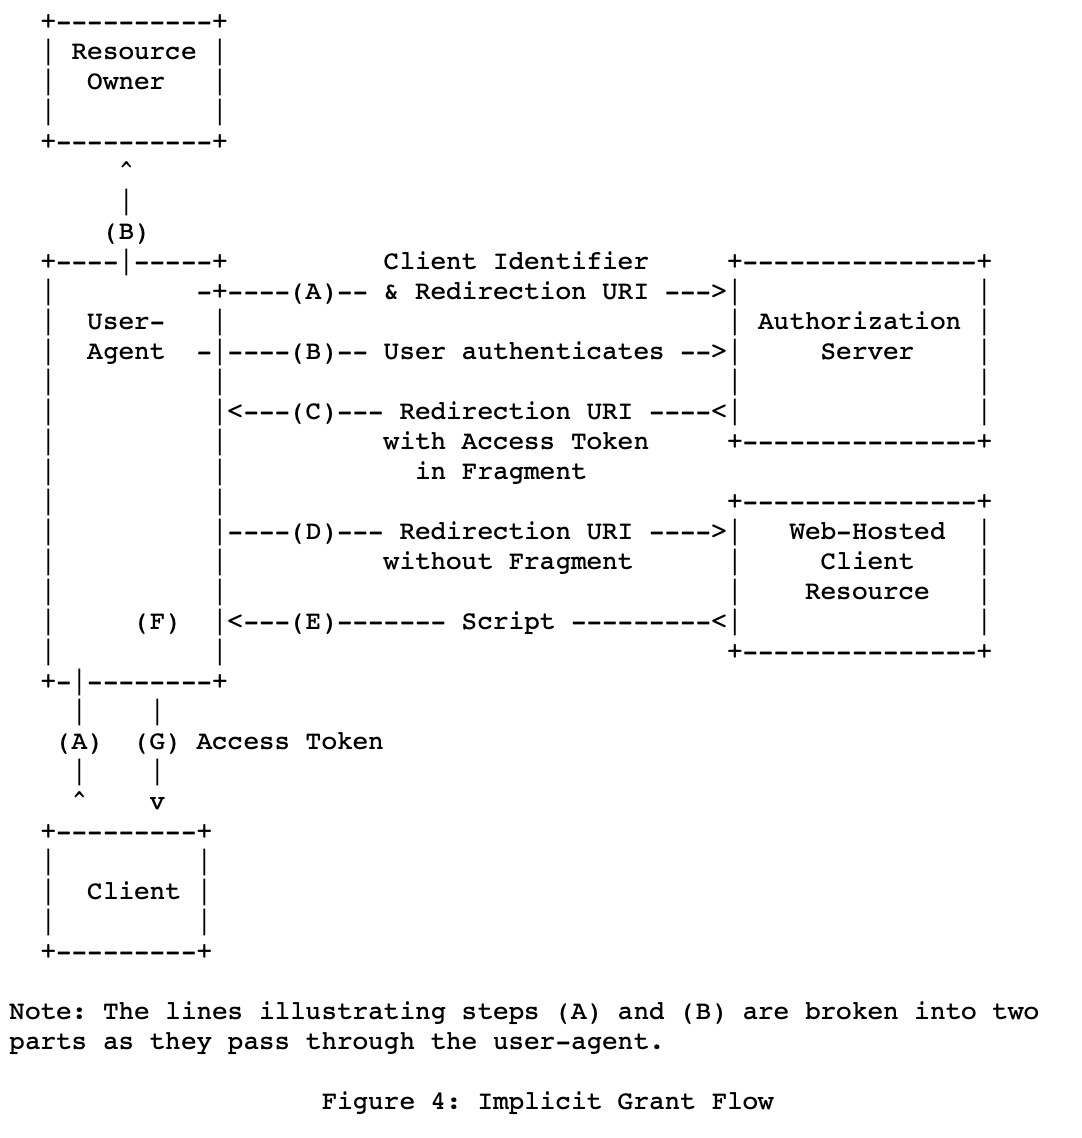
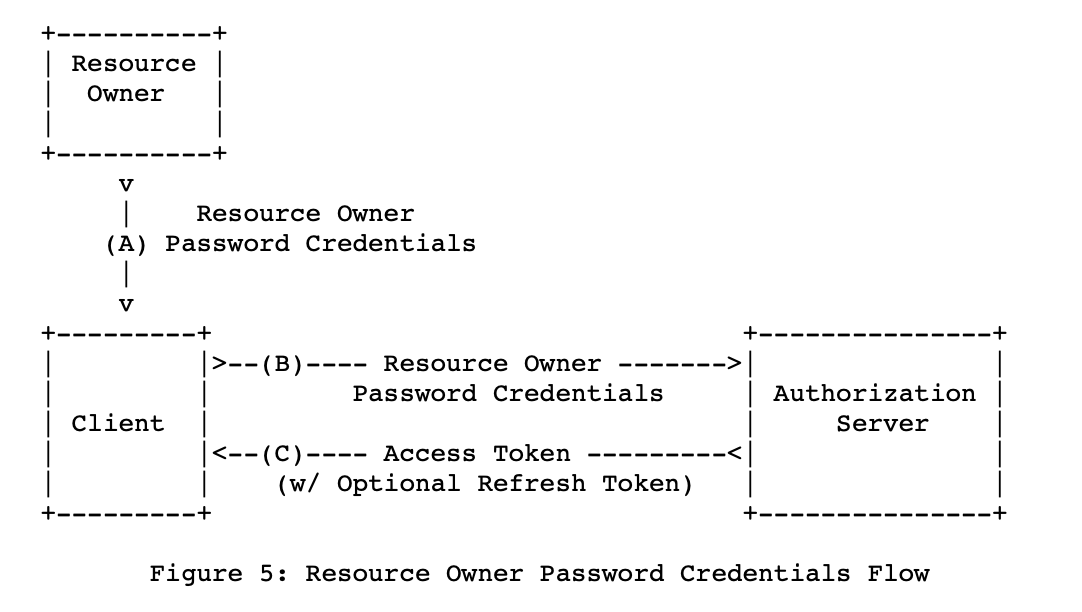
위에 설명한 Grant Type의 플로우가 담긴 그림들이다.
여기까지 OAuth2.0의 용어 설명이다. 부족한 것이 있거나 이해가 안되는 부분이 있다면 구글링을 통해 용어를 정확하게 다시 이해하고 오는 것이 좋겠다.
대부분 OAuth2.0에 관련된 글들은 Resource Server와 Authorization Server의 구분이 없는 글들이 많다. 네이버에 계신 어느 개발자님에 따르면 구현 자체도 애매모호하게 되어 있는 부분도 없지않아 있고, 레퍼런스도 불친절하게 나와있는 탓에 둘을 구분하여 개발하기 힘든 이유도 있다고한다. 하지만 필자는 완벽하고 100% 맞다고 확신하지는 않지만 소스코드를 분석하고 예제를 짜면서 조금 얻은 지식으로 Resource Server, Authorization Server, Client를 나누어서 개발할 것이다. 혹시나 잘못된 부분, 부족한 부분이 있다면 코멘트 남겨주길 간곡히 부탁한다.
오늘 예제는 모두 In-Memory가 아닌 DB를 이용한 데이터 관리를 할 것이다. 예제를 진행하기 앞서 필요한 DB 스키마를 정리해보았다. Spring Security에서 제공한 DB 스키마도 있지만 조금 다른 부분도 있다.
|
1
2
3
4
5
6
7
8
9
10
11
12
13
14
15
16
17
18
19
20
21
22
23
24
25
26
27
28
29
30
31
32
33
34
35
36
37
38
39
40
41
42
43
44
45
46
47
48
49
50
51
52
53
54
55
56
57
58
59
60
|
-- 클라이언트 등록과 관련된 데이터 테이블
create table oauth_client_details (
client_id VARCHAR(256) PRIMARY KEY,
resource_ids VARCHAR(256),
client_secret VARCHAR(256),
scope VARCHAR(256),
authorized_grant_types VARCHAR(256),
web_server_redirect_uri VARCHAR(256),
authorities VARCHAR(256),
access_token_validity INTEGER,
refresh_token_validity INTEGER,
additional_information VARCHAR(2000),
autoapprove VARCHAR(256)
);
-- 발급된 액세스 토큰을 저장하기 위한 테이블
-- 예제는 JWT 토큰을 사용하므로 사용하지 않는다. 하지만 JWT토큰을 사용하지 않으면 해당 스키마를 사용한다.
create table oauth_access_token (
token_id VARCHAR(256),
token clob,
authentication_id VARCHAR(256) PRIMARY KEY,
user_name VARCHAR(256),
client_id VARCHAR(256),
authentication clob,
refresh_token VARCHAR(256)
);
-- 리프레시 토큰 발급을 위한 테이블
-- 이 테이블도 역시 JWT 토큰을 사용하므로 사용하지 않는다.
create table oauth_refresh_token (
token_id VARCHAR(256),
token varchar(1000),
authentication varchar(1000)
);
-- 사용자(Resource Owner)의 승인을 저장하기 위한 테이블
create table oauth_approvals (
userId VARCHAR(256),
clientId VARCHAR(256),
scope VARCHAR(256),
status VARCHAR(10),
expiresAt TIMESTAMP,
lastModifiedAt TIMESTAMP
);
-- authorization code table
create table oauth_code (
code VARCHAR(256), authentication blob
);
|
cs |
이번 예제에 필요한 부분도 있고 필요하지 않은 부분도 있기에 예제에서 스키마에 대한 설명을 진행하도록 하겠다.
첫번째 구현할 것은 Authorization Server이다. 인증 서버는 클라이언트 애플리케이션에게 액세스토큰,리프레시 토큰 등을 발급해주는 역할을 하는 서버이다. 물론 토큰 발급 이전에 선행되는 Resource Owner의 인증과정이 포함되어있다. 그리고 Spring security OAuth2.0은 Spring Security와 상호보완적이다. 즉, Spring Security에서 하던 코딩도 어느정도 들어가야한다. 혹시 Spring Security를 잘모른다면 선행해서 봐야할 것 같다. 아래 링크에서 Spring Security를 참고하면 될듯하다. 바로 예제 소스로 들어가겠다.
https://coding-start.tistory.com/153
Spring boot - Spring Security(스프링 시큐리티) 란? 완전 해결!
오늘 포스팅할 내용은 Spring Security이다. 사실 필자는 머리가 나빠서 그런지 모르겠지만, 아무리 구글링을 통해 스프링 시큐리티를 검색해도 이렇다할 명쾌한 해답을 얻지 못했다. 대부분 이론적인 설명들은..
coding-start.tistory.com
필요한 DB스키마를 생성해준다. 위의 스키마 중에 OAUTH_CLIENT_DETAILS, OAUTH_APPROVALS, OAUTH_CODE 테이블을 생성해준다.
- OAUTH_CLIENT_DETAILS : 인증서버가 토큰을 발급해줄때, 등록된 유효한 클라이언트 애플리케이션이 맞는지 확인할때 사용되는 테이블이다.
- OAUTH_APPROVALS : Resource Owner가 3rd-party 애플리케이션을 사용할때 마다, 해당 애플리케이션이 사용자의 리소스에 접근하는 것을 허락하겠냐라는 문구를 항상 띄워 줄수는 없을 것이다. 즉, 해당 테이블에는 최초로 Resource Owner가 3rd-party 애플리케이션에게 자신의 리소스 사용을 허락할때 Approval했다라는 데이터를 삽입한다. 그 이후로는 더 이상 Resource Owner에게 Approval 관련된 문구(팝업 등)을 띄우지 않을 것이다.
- OAUTH_CODE : 오늘 진행해볼 Authorization Code Grant Type에 사용될 인증코드를 보관하는 테이블이다.
pom.xml
|
1
2
3
4
5
6
7
8
9
10
11
12
13
14
15
16
17
18
19
20
21
22
23
24
25
26
27
28
29
30
31
32
33
34
35
36
37
38
39
40
41
42
43
44
45
46
47
48
49
50
51
52
53
54
55
56
57
58
59
60
61
62
63
64
65
66
67
68
69
70
71
72
73
74
75
76
77
78
79
80
81
82
83
84
85
86
87
88
89
90
91
92
93
94
95
96
97
98
|
<?xml version="1.0" encoding="UTF-8"?>
<project xmlns="http://maven.apache.org/POM/4.0.0" xmlns:xsi="http://www.w3.org/2001/XMLSchema-instance"
xsi:schemaLocation="http://maven.apache.org/POM/4.0.0 http://maven.apache.org/xsd/maven-4.0.0.xsd">
<modelVersion>4.0.0</modelVersion>
<parent>
<groupId>org.springframework.boot</groupId>
<artifactId>spring-boot-starter-parent</artifactId>
<version>2.1.4.RELEASE</version>
<relativePath/> <!-- lookup parent from repository -->
</parent>
<groupId>com.example</groupId>
<artifactId>oauth_authorization_server</artifactId>
<version>0.0.1-SNAPSHOT</version>
<name>oauth_authorization_server</name>
<description>spring security exam</description>
<properties>
<java.version>1.8</java.version>
</properties>
<repositories>
<!-- 오라클 저장소 -->
<repository>
<id>codelds</id>
<url>https://code.lds.org/nexus/content/groups/main-repo</url>
</repository>
</repositories>
<dependencies>
<dependency>
<groupId>org.webjars</groupId>
<artifactId>bootstrap</artifactId>
<version>3.3.5</version>
</dependency>
<dependency>
<groupId>org.springframework.boot</groupId>
<artifactId>spring-boot-starter-thymeleaf</artifactId>
</dependency>
<dependency>
<groupId>org.apache.commons</groupId>
<artifactId>commons-lang3</artifactId>
</dependency>
<dependency>
<groupId>com.oracle</groupId>
<artifactId>ojdbc6</artifactId>
<version>11.2.0.3</version>
<scope>compile</scope>
</dependency>
<dependency>
<groupId>com.oracle</groupId>
<artifactId>ucp</artifactId>
<version>11.2.0.3</version>
<scope>compile</scope>
</dependency>
<dependency>
<groupId>org.springframework.security.oauth.boot</groupId>
<artifactId>spring-security-oauth2-autoconfigure</artifactId>
<version>2.1.4.RELEASE</version>
</dependency>
<dependency>
<groupId>org.springframework.boot</groupId>
<artifactId>spring-boot-starter-data-jpa</artifactId>
</dependency>
<dependency>
<groupId>org.springframework.boot</groupId>
<artifactId>spring-boot-starter-security</artifactId>
</dependency>
<dependency>
<groupId>org.springframework.boot</groupId>
<artifactId>spring-boot-starter-web</artifactId>
</dependency>
<dependency>
<groupId>org.projectlombok</groupId>
<artifactId>lombok</artifactId>
<optional>true</optional>
</dependency>
<dependency>
<groupId>org.springframework.boot</groupId>
<artifactId>spring-boot-starter-test</artifactId>
<scope>test</scope>
</dependency>
<dependency>
<groupId>org.springframework.security</groupId>
<artifactId>spring-security-test</artifactId>
<scope>test</scope>
</dependency>
</dependencies>
<build>
<plugins>
<plugin>
<groupId>org.springframework.boot</groupId>
<artifactId>spring-boot-maven-plugin</artifactId>
</plugin>
</plugins>
</build>
</project>
|
cs |
필요한 라이브러리들을 받아준다. 사용되는 라이브러리들 중에 롬복을 설치하지 않은 사람이 있다면 이전 포스팅에 롬복 설치방법에 대한 글을 올린 것을 참조하길 바란다.
https://coding-start.tistory.com/78?category=738632
Mac OS - Eclipse & Lombok(롬복 사용방법)
해당 환경은 모두 Mac OS환경에서 진행되었습니다. Lombok(jar) 설치 https://projectlombok.org/download에서 최신버전 혹은 원하는 버젼의 Lombok을 다운로드 받아 줍니다. Lombok jar 실행 lombok이 설치된 경..
coding-start.tistory.com
application.properties
|
1
2
3
4
5
6
7
8
9
10
11
12
13
14
15
16
17
18
19
20
21
22
23
24
25
26
27
28
29
30
31
32
33
34
|
spring.application.name=oauth2_authorization_server
server.port=8080
spring.thymeleaf.cache=false
############################<DataSource&JPA>###############################
spring.datasource.url=jdbc:oracle:thin:@localhost:59162:XE
spring.datasource.username=oauth_user
spring.datasource.password=oauth_user
spring.datasource.driver-class-name=oracle.jdbc.OracleDriver
spring.datasource.tomcat.initial-size=0
spring.datasource.tomcat.max-active=50
spring.datasource.tomcat.max-wait=10000
spring.datasource.tomcat.max-idle=0
spring.datasource.tomcat.min-idle=0
spring.datasource.tomcat.remove-abandoned=true
spring.datasource.tomcat.remove-abandoned-timeout=10000
spring.datasource.tomcat.validation-interval=10000
spring.datasource.tomcat.validation-query-timeout=10000
spring.datasource.tomcat.validation-query=SELECT 1 FROM dual
spring.datasource.tomcat.test-on-borrow=true
spring.datasource.tomcat.test-on-connect=true
spring.datasource.tomcat.test-on-return=true
spring.jpa.showSql=true
spring.jpa.generate-ddl=false
spring.jpa.hibernate.ddl-auto=create
spring.jpa.hibernate.naming-strategy=org.hibernate.cfg.ImprovedNamingStrategy
spring.jpa.properties.hibernate.dialect=org.hibernate.dialect.Oracle10gDialect
spring.jpa.properties.hibernate.format_sql=true
spring.jpa.properties.hibernate.show_sql=false
spring.jpa.properties.hibernate.default_schema=oauth_user
############################</DataSource&JPA>#############################
|
cs |
많지 않은 설정이다. DataSource, JPA 설정이 대부분이다. OAuth2.0에 관련된 대부분의 설정은 모두 Java Config 기반이다.
OAuth2AuthorizationServerConfig.java
|
1
2
3
4
5
6
7
8
9
10
11
12
13
14
15
16
17
18
19
20
21
22
23
24
25
26
27
28
29
30
31
32
33
34
35
36
37
38
39
40
41
42
43
44
45
46
47
48
49
50
51
52
53
54
55
56
57
58
59
60
61
62
63
64
65
66
67
68
69
70
71
72
73
74
75
76
|
/**
*
* @author yun-yeoseong
*
*/
@Configuration
@EnableAuthorizationServer
public class OAuth2AuthorizationServerConfig extends AuthorizationServerConfigurerAdapter{
@Autowired private DataSource dataSource;
@Autowired private PasswordEncoder encoder;
@Autowired private ClientDetailsService clientDetailsService;
@Autowired private UserDetailsService userDetailsService;
@Override
public void configure(AuthorizationServerSecurityConfigurer security) throws Exception {
}
/*
* Client에 대한 인증 처리를 위한 설정
* 1) In-Memory 설정 - 기본 구현체 InMemoryClientDetailsService(Map에 클라이언트를 저장)
* 2) JDBC 설정 - 기본 구현체 JdbcClientDetailsService(JdbcTemplate를 이용한 DB이용)
* 3) CleintDetailsService 설정
*/
@Override
public void configure(ClientDetailsServiceConfigurer clients) throws Exception {
/*
* Client를 DB에서 관리하기 위하여 DataSource 주입.
* UserDetailsService와 동일한 역할을 하는 객체이다.
*/
clients.withClientDetails(clientDetailsService);
}
@Override
public void configure(AuthorizationServerEndpointsConfigurer endpoints) throws Exception {
// TODO Auto-generated method stub
endpoints
.userDetailsService(userDetailsService) //refresh token 발급을 위해서는 UserDetailsService(AuthenticationManager authenticate()에서 사용)필요
.authorizationCodeServices(new JdbcAuthorizationCodeServices(dataSource)) //authorization code를 DB로 관리 코드 테이블의 authentication은 blob데이터타입으로..
.approvalStore(approvalStore()) //리소스 소유자의 승인을 추가, 검색, 취소하기 위한 메소드를 정의
.tokenStore(tokenStore()) //토큰과 관련된 인증 데이터를 저장, 검색, 제거, 읽기를 정의
.accessTokenConverter(accessTokenConverter())
;
}
@Bean
public JwtTokenStore tokenStore() {
return new JwtTokenStore(accessTokenConverter());
}
@Bean
public JdbcApprovalStore approvalStore() {
return new JdbcApprovalStore(dataSource);
}
@Bean
public JwtAccessTokenConverter accessTokenConverter() {
JwtAccessTokenConverter converter = new JwtAccessTokenConverter();
converter.setSigningKey("non-prod-signature");
return converter;
}
/*
* 새로운 클라이언트 등록을 위한 빈
*/
@Bean
public ClientRegistrationService clientRegistrationService() {
return new JdbcClientDetailsService(dataSource);
}
}
|
cs |
Authorization Server 관련 설정 Java class이다. 우선 @Configuration, @EnableAuthorizationServer 어노테이션을 붙여 해당 프로젝트가 인증서버임을 알린다. 그리고 해당 클래스는 AuthorizationServerConfigurerAdapter를 상속받는다. 첫번째 AuthorizationServerSecurityConfigurer를 매개변수로 가진 설정 메소드이다. 해당 메소드에서 설정하는 것은 AuthenticationEntryPoint, AccessDeniedHandler, PasswordEncoder 등을 설정할 수 있는 메소드이다. 몇 개 테스트를 해보니 여기에 아무리 설정을 하여도 Spring Security 설정 클래스에 적용된 AuthenticationEntryPoint, AccessDeniedHandler, PasswordEncoder등을 사용한다. 즉, Spring Security와 상호보완적이라고 표현한 것을 이것을 생각하여 말한것이다. 두번째는 ClientDetailsServiceConfigurer 매개변수를 가진 메소드이다. 쉽게 설명하면 Client관련된 동작들을 Im-memory에서 할 것인지 Jdbc를 이용해서 할것인지에 대한 설정이라고 보면된다. Client 애플리케이션 관리를 인메모리에서 하는 것은 말도 안되므로, jdbc를 이용한 클라이언트 관리 설정을 해주었다. DB를 이용하여 클라이언트를 관리하는 설정에는 크게 두가지 방법이있다.
위처럼 직접 DB와 통신하게 되는 ClientDetailsService 인터페이스를 구현한 클래스를 등록하는 방법이 있고, 나머지 하나는 OAuth2.0에서 제공하는 JdbcClientDetailsService를 사용하기위해 DataSource를 설정해주는 방법이다.( -> clients.jdbc(dataSource) )
마지막으로 가장 중요한 AuthorizationServerEndpointsConfigurer를 매개변수로 가진 메소드이다. 사실 이 설정이 Authorization Server의 설정의 전부라고 해도 무방할정도로 중요한 설정 메소드이다. 이 설정은 Authorize, Token 발급, Token Check할때의 행동을 정의하는 설정들이 들어간다. 해당 설정 메소드의 모든 설정을 다루지는 못했다. 필자가 생각하기에 가장 많이 사용되는 부분의 설정만 다루었다.
- .userDetailsService(userDetailsService) : 사실 모든 사용목적은 살펴보지 못했지만, Refresh Token을 통해 Access Token을 재발급 받을 때 사용된다. UserDetailsService는 이전 Spring Security에서 다루었던 내용이므로 설명은 생략한다.
- .authorizationCodeServices(new JdbcAuthorizationCodeService(dataSource)) : 우리는 Authorization Code Grant Type으로 예제코드를 짜볼것이다. 해당 설정은 Resource Owner의 인증을 통하여 Client가 얻는 인증코드를 다루는 Service 클래스를 등록하는 설정이다. 여기서는 Jdbc를 이용한 AuthorizationCodeService를 사용하였다.
- .approvalStore(approvalStore()) : 만약 어떤 애플리케이션이 페이스북에서 나의 리소스를 사용한다고 가정하면, 최초에 페이스북에서 나의 리소스를 쓰도록 허락한 다음에는 더 이상 허락을 요구하는 메시지를 보여주지 않을 것이다. 그것은 어딘가에 내가 리소스사용을 허락한다라는 데이터가 저장되어 있기때문에 더 이상 물어보지 않는 것이다. 이것과 같이 Resource Owner가 Client 애플리케이션이 Resource Server에 있는 Resource Owner의 리소스의 사용을 허락한다는 데이터를 담는 approvalStore를 설정해주는 것이다.(DB에서 관리하기 위하여 JdbcApprovalStore를 사용하였다.)
- .tokenStore(tokenStore()) : 어떻게 보면 핵심이 되는 설정이다. 해당 설정은 TokenStore로써 어떤 것을 사용할 것인지를 설정하는 메소드이다. TokenStore의 종류로는 InMemoryTokenStore, JdbcTokenStore,JwtTokenStore,RedisTokenStore 등이 있지만, 우리는 JwtTokenStore를 사용할 것이다. JwtTokenStore를 빈으로 등록하였으며, JwtTokenStore 사용을 위한 JwtAccessTokenConverter를 빈으로 등록하였다.
맨 밑에 ClientRegistrationService 빈을 동적으로 클라이언트를 등록하기 위해 사용되는 서비스 클래스이다. 예를 들어 우리의 애플리케이션이 페이스북의 기능을 사용하기 위하여 사전에 App을 등록하는 과정이 있을 것이다. 거기에 사용되는 서비스 클래스라고 보면된다. 나중에 설명 할 것이다.
WebSecurityConfig.java
OAuth2.0과 Spring Security는 상호보완적이라고 얘기했다. 추후에는 어떻게 될지는 모르겠지만 현재는 그렇다. 다음 볼 코드는 시큐리티 관련 소스코드이다.
|
1
2
3
4
5
6
7
8
9
10
11
12
13
14
15
16
17
18
19
20
21
22
23
24
25
26
27
28
29
30
31
32
33
34
35
36
37
38
39
40
41
42
43
44
45
46
47
48
49
50
51
52
53
54
55
56
57
58
59
60
61
62
63
64
65
66
67
68
69
70
71
72
73
74
75
76
77
78
79
80
81
82
83
84
85
86
87
88
89
90
91
92
93
94
95
96
97
98
99
100
101
102
103
104
105
106
107
108
109
110
111
112
113
114
115
116
|
/**
*
* @author yun-yeoseong
*
*/
@EnableWebSecurity
public class WebSecurityConfig extends WebSecurityConfigurerAdapter{
@Autowired private UserDetailsService userDetailsService;
@Autowired private PasswordEncoder passwordEncoder;
@Override
protected void configure(AuthenticationManagerBuilder auth) throws Exception {
/*
* AuthenticationProvider 등록
*/
auth.authenticationProvider(authenticationProvider());
}
@Override
public void configure(WebSecurity web) throws Exception {
web.ignoring()
.antMatchers("/resources/**")
.antMatchers("/css/**")
.antMatchers("/vendor/**")
.antMatchers("/js/**")
.antMatchers("/favicon*/**")
.antMatchers("/img/**")
;
}
@Override
protected void configure(HttpSecurity http) throws Exception {
http
.cors()
.and()
.authorizeRequests()
.antMatchers("/login*/**").permitAll()
.anyRequest().authenticated()
.and().csrf()
.disable()
.addFilter(authenticationFilter())
.exceptionHandling()
.authenticationEntryPoint(authenticationEntryPoint())
;
}
@Bean
public CorsConfigurationSource corsConfigurationSource() {
CorsConfiguration configuration = new CorsConfiguration();
configuration.setAllowedOrigins(Arrays.asList("*"));
configuration.setAllowedMethods(Arrays.asList("*"));
configuration.setAllowedHeaders(Arrays.asList("*"));
UrlBasedCorsConfigurationSource source = new UrlBasedCorsConfigurationSource();
source.registerCorsConfiguration("/**", configuration);
return source;
}
/*
* SuccessHandler bean register
*/
@Bean
public AuthenticationSuccessHandler authenticationSuccessHandler() {
CustomAuthenticationSuccessHandler successHandler = new CustomAuthenticationSuccessHandler();
successHandler.setDefaultTargetUrl("/index");
return successHandler;
}
/*
* FailureHandler bean register
*/
@Bean
public AuthenticationFailureHandler authenticationFailureHandler() {
CustomAuthenticationFailureHandler failureHandler = new CustomAuthenticationFailureHandler();
failureHandler.setDefaultFailureUrl("/loginPage?error=error");
return failureHandler;
}
/*
* AuthenticationEntryPoint bean register
*/
@Bean
public AuthenticationEntryPoint authenticationEntryPoint() {
return new CustomAuthenticationEntryPoint("/loginPage");
}
/*
* Form Login시 걸리는 Filter bean register
*/
@Bean
public CustomAuthenticationFilter authenticationFilter() throws Exception {
CustomAuthenticationFilter authenticationFilter = new CustomAuthenticationFilter(authenticationManager());
authenticationFilter.setFilterProcessesUrl("/login");
authenticationFilter.setUsernameParameter("username");
authenticationFilter.setPasswordParameter("password");
authenticationFilter.setAuthenticationSuccessHandler(authenticationSuccessHandler());
authenticationFilter.setAuthenticationFailureHandler(authenticationFailureHandler());
authenticationFilter.afterPropertiesSet();
return authenticationFilter;
}
@Bean
public AuthenticationProvider authenticationProvider() {
DaoAuthenticationProvider authenticationProvider = new DaoAuthenticationProvider();
authenticationProvider.setUserDetailsService(userDetailsService);
authenticationProvider.setPasswordEncoder(passwordEncoder);
return authenticationProvider;
}
}
|
cs |
해당 설정은 이전 포스팅 Spring Security관련 글을 보면 조금더 자세히 설명하였다. 거기에서 참조하여 이해하면 될 것같다. 간단하게 설명하면 Authorization Server가 인증 코드를 발급해주기 위하여 Resource Owner에 대한 인증을 담당하게 될것이다. 그 밖에도 Authorization Server의 엔드포인트 보안이 필요하다면 여기에 작성하면 될것 같다.
다음은 OAuth2.0 및 Spring Security에 사용되는 클래스들이다.
|
1
2
3
4
5
6
7
8
9
10
11
12
13
14
15
16
17
18
19
20
21
22
23
24
25
26
27
28
29
30
31
32
33
34
35
36
37
38
39
40
41
42
43
44
45
46
47
48
49
50
51
52
53
54
55
56
57
58
59
60
61
62
63
64
65
66
67
68
69
70
71
72
73
74
75
76
77
78
79
80
81
82
83
84
85
86
87
88
89
90
91
92
93
94
95
96
97
98
99
100
101
102
103
104
105
106
107
108
109
110
111
112
113
114
115
116
117
118
119
120
121
122
123
124
125
126
127
128
129
130
131
132
133
134
135
136
137
138
139
140
141
142
143
144
145
146
147
148
149
150
151
152
153
154
155
156
157
158
159
160
161
162
163
164
165
166
167
168
169
170
171
172
173
174
175
176
177
178
179
180
181
182
183
184
185
186
187
188
189
190
191
192
193
194
195
196
197
198
199
200
201
202
203
204
205
206
207
208
209
210
211
212
213
214
215
216
217
218
219
220
221
222
223
224
225
226
227
228
229
230
231
232
233
234
235
236
237
238
239
240
241
242
243
244
245
246
247
248
249
250
251
252
253
254
255
256
257
258
259
260
261
262
263
264
265
266
267
268
269
270
271
272
273
274
275
276
277
278
279
280
281
282
283
284
285
286
287
288
289
290
291
292
293
294
295
296
297
298
299
300
301
302
303
304
305
306
307
308
309
310
311
312
313
314
315
316
317
318
319
320
321
322
323
324
325
326
327
328
329
330
331
332
333
334
335
336
337
338
339
340
341
342
343
344
345
346
347
348
349
350
351
352
353
354
355
356
357
358
359
360
361
362
363
364
365
366
367
368
369
370
371
372
373
374
375
376
377
378
379
380
381
382
383
384
385
386
387
388
389
390
|
/*
* 동적으로 클라이언트를 등록할때 사용할 Client Type이다.
*/
public enum ClientType {
PUBLIC,CONFIDENTIAL
}
/**
*
* @author yun-yeoseong
* Spring Security에서 사용자의 Role(권한)이다.
*
*/
public enum UserRole {
ROLE_USER,
ROLE_ADMIN
}
/**
*
* @author yun-yeoseong
* View 랜더링을 위한 ViewController 설정이다.
*/
@Configuration
public class WebMvcConfig implements WebMvcConfigurer{
/*
* ViewController
*/
@Override
public void addViewControllers(ViewControllerRegistry registry) {
WebMvcConfigurer.super.addViewControllers(registry);
registry.addViewController("/loginPage")
.setViewName("login");
}
}
/**
*
* @author yun-yeoseong
* Spring Security에서 사용자를 인증할때 사용되는 객체이다.(DB에서 관리되는 객체)
* UserDetailsService에서 사용자를 load할때 반환되는 결과객체이다.
*/
@Getter
@Setter
@ToString
@Entity
public class UserDetailsImpl implements UserDetails{
private static final long serialVersionUID = -4608347932140057654L;
@Id
private Long id;
private String username;
private String password;
private UserRole role;
@Column(length=2000)
private String access_token;
private LocalDateTime access_token_validity;
@Column(length=2000)
private String refresh_token;
@Transient
private Collection<? extends GrantedAuthority> authorities;
@Transient
private boolean accountNonExpired = true;
@Transient
private boolean accountNonLocked = true;
@Transient
private boolean credentialsNonExpired = true;
@Transient
private boolean enabled = true;
}
/*
* 동적클라이언트 등록시 컨트롤러에서 매개변수로 사용되는 Dto클래스.
*/
public class RegisterClientInfo {
private String name;
private String redirectUri;
private String clientType;
public String getName() {
return name;
}
public void setName(String name) {
this.name = name;
}
public String getRedirectUri() {
return redirectUri;
}
public void setRedirectUri(String redirectUri) {
this.redirectUri = redirectUri;
}
public String getClientType() {
return clientType;
}
public void setClientType(String clientType) {
this.clientType = clientType;
}
}
/*
* OAuth2.0에서 클라이언트 인증에 사용되는 객체이다.
* ClientDetailsService에서 load하면 반환하는 객체이다.
* Spring Security를 다루어보았다면, UserDetails와 동일한 역할을 하는 객체이다.
*/
public class ClientDetailsImpl extends BaseClientDetails {
private static final long serialVersionUID = -8263549600098155096L;
private ClientType clientType;
public ClientType getClientType() {
return clientType;
}
public void setClientType(ClientType clientType) {
this.clientType = clientType;
}
}
/*
* Spring Security에서 로그인 페이지로 리다이렉트 시켜줄 Entrypoint객체이다.
* 만약 권한이 없는 사용자가 페이지에 접근하였을 때, 해당 객체가 로그인 페이지로
* 리다이렉트 시켜주는 역할을 담당한다.
*/
@Slf4j
public class CustomAuthenticationEntryPoint extends LoginUrlAuthenticationEntryPoint{
public CustomAuthenticationEntryPoint(String loginFormUrl) {
super(loginFormUrl);
}
@Override
public void commence(HttpServletRequest request, HttpServletResponse response,
AuthenticationException authException) throws IOException, ServletException {
log.info("CustomAuthenticationEntryPoint.commence :::: {}",request.getRequestURI());
super.commence(request, response, authException);
}
}
/**
* 로그인 실패시 행동을 재정의할 클래스(추상 클래스가 아닌 인터페이스를 구현해도 된다.)
* Or Interface - AuthenticationFailureHandler
* @author yun-yeoseong
*
*/
@Slf4j
public class CustomAuthenticationFailureHandler extends SimpleUrlAuthenticationFailureHandler implements ExceptionProcessor{
@Override
public void onAuthenticationFailure(HttpServletRequest request, HttpServletResponse response,
AuthenticationException exception) throws IOException, ServletException {
log.info("CustomAuthenticationFailureHandler.onAuthenticationFailure ::::");
super.onAuthenticationFailure(request, response, exception);
}
@Override
public void makeExceptionResponse(HttpServletRequest request, HttpServletResponse response,
Exception exception) {
}
}
/**
* Form 로그인 인증을 담당하는 Filter이다.
* @author yun-yeoseong
*
*/
@Slf4j
public class CustomAuthenticationFilter extends UsernamePasswordAuthenticationFilter{
private boolean postOnly = true;
public CustomAuthenticationFilter(AuthenticationManager authenticationManager) {
super.setAuthenticationManager(authenticationManager);
}
/*
* 해당 필터에서 인증 프로세스 이전에 요청에서 사용자 정보를 가져와서
* Authentication 객체를 인증 프로세스 객체에게 전달하는 역할
*/
@Override
public Authentication attemptAuthentication(HttpServletRequest request, HttpServletResponse response)
throws AuthenticationException {
log.info("JwtAuthentication.attemptAuthentication ::::");
/*
* POST로 넘어왔는지 체크
*/
if(postOnly && !request.getMethod().equals("POST")) {
throw new AuthenticationServiceException(
"Authentication method not supported: " + request.getMethod());
}
String username = obtainUsername(request);
String password = obtainPassword(request);
if(StringUtils.isEmpty(username)) {
username = "";
}
if(StringUtils.isEmpty(password)) {
password = "";
}
username = username.trim();
UsernamePasswordAuthenticationToken authRequest = new UsernamePasswordAuthenticationToken(username, password);
setDetails(request, authRequest);
return this.getAuthenticationManager().authenticate(authRequest);
}
}
/**
* 로그인 성공시 행동을 재정의할 클래스(추상 클래스가 아닌 인터페이스를 구현해도 된다.)
* Or Interface - AuthenticationSuccessHandler
* @author yun-yeoseong
*
*/
@Slf4j
public class CustomAuthenticationSuccessHandler extends SavedRequestAwareAuthenticationSuccessHandler implements ExceptionProcessor{
@Override
public void onAuthenticationSuccess(HttpServletRequest request, HttpServletResponse response,
Authentication authentication) throws ServletException, IOException {
log.info("CustomAuthenticationSuccessHandler.onAuthenticationSuccess ::::");
/*
* 쿠키에 인증 토큰을 넣어준다.
*/
super.onAuthenticationSuccess(request, response, authentication);
}
@Override
public void makeExceptionResponse(HttpServletRequest request, HttpServletResponse response,
Exception exception) {
}
}
public interface ExceptionProcessor {
public void makeExceptionResponse(HttpServletRequest request, HttpServletResponse response, Exception exception) throws IOException;
}
public interface ChatbotUserRepository extends JpaRepository<UserDetailsImpl, Long>{
public UserDetailsImpl findByUsername(String username);
}
public interface ChatbotUserService {
public UserDetailsImpl findByUsername(String username);
public UserDetailsImpl save(UserDetailsImpl user);
}
@Slf4j
@Service
public class ChatbotUserServiceImpl implements ChatbotUserService {
@Autowired private ChatbotUserRepository repository;
@Override
public UserDetailsImpl findByUsername(String username) {
log.info("ChatbotUserServiceImpl.findByUsername :::: {}",username);
return repository.findByUsername(username);
}
@Override
public UserDetailsImpl save(UserDetailsImpl user) {
log.info("ChatbotUserServiceImpl.save :::: {}",user.toString());
return repository.save(user);
}
}
/**
* Client 인증시 사용되는 서비스 클래스.
* DB에서 ClientDetails객체를 가져온다.
* Spring Security를 다루어보았다면 UserDetailsService와 동일한 역할을 한다.
* @author yun-yeoseong
*
*/
@Slf4j
@Primary
@Service
public class ClientDetailsServiceImpl extends JdbcClientDetailsService{
public ClientDetailsServiceImpl(DataSource dataSource) {
super(dataSource);
}
@Override
public ClientDetails loadClientByClientId(String clientId) throws ClientRegistrationException {
log.info("ClientDetailsServiceImpl.loadClientByClientId :::: {}",clientId);
return super.loadClientByClientId(clientId);
}
@Override
public void addClientDetails(ClientDetails clientDetails) throws ClientAlreadyExistsException {
log.info("ClientDetailsServiceImpl.addClientDetails :::: {}",clientDetails.toString());
super.addClientDetails(clientDetails);
}
@Override
public void updateClientDetails(ClientDetails clientDetails) throws NoSuchClientException {
log.info("ClientDetailsServiceImpl.updateClientDetails :::: {}",clientDetails.toString());
super.updateClientDetails(clientDetails);
}
@Override
public void updateClientSecret(String clientId, String secret) throws NoSuchClientException {
log.info("ClientDetailsServiceImpl.updateClientSecret :::: {},{}",clientId,secret);
super.updateClientSecret(clientId, secret);
}
@Override
public void removeClientDetails(String clientId) throws NoSuchClientException {
log.info("ClientDetailsServiceImpl.removeClientDetails :::: {}",clientId);
super.removeClientDetails(clientId);
}
@Override
public List<ClientDetails> listClientDetails() {
List<ClientDetails> list = super.listClientDetails();
log.info("ClientDetailsServiceImpl.listClientDetails :::: count = {}",list.size());
return list;
}
}
/*
* Spring Security에서 User를 인증할때 사용하는 서비스클래스이다.
* UserDetails 객체를 DB에서 가져오는 역할을 한다.
*/
@Slf4j
@Service
public class UserDetailsServiceImpl implements UserDetailsService{
@Autowired private ChatbotUserService service;
@Override
public UserDetails loadUserByUsername(String username) throws UsernameNotFoundException {
log.info("UserDetailsServiceImpl.loadUserByUsername :::: {}",username);
UserDetailsImpl user = service.findByUsername(username);
if(ObjectUtils.isEmpty(user)) {
throw new UsernameNotFoundException("Invalid username, please check user info !");
}
user.setAuthorities(AuthorityUtils.createAuthorityList(String.valueOf(user.getRole())));
return user;
}
}
/*
* Sha256 암호화를 담당하는 유틸클래스.
*/
@Slf4j
public class Crypto {
public static String sha256(final String string) {
log.info("Crypto.sha256 :::: {}",string);
try {
MessageDigest digest = MessageDigest.getInstance("SHA-256");
byte[] hash = digest.digest(string.getBytes("UTF-8"));
StringBuffer hexString = new StringBuffer();
for(int i=0;i<hash.length;i++) {
String hex = Integer.toHexString(0xff & hash[i]);
if(hex.length() == 1) {
hexString.append('0');
}
hexString.append(hex);
}
return hexString.toString();
}catch (Exception e) {
// TODO: handle exception
throw new RuntimeException(e);
}
}
}
/*
* 인증을 할때 Form에서 넘어온 비밀번호를 암호화하여
* DB에서 불러온 암호화된 인증패스워드를 비교하는 역할을 한다.
*/
@Slf4j
@Component
public class ShaPasswordEncoder implements PasswordEncoder{
@Override
public String encode(CharSequence rawPassword) {
log.info("ShaPasswordEncoder.encode :::: {}",rawPassword);
return Crypto.sha256(rawPassword.toString());
}
@Override
public boolean matches(CharSequence rawPassword, String encodedPassword) {
log.info("ShaPasswordEncoder.matches :::: {}<->{}",rawPassword,encodedPassword);
return Crypto.sha256(rawPassword.toString()).equals(encodedPassword);
}
}
|
cs |
|
1
2
3
4
5
6
7
8
9
10
11
12
13
14
15
16
17
18
19
20
21
22
23
24
25
26
27
28
29
30
31
32
33
34
35
36
37
38
39
40
41
42
43
44
45
46
47
48
49
50
51
52
53
54
55
|
/*
* 동적 클라이언트 등록에 사용되는 컨트롤러
*/
@Controller
@RequestMapping("/client")
public class ClientController {
@Autowired private ClientRegistrationService clientRegistrationService;
@GetMapping("/register")
public ModelAndView registerPage(ModelAndView mav) {
mav.setViewName("client/register");
mav.addObject("registry", new RegisterClientInfo());
return mav;
}
@GetMapping("/dashboard")
public ModelAndView dashboard(ModelAndView mv) {
mv.addObject("applications",
clientRegistrationService.listClientDetails());
return mv;
}
@PostMapping("/save")
public ModelAndView save(@Valid RegisterClientInfo clientDetails,ModelAndView mav ,BindingResult bindingResult) {
if(bindingResult.hasErrors()) {
return new ModelAndView("client/register");
}
ClientDetailsImpl client = new ClientDetailsImpl();
client.addAdditionalInformation("name", clientDetails.getName());
client.setRegisteredRedirectUri(new HashSet<>(Arrays.asList("http://localhost:9000/callback")));
client.setClientType(ClientType.PUBLIC);
client.setClientId(UUID.randomUUID().toString());
client.setClientSecret(UUID.randomUUID().toString());
client.setAccessTokenValiditySeconds(3600);
client.setScope(Arrays.asList("read","write"));
clientRegistrationService.addClientDetails(client);
mav.setViewName("redirect:/client/dashboard");
return mav;
}
@GetMapping("/remove")
public ModelAndView remove(
@RequestParam(value = "client_id", required = false) String clientId) {
clientRegistrationService.removeClientDetails(clientId);
ModelAndView mv = new ModelAndView("redirect:/client/dashboard");
mv.addObject("applications",
clientRegistrationService.listClientDetails());
return mv;
}
}
|
cs |
클래스설명(대부분 소스 주석에 간단히 달아놓았다.)
- ClientType : 클라이언트 동적등록에 사용되는 이늄. 인증 서버에 등록할 클라이언트 애플리케이션의 타입이다.
- UserRole : Resource Owner의 Role 이늄.(Spring Security에서 사용될 권한 타입이다.)
- WebMvcConfig : MVC 설정을 위한 클래스.
- ClientDetailsImpl : ClientDetails를 구현한 BaseClientDeatils를 상속한 클래스이다. Client 인증에 사용될 클래스이다. ClientDetailsService와 상호보완적인 클래스이다.(Spring Security의 UserDetails 와 비슷한 역할이다. 주체가 사용자에서 클라이언트 애플리케이션으로 갔다고 보면된다.)
- RegisterClientInfo : 클라이언트 동적 등록에 사용될 Controller Dto 클래스.
- UserDetails : Resource Owner의 인증에 사용되는 클래스. UserDetailsService와 상호보완적이다.
- ChatbotUserRepository : UserDetailsImpl JPA Repository 인터페이스이다.
- ClientDetailsServiceImpl : 클라이언트 인증에 사용되는 서비스 클래스이다. 인증 과정에서 DB에서 사용자 정보를 가져오는데 사용된다.
- UserDetailsServiceImpl : 위와 동일한 역할이며 인증 주체가 Resource Owner이다.
- Crypto,ShaPasswordEncoder : 비밀번호 암호화에 사용되는 클래스들이다.
|
1
2
3
4
5
6
7
8
9
10
11
12
13
|
INSERT INTO oauth_client_details
(client_id, resource_ids, client_secret, scope, authorized_grant_types,
web_server_redirect_uri, authorities, access_token_validity, refresh_token_validity,
additional_information, autoapprove)
VALUES
('clientapp', null, '311ffdc998038e85ac0b5bd1fb20097a67281b7c0bc0ef905771daec9eb52b66',
'read_profile,read_posts', 'authorization_code,refresh_token',
'http://localhost:9000/callback',
null, 3000, -1, null, 'false');
INSERT INTO USER_DETAILS_IMPL values('1','5e884898da28047151d0e56f8dc6292773603d0d6aabbdd62a11ef721d1542d8','ROLE_USER','ResourceOwner');
commit;
|
cs |
예제를 진행하기 위하여 위의 2개의 데이터를 DB에 넣어준다. Resource Owner의 패스워드는 물론 Client Secret도 암호화가 되어 들어가있다는 점을 유의해야한다. 현재는 PasswordEncoder가 빈으로 떠있음으로 암호화가된 형태로 DB에 데이터가 들어가야한다. 혹은 http://localhost:8080/register에 접속하여 동적으로 클라이언트를 등록하여도 된다. 하지만 Resource Owner는 수동으로 등록해주어야한다.
브라우저를 킨다. 그리고 아래 Url로 접근을 시도해보자. 해당 Url은 Authorization Code를 받기 위한 Url 요청이다.
쿼리스트링들에 뭐가 담겨있는지 꼭 확인하자. client_id을 명시해주고, 인증코드를 받기위한 redirect_uri를 명시하고, 해당 요청을 인증코드를 받기위한 요청이므로 response_type을 code로 명시하고 해당 client의 scope를 작성한다. 그리고 마지막으로 cors를 위하여 state 코드를 임의로 넣어준다.
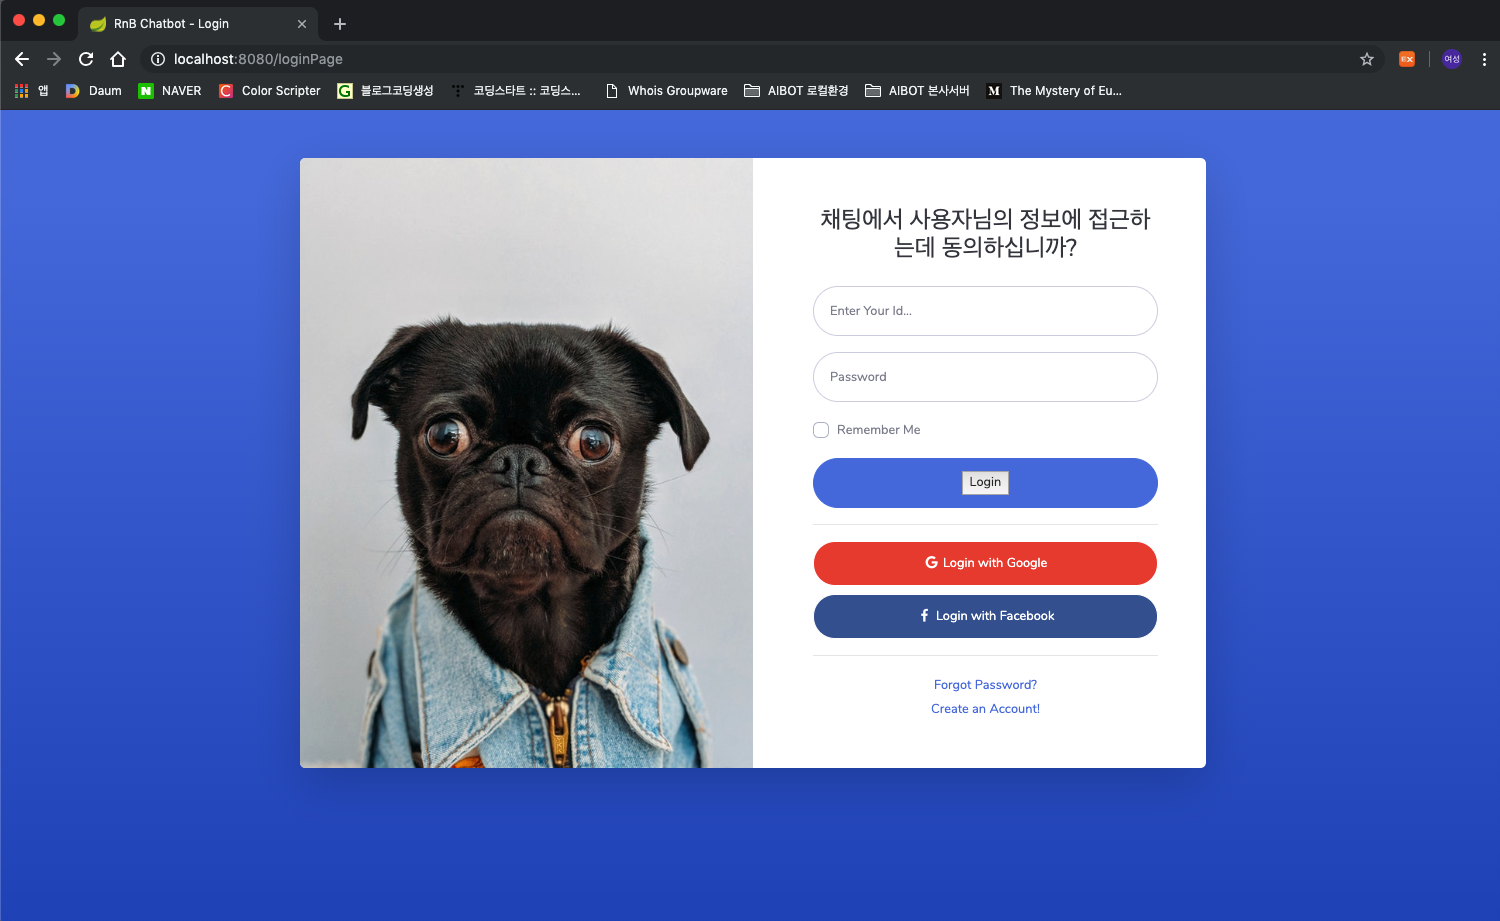
만약 예제를 잘 따라왔다면 로그인 페이지로 리다이렉트 될것이다. 로그인 해주자.
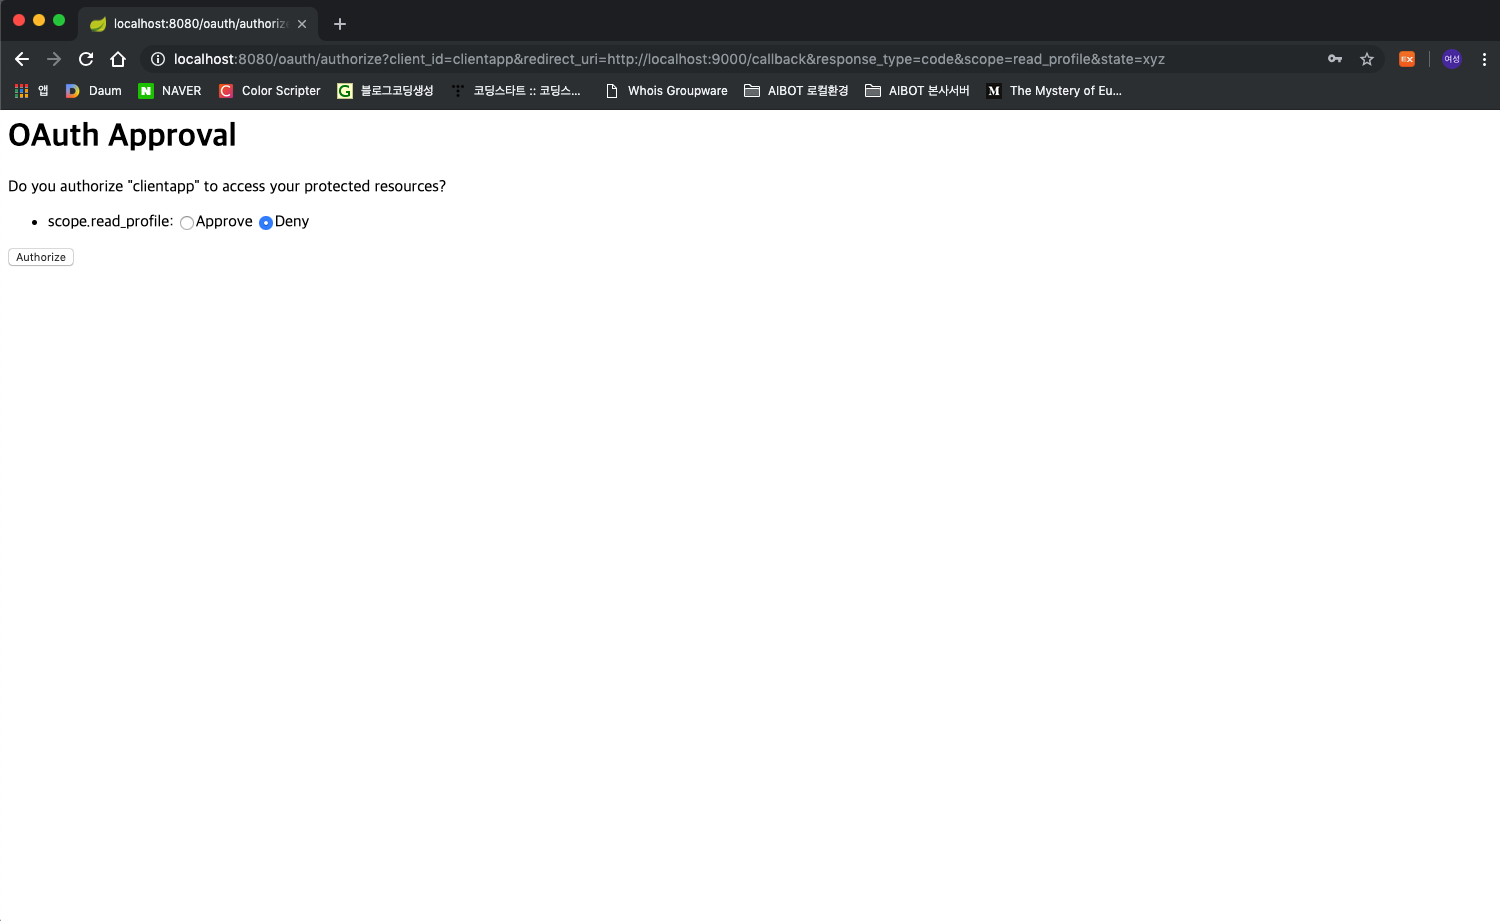
만약 로그인에 성공하였다면 Resource Owner에게 Client가 자신의 리소스를 사용하기 위해 Resource Server에 접근하는 것을 허락할 것인가를 물어보는 페이지를 보여준다. Approve를 클릭하고 인증버튼을 누르자.
http://localhost:9000/callback?code=s470jJ&state=xyz 이렇게 인증코드가 위에 쿼리스트링에 등록한 Redirect_uri로 전달된 것을 볼 수있다. 여기하나 중요한 것이있다. DB에 넣은 Redirect_uri와 authorize요청에 포함시킨 Redirect_uri가 다르다면 토큰은 물론 인증코드 조차 받을 수 없다. 내부적으로 DB와 쿼리스트링의 Redirect_uri를 비교하여 동일한지 판단하기 때문이다. 받은 인증코드로 토큰을 요청해보자.
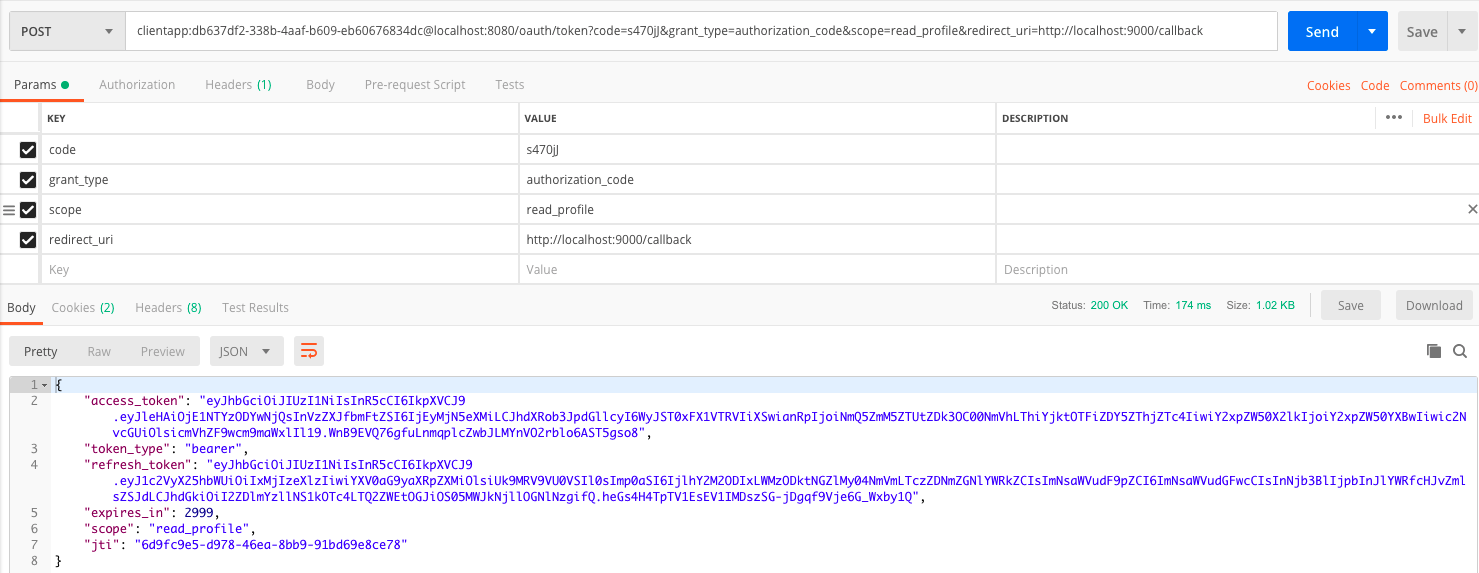
필자는 Postman 툴을 이용하여 토큰발급 요청을 보내보았다. 우선 화면에서 보이지 않은 Headers 설정이다.
"Content-Type","application/x-www-form-urlencoded" 컨텐츠 타입은 urlencoding을 해서 보낸다.
clientapp:db637df2-338b-4aaf-b609-eb60676834dc@localhost:8080/oauth/token?code=s470jJ&grant_type=authorization_code&scope=read_profile&redirect_uri=http://localhost:9000/callback
Url이다. Basic Authentication에 클라이언트 아이디와 Secret을 넣어준다. 그리고 받은 인증코드와 그랜트 타입, 스코프, 리다이렉트 Uri를 쿼리스트링으로 넣어준다. 결과를 보면 access_token,token_type,refresh_token,expires_in,scope,jti가 결과값으로 온것을 볼 수 있다. 이후 클라이언트는 헤더에 아래 내용을 포함하여 요청을 보내면 Resource Server에 보호되고 있는 리소스 요청을 보낼 수 있게된다.
Header : Authorization Bearer eyJhbGciOiJIUzI1NiIsInR5cCI6IkpXVCJ9.eyJleHAiOjE1NTYzODYwNjQsInVzZXJfbmFtZSI6IjEyMjN5eXMiLCJhdXRob3JpdGllcyI6WyJST0xFX1VTRVIiXSwianRpIjoiNmQ5ZmM5ZTUtZDk3OC00NmVhLThiYjktOTFiZDY5ZThjZTc4IiwiY2xpZW50X2lkIjoiY2xpZW50YXBwIiwic2NvcGUiOlsicmVhZF9wcm9maWxlIl19.WnB9EVQ76gfuLnmqplcZwbJLMYnVO2rblo6AST5gso8
혹시 Jwt 토큰에 대해 잘 알지 못한다면 아래 링크를 참조하자.
https://coding-start.tistory.com/157?category=738633
Algorithm - JWT 위변조를 알아내는 HMAC이란?
오늘 포스팅할 내용은 HMAC에 대한 설명이다. 우선 HMAC에 대해 설명하기 이전에 요즘 대부분이 사용하고 있는 토큰인증 방식에 이용되는 JWT(Json Web Token)이다. 그렇다면 JWT란 무엇일까? JSON Web Token은..
coding-start.tistory.com
오늘은 여기까지 Authorization Server 설정까지 하였다. 굉장히 범위가 넓은 주제이기도 하므로, 나머지 동적 클라이언트 등록 및 Resource Server와 Client 애플리케이션은 다음 포스팅에서 다루어볼 것이다. 성의없는 글을 보느라 고생하셨을 것이라 생각한다 다음 포스팅은 조금더 친절하게..
<깃헙 주소>
yoonyeoseong/spring-oauth2.0
Contribute to yoonyeoseong/spring-oauth2.0 development by creating an account on GitHub.
github.com
'Web > Spring Security&OAuth' 카테고리의 다른 글

오늘 포스팅할 내용은 HMAC에 대한 설명이다. 우선 HMAC에 대해 설명하기 이전에 요즘 대부분이 사용하고 있는 토큰인증 방식에 이용되는 JWT(Json Web Token)이다. 그렇다면 JWT란 무엇일까?
JSON Web Token은 웹표준(RFC-7519)으로서 두 개체에서 JSON객체를 사용하여 가볍고 자가수용적인(self-contained)방식으로 인증정보를 안정성있게 주고 받기 위해 만들어진 토큰이다. 우선 JWT토큰은 수많은 프로그래밍 언어에서 공통적으로 사용할 수 있는 인증 토큰이다. 그리고 JWT는 자체적으로 필요한 모든 정보(in Claims)를 가지고 있다. JWT 시스템에서 발급된 토큰은, 토큰에 대한 기본정보,전달할 정보(ex. 유저정보,권한 등..) 그리고 토큰의 signature를 포함하고 있다. 그렇다면 왜 토큰 방식의 인증방법을 채택하는 것일까?
Stateless 서버
Stateless 서버를 설명하기 이전에 Stateful서버가 무엇인지 먼저 알아본다. Stateful 서버는 클라이언트에게서 요청을 받을 때마다, 클라이언트의 상태를 계속해서 유지하고, 이 정보를 이용하여 서비스제공을 한다. Stateful 서버의 예제로는 HttpSession을 서버에 유지하고 있는 WAS이다. 예를들어 사용자가 로그인하면 로그인한 사용자의 정보를 자체 메모리에 갖고 있는다. 그리고 매 사용자 요청에 자신의 메모리에 담긴 세션객체를 이용한다. 만약 사용자가 많아 진다면 메모리에 담긴 세션객체가 많아질 것이고, 그렇다면 서버의 램에 많은 부하가 갈것이다. 그렇기 때문에 Stateless서버로 아키텍쳐를 잡고 서비스를 운영하면 상태를 유지할 필요가 없기때문에 서버에 부담도 주는 것과 동시에 확장성 또한 매우 높아진다.
<서버기반 인증>

<토큰기반 인증>
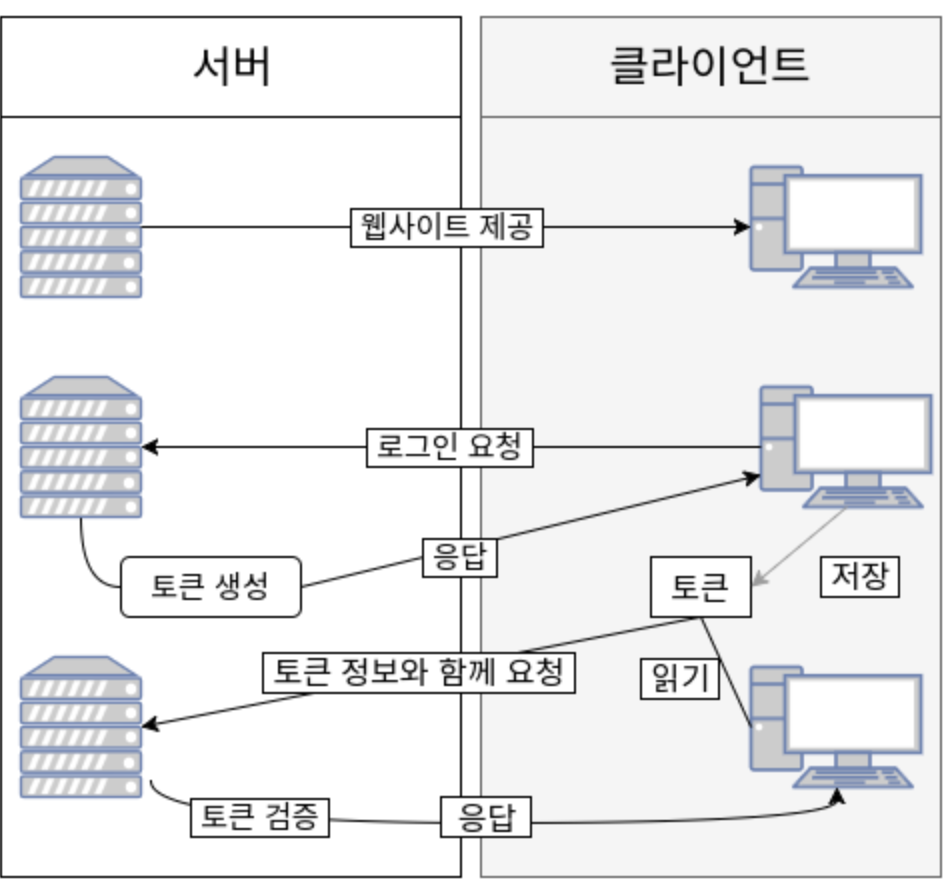
그렇다면 토큰기반인증에 사용되는 JWT란 진짜 무엇인가?
JWT의 구성
JWT는 "."을 구분으로 3가지의 문자열로 구성되어 있다.

이렇게 3가지 부분으로 나뉘어있는 토큰을 하나하나 설명해본다.
헤더(Header)
헤더는 두가지의 정보를 가지고 있다.
- typ : 토큰의 타입을 지정한다. 여기서는 JWT.
- alg : 해싱 알고리즘을 지정한다. 해싱 알고리즘으로는 보통 HMAC SHA256 혹은 RSA가 사용된다. 오늘 설명할 부분이기도 하다.
|
1
|
{ "typ" : "JWT", "alg" : "HS256" }
|
cs |
이 JSON 형태의 헤더정보를 base64로 인코딩하게 되면 토큰의 첫번째 헤더부분에 위치하게 된다.
정보(Payload)
Payload 부분에는 토큰에 담을 정보가 들어있다. Payload에 담기는 정보의 한 조각을 'Claim'이라고 부르고, 이는 키-값형태의 한쌍을 의미한다. 그렇다면 Payload는 'Claim'들의 모임인 'Claims'가 된다. 이런 클레임에는 크게 세분류로 나뉘어져있다.
- 등록된(registered) 클레임
- 공개(public)클레임
- 비공개(private)클레임
등록된 클레임
- iss : 토큰 발급자(issuer)
- sub : 토큰 제목(subject)
- aud : 토큰 대상자(audience)
- exp : 토큰의 만료시간, 시간은 NumericDate 형식으로 되어있어야한다.(ex. 1241421414124141)
- iat : 토큰이 발급된 시간(issued at), 이 값을 이용하여 토큰의 age를 판단할 수 있다.
- jti : JWT의 고유 식별자로써, 주로 중복적인 처리를 방지하기 위하여 사용된다.
위에 설명된 것보다 등록된 클레임 종류는 더 있을 것이다.
공개 클레임
공개클레임들은 충돌이 방지된 이름을 가지고 있어야한다. 충돌을 방지하기 위해서는, 클레임 이름을 URI형식으로 짓는다.
|
1
2
3
|
{
"https://jwt.com/jwt_claims/is_admin" : true
}
|
cs |
비공개 클레임
등록된 클레임도 아니고, 공개된 클레임도 아니다. 양 측간에 협의하에 사용되는 클레임 이름들이다. 공개 클레임과는 달리 이름이 중복되어 충돌이 될 수 있다.
|
1
|
{ "username" : "yeoseonggae" }
|
cs |
이러한 Payload가 base64로 인코딩되면 토큰의 두번째 자리에 위치하게 된다.
서명
사실 오늘 포스팅한 주제에 해당 되는 부분이다. 이부분은 헤더의 인코딩 값과, Payload의 인코딩 값을 합친 후 주어진 비밀키로 해쉬 값을 생성한다. 이렇게 만든 해쉬를 다시 base64로 인코딩하면 세번째 자리에 위치하게 되는 값이 된다. 그렇다면 서명은 왜 필요한 것일까?
JWT토큰 인증 방법의 큰 장점 중 하나는 토큰의 유효성을 검사하기 위하여 Resource Server(보호된 API를 가지고 있는 서버)가 인증서버(Authorization Server)로 토큰을 전송하지 않는 다는 점이다. JWT 토큰을 사용하지 않는 토큰 인증 방법은 Resource Server가 토큰값을 받으면 이 토큰값 검사를 위하여 인증 서버 혹은 토큰이 저장된 저장소에서 토큰을 꺼내와 토큰의 유효성을 검사하곤 했다. 사용자가 적으면 문제 없지만 사용자가 대고객이라면? 인증서버 혹은 토큰의 저장소(Redis,RDBMS)에 큰 무리가 갈것이다. 하지만 JWT 토큰은 자체적으로 토큰 유효성 검사가 가능하다 ! 그 이유는 오늘 설명할 HMAC이다.(물론 HMAC이 아니라 RSA도 있다.) Resource Server는 토큰 유효성을 검사하기 위해 인증서버 혹은 토큰이 저장된 저장소에서 토큰을 가져올 필요가 없다. 단순히 JWT토큰을 받아서 해당 토큰이 위변조되었는지만 확인하여 위변조가 되지 않으면 JWT토큰 내부에서 사용자 정보를 꺼내 사용할 수 있기 때문이다. 바로 이렇게 토큰의 위변조가 있었는지 혹은 위변조를 방지하는 기법 중 하나를 HMAC(Hash-based Message Authentication)이라고 한다.
해싱은 원문(Plain Text)을 일정 길이의 바이트로 변환하는데 그 결과가 유일하여 긴 문장의 빠른 검색을 위한 키 값으로 많이 쓰인다. 그리고 해시된 결과를 사용해서 거꾸로 원문을 복구할 수 없다는 것이 해시를 사용하는 고유한 가치라고 할 수 있다. 이러한 해시의 특성을 사용하여 데이터의 위변조 여부를 알아낼 수 있다.

출처 : http://blog.jakeymvc.com/sso-hmac/
- 사전에 Sender와 Receiver는 별도 채널로 해시에 사용할 키(Share key)를 공유한다. 그리고, 양쪽에서 사용할 해시 알고리즘을 정한다.
- Sender는 공유키를 사용해서 UserId를 해시한다.
- Sender는 원본 UserId와 그 해시결과(HMAC)을 쿼리스트링 값으로 Receiver에게 전달한다.
- Receiver는 받은 UserId를 공유키를 사용하여 같은 알고리즘으로 해시한 결과(Receiver's HMAC)를 만든다.
- Receiver가 만든 HMAC과 쿼리스트링으로 받은 HMAC이 같다면 UserId는 변경되지 않았다고 신뢰할 수 있다.
UserId + Sharekey = HMAC 이라는 공식에서 UserId를 변경한다면 그 결과인 HMAC도 변경된다. 따라서, 위조한 UserId가 Receiver에서 인정 받으려면 똑같은 해싱 과정을 거쳐 HMAC을 제공해야하는데, 공유키와 해시 알고리즘을 알지 못하면 어려운 일인 것이다.
즉, JWT는 이러한 위변조 방지 방법을 이용하여 인증서버 없이도 Resource Server에서 안전한 토큰 유효성 검사가 가능한 것이다. 물론 우리가 인증에 사용하는 JWT는 위에서 설명한 HMAC 플로우랑은 조금 다를 수 있다. 하지만 이번 포스팅의 목적은 이러한 HMAC을 이용하여 토큰의 유효성을 검사한다라는 것을 알기 위한 포스팅이기에 직접 프로젝트에 JWT인증 방법을 도입하려면 적당한 플로우를 적용시켜야 할 것이다.
오늘 포스팅할 내용은 Spring Security이다. 사실 필자는 머리가 나빠서 그런지 모르겠지만, 아무리 구글링을 통해 스프링 시큐리티를 검색해도 이렇다할 명쾌한 해답을 얻지 못했다. 대부분 이론적인 설명들은 잘 해주시는 분들이 많지만 실사례로 묵은 채증을 내려주지는 못했다.레퍼런스 또한 마찬가지이다. 영어를 잘 못하는 나로써는 잘 안되는 머릿속 몇 안되는 영어단어를 떠올리고 혹은 정말 모르는 문장은 번역기를 돌려서 보니 오히려 혼란만 가중되었다. 그래서 맘먹고 몇일을 스프링 시큐리티를 파고 들어보니 어느정도 사용할 정도가 되어서 이렇게 포스팅하게 된다. 아마 포스팅은 3~4개 정도로 이어질 것같다. 이번 포스팅에서는 토큰 기반 인증 직전까지의 포스팅이 될 것같고, 다음 포스팅은 이어서 JWT 토큰을 이용할 것이며 마지막으로는 OAuth2.0 포스팅으로 마무리를 지을 것같다. 우선 예제를 들어가기전에 스프링 시큐리티(Spring Security)란 무엇이고, 어떠한 아키텍쳐와 사상으로 이루어져있는지 설명할 것이다. 마지막으로 이번 포스팅을 보며 필자와 같이 스프링 시큐리티에 대해 헤매고 있는 분의 묵은 채증이 쑥 하고 내려갔으면 한다. 모든 예제는 spring boot 2.1.3.RELEASE으로 진행하였고, 모든 설정은 Java Config로 진행하였다.
보안 용어
필자가 솔직하게 스프링 시큐리티에 대해 알아보려고 많은 블로그를 돌아다니고 레퍼런스를 보면서 이해하지 못했던 이유중 하나는 바로 보안 용어에 대한 이해가 부족했기 때문이라고 생각한다. 스프링 시큐리티를 접하기 이전 밑에서 나열할 보안 용어들은 정말 필수로 숙지해야 할 것 같다.
- 접근 주체(Principal) : 보호된 리소스에 접근하는 대상
- 인증(Authentication) : 보호된 리소스에 접근한 대상에 대해 이 유저가 누구인지, 애플리케이션의 작업을 수행해도 되는 주체인지 확인하는 과정(ex. Form 기반 Login)
- 인가(Authorize) : 해당 리소스에 대해 접근 가능한 권한을 가지고 있는지 확인하는 과정(After Authentication, 인증 이후)
- 권한 : 어떠한 리소스에 대한 접근 제한, 모든 리소스는 접근 제어 권한이 걸려있다. 즉, 인가 과정에서 해당 리소스에 대한 제한된 최소한의 권한을 가졌는지 확인한다.
Spring Security(스프링 시큐리티)란?
스프링 시큐리티는 스프링 기반의 애플리케이션의 보안(인증과 권한,인가 등)을 담당하는 스프링 하위 프레임워크이다. 주로 서블릿 필터와 이들로 구성된 필터체인으로의 위임모델을 사용한다. 그리고 보안과 관련해서 체계적으로 많은 옵션을 제공해주기 때문에 개발자 입장에서는 일일이 보안관련 로직을 작성하지 않아도 된다.
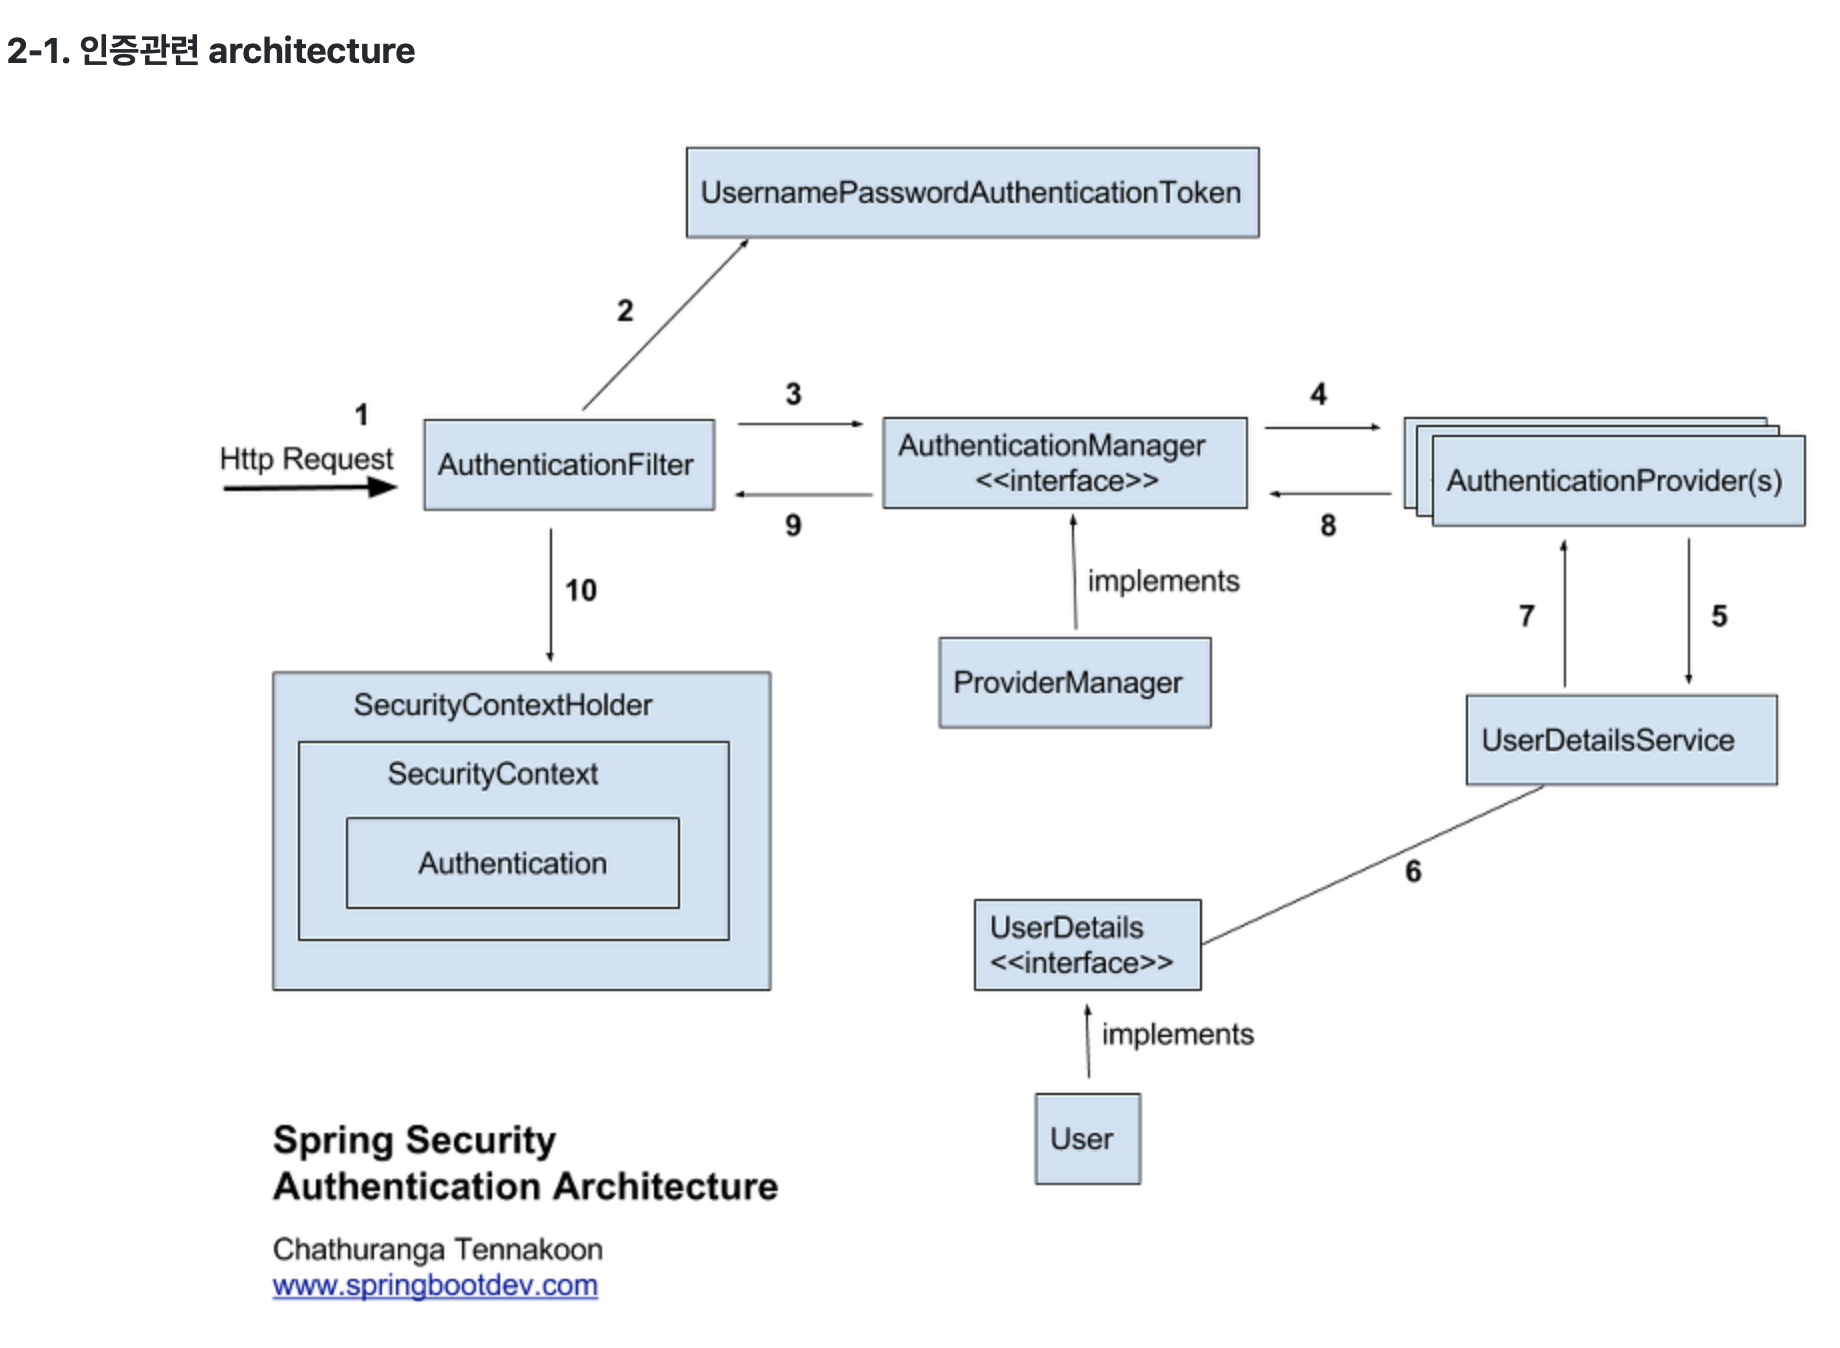
위의 그림은 Form 기반 로그인에 대한 플로우를 보여주는 그림이다.
- 사용자가 Form을 통해 로그인 정보를 입력하고 인증 요청을 보낸다.
- AuthenticationFilter(사용할 구현체 UsernamePasswordAuthenticationFilter)가 HttpServletRequest에서 사용자가 보낸 아이디와 패스워드를 인터셉트한다. 프론트 단에서 유효성검사를 할 수도 있지만, 무엇보다 안전! 안전을 위해서 다시 한번 사용자가 보낸 아이디와 패스워드의 유효성 검사를 해줄 수 있다.(아이디 혹은 패스워드가 null인 경우 등) HttpServletRequest에서 꺼내온 사용자 아이디와 패스워드를 진짜 인증을 담당할 AuthenticationManager 인터페이스(구현체 - ProviderManager)에게 인증용 객체(UsernamePasswordAuthenticationToken)로 만들어줘서 위임한다.
- AuthenticationFilter에게 인증용 객체(UsernamePasswordAuthenticationToken)을 전달받는다.
- 실제 인증을 할 AuthenticationProvider에게 Authentication객체(UsernamePasswordAuthenticationToken)을 다시 전달한다.
- DB에서 사용자 인증 정보를 가져올 UserDetailsService 객체에게 사용자 아이디를 넘겨주고 DB에서 인증에 사용할 사용자 정보(사용자 아이디, 암호화된 패스워드, 권한 등)를 UserDetails(인증용 객체와 도메인 객체를 분리하지 않기 위해서 실제 사용되는 도메인 객체에 UserDetails를 상속하기도 한다.)라는 객체로 전달 받는다.
- AuthenticationProvider는 UserDetails 객체를 전달 받은 이후 실제 사용자의 입력정보와 UserDetails 객체를 가지고 인증을 시도한다.
- 8. 9. 10. 인증이 완료되면 사용자 정보를 가진 Authentication 객체를 SecurityContextHolder에 담은 이후 AuthenticationSuccessHandle를 실행한다.(실패시 AuthenticationFailureHandler를 실행한다.)
여기까지 간단히 Form 로그인에 대한 플로우를 설명했다. 사실 글로 보면 이해가 잘되지 않을 수 있다. 이후에 실제 코드를 예를 들어서 설명할 것이다.
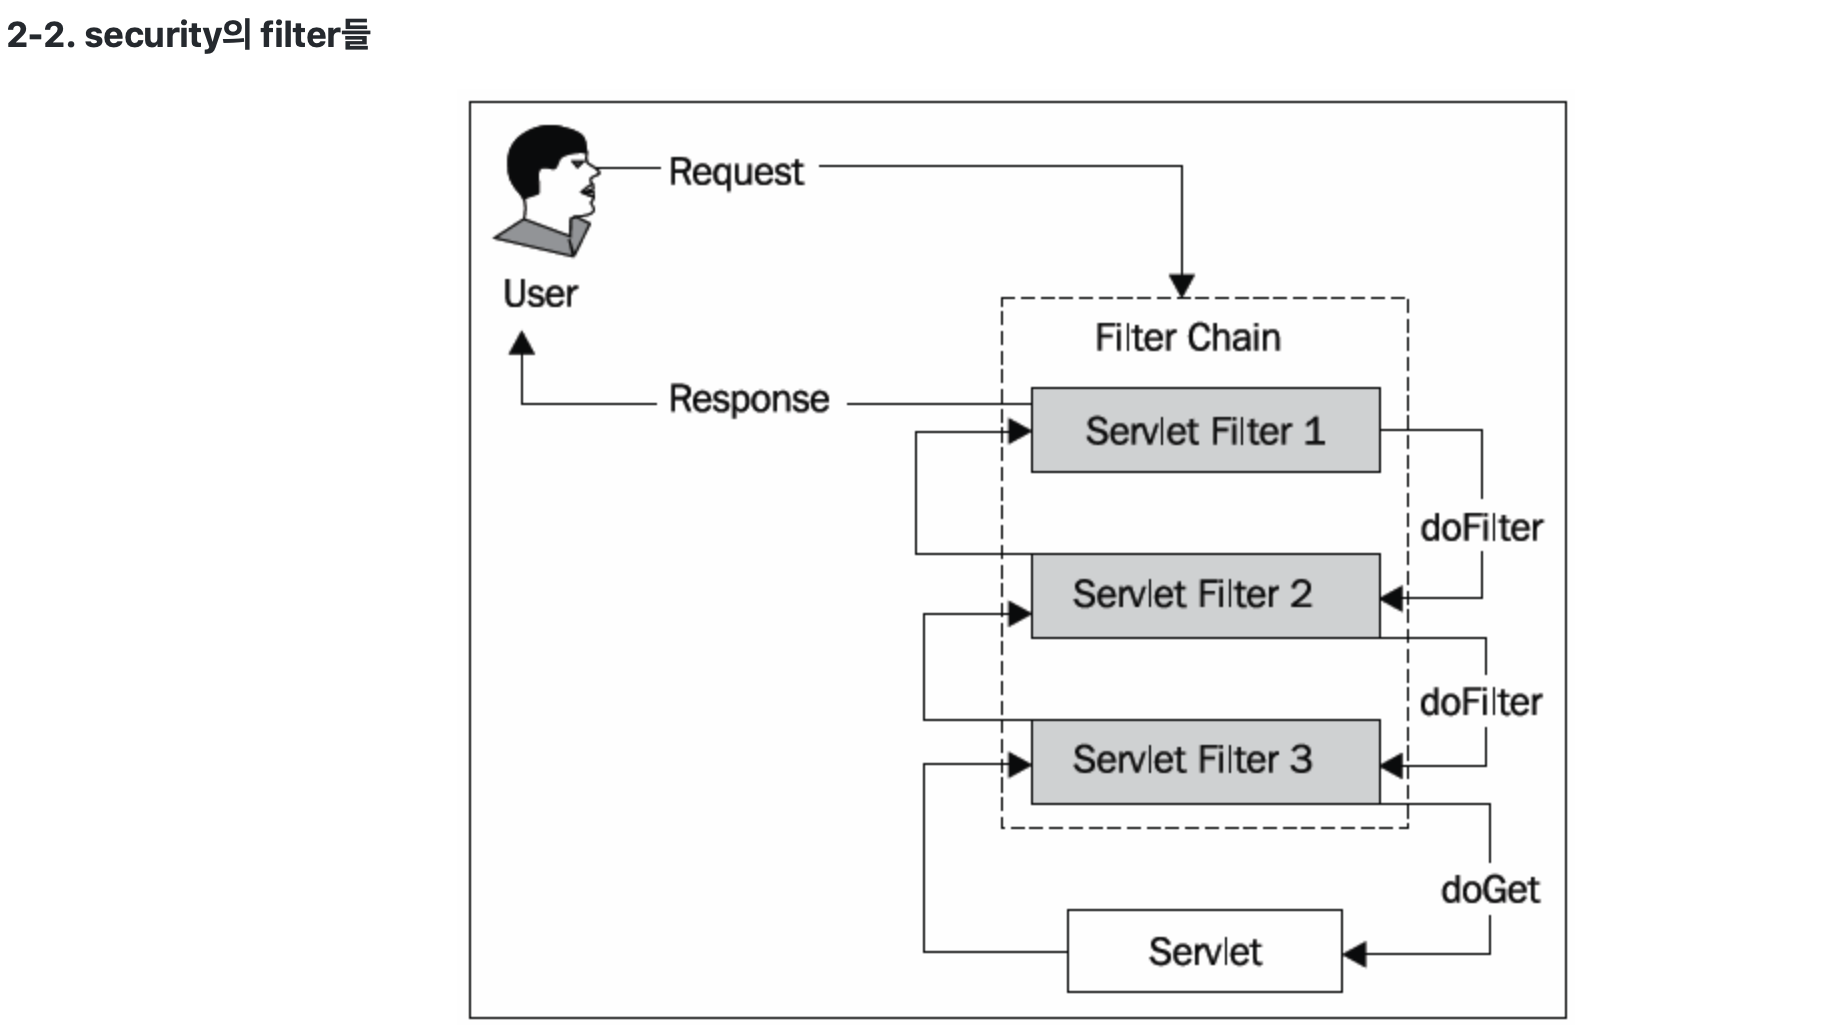
- SecurityContextPersistenceFilter : SecurityContextRepository에서 SecurityContext를 가져오거나 저장하는 역할을 한다. (SecurityContext는 밑에)
- LogoutFilter : 설정된 로그아웃 URL로 오는 요청을 감시하며, 해당 유저를 로그아웃 처리
- (UsernamePassword)AuthenticationFilter : (아이디와 비밀번호를 사용하는 form 기반 인증) 설정된 로그인 URL로 오는 요청을 감시하며, 유저 인증 처리
- AuthenticationManager를 통한 인증 실행
- 인증 성공 시, 얻은 Authentication 객체를 SecurityContext에 저장 후 AuthenticationSuccessHandler 실행
- 인증 실패 시, AuthenticationFailureHandler 실행
- DefaultLoginPageGeneratingFilter : 인증을 위한 로그인폼 URL을 감시한다.
- BasicAuthenticationFilter : HTTP 기본 인증 헤더를 감시하여 처리한다.
- RequestCacheAwareFilter : 로그인 성공 후, 원래 요청 정보를 재구성하기 위해 사용된다.
- SecurityContextHolderAwareRequestFilter : HttpServletRequestWrapper를 상속한 SecurityContextHolderAwareRequestWapper 클래스로 HttpServletRequest 정보를 감싼다. SecurityContextHolderAwareRequestWrapper 클래스는 필터 체인상의 다음 필터들에게 부가정보를 제공한다.
- AnonymousAuthenticationFilter : 이 필터가 호출되는 시점까지 사용자 정보가 인증되지 않았다면 인증토큰에 사용자가 익명 사용자로 나타난다.
- SessionManagementFilter : 이 필터는 인증된 사용자와 관련된 모든 세션을 추적한다.
- ExceptionTranslationFilter : 이 필터는 보호된 요청을 처리하는 중에 발생할 수 있는 예외를 위임하거나 전달하는 역할을 한다.
- FilterSecurityInterceptor : 이 필터는 AccessDecisionManager 로 권한부여 처리를 위임함으로써 접근 제어 결정을 쉽게해준다.
2-3. Authentication
접근 주체는 Authentication 객체를 생성한다. 이 객체는 SecurityContext(내부 메모리)에 보관되고 사용되어진다.
|
1
2
3
4
5
6
7
8
|
public interface Authentication extends Principal, Serializable {
Collection<? extends GrantedAuthority> getAuthorities(); // Authentication 저장소에 의해 인증된 사용자의 권한 목록
Object getCredentials(); // 주로 비밀번호
Object getDetails(); // 사용자 상세정보
Object getPrincipal(); // 주로 ID
boolean isAuthenticated(); //인증 여부
void setAuthenticated(boolean isAuthenticated) throws IllegalArgumentException;
}
|
cs |
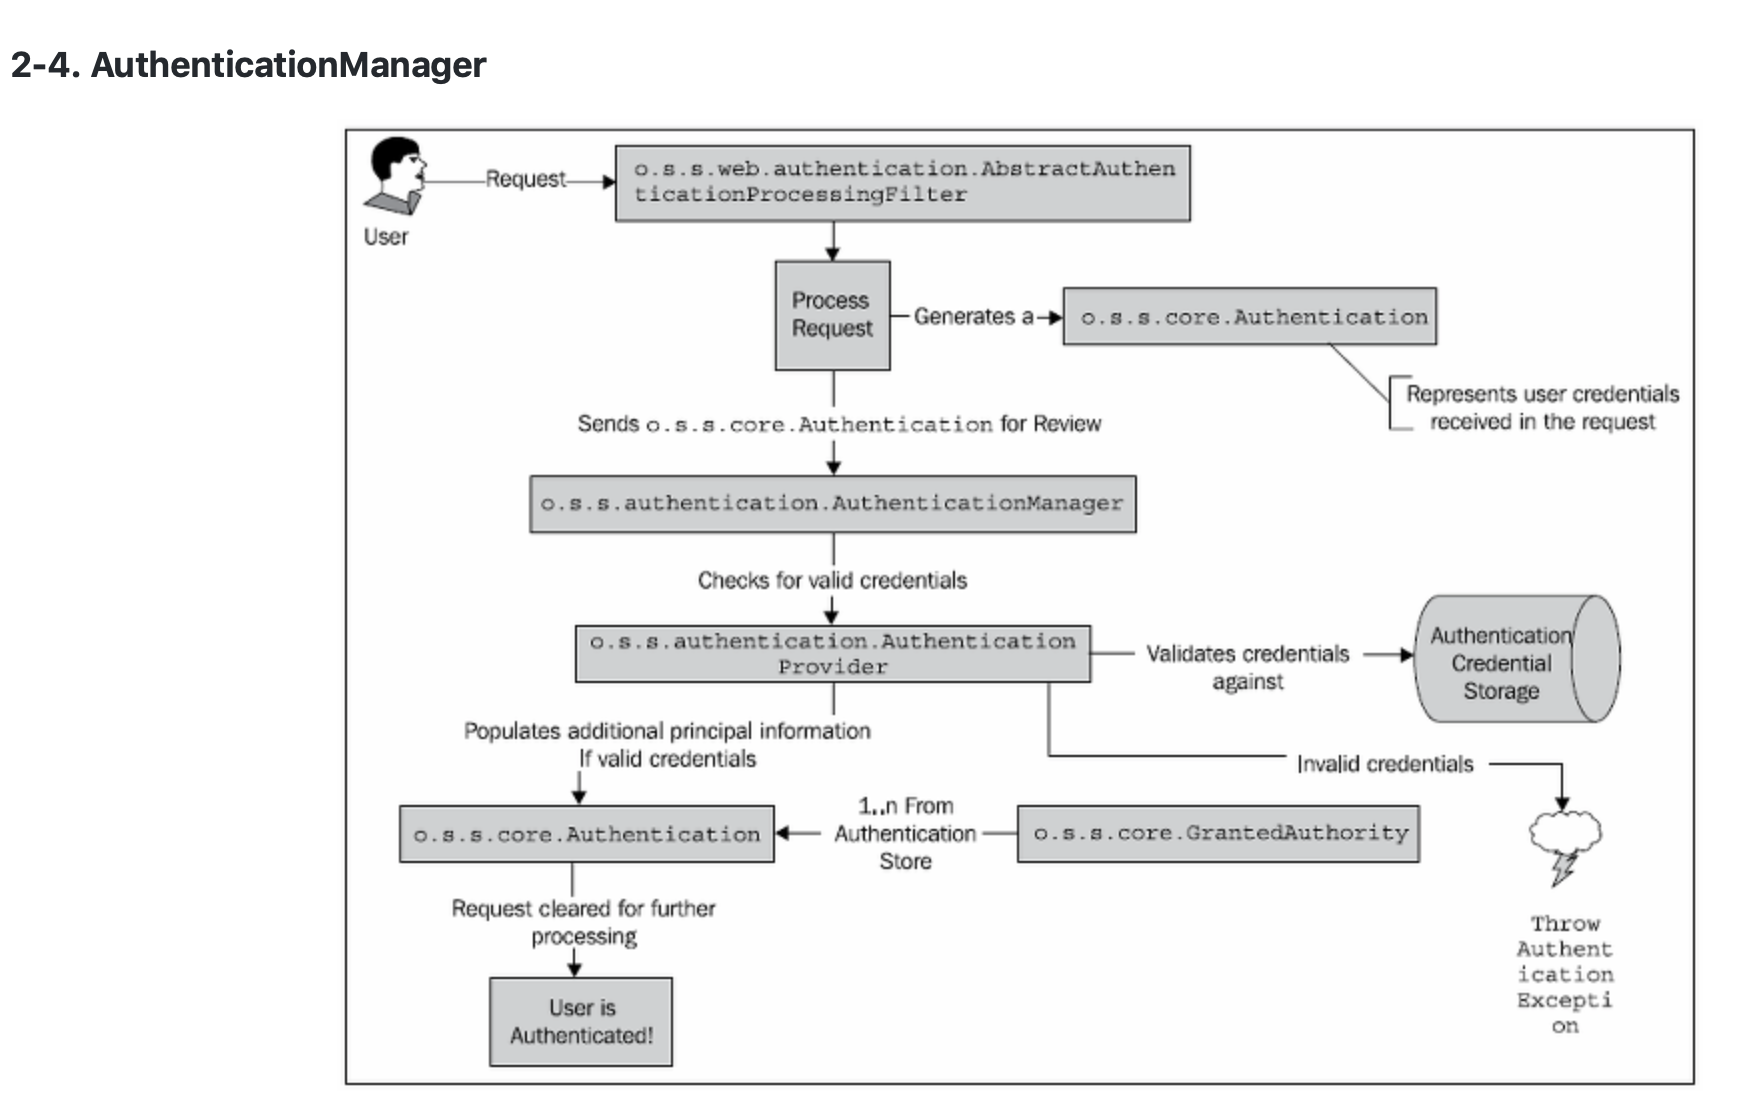
유저의 요청을 AuthenticationFilter에서 Authentication 객체로 변환해 AuthenticationManager(ProviderManager)에게 넘겨주고, AuthenticationProvider(DaoAuthenticationProvider)가 실제 인증을 한 이후에 인증이 완료되면 Authentication객체를 반환해준다.
- AbstractAuthenticationProcessingFilter : 웹 기반 인증요청에서 사용되는 컴포넌트로 POST 폼 데이터를 포함하는 요청을 처리한다. 사용자 비밀번호를 다른 필터로 전달하기 위해서 Authentication 객체를 생성하고 일부 프로퍼티를 설정한다.
- AuthenticationManager : 인증요청을 받고 Authentication을 채워준다.
- AuthenticationProvider : 실제 인증이 일어나고 만약 인증 성공시 Authentication 객체의 authenticated = true로 설정해준다.
Spring Security 는 ProviderManager 라는 AuthenticationManager 인터페이스의 유일한 구현체를 제공한다. ProviderManager 는 하나 또는 여러 개의 AuthenticationProvider 구현체를 사용할 수 있다. AuthenticationProvider는 많이 사용되고 ProviderManager(AuthenticationManager 의 구현체) 와도 잘 통합되기 때문에 기본적으로 어떻게 동작하는 지 이해하는 것이 중요하다.
2-5. 비밀번호 인증과정
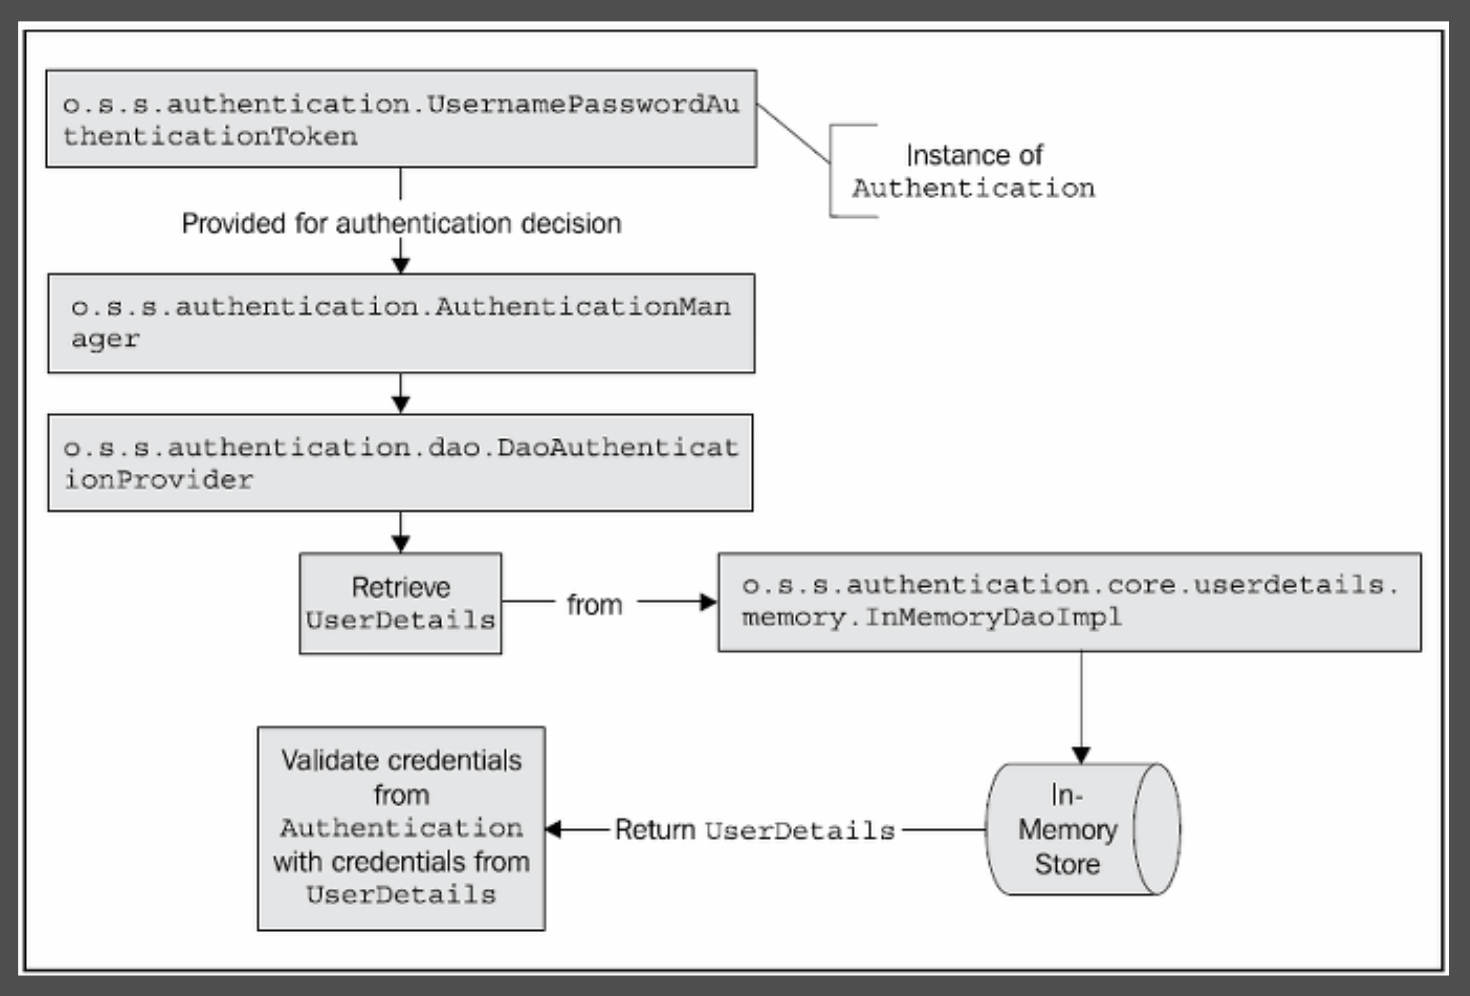
DaoAuthenticationProvider 는 UserDetailsService 타입 오브젝트로 위임한다. UserDetailsService 는 UserDetails 구현체를 리턴하는 역할을 한다. UserDetails 인터페이스는 이전에 설명한 Authentication 인터페이스와 상당히 유사하지만 서로 다른 목적을 가진 인터페이스이므로 헷갈리면 안된다.
- Authentication : 사용자 ID, 패스워드와 인증 요청 컨텍스트에 대한 정보를 가지고 있다. 인증 이후의 사용자 상세정보와 같은 UserDetails 타입 오브젝트를 포함할 수도 있다.
- UserDetails : 이름, 이메일, 전화번호와 같은 사용자 프로파일 정보를 저장하기 위한 용도로 사용한다.
2-6. 인증예외
인증과 관련된 모든 예외는 AuthenticationException 을 상속한다. AuthenticationException 은 개발자에게 상세한 디버깅 정보를 제공하기위한 두개의 멤버 필드를 가지고 있다.
- authentication : 인증 요청관련 Authentication 객체를 저장하고 있다.
- extraInformation : 인증 예외 관련 부가 정보를 저장한다. 예를 들어 UsernameNotFoundException 예외는 인증에 실패한 유저의 id 정보를 저장하고 있다.
많이 발생하는 예외들.
- BadCredentialsException : 사용자 아이디가 전달되지 않았거나 인증 저장소의 사용자 id 에 해당하는 패스워드가 일치하지 않을 경우 발생한다.
- LockedException : 사용자 계정이 잠긴경우 발생한다.
- UsernameNotFoundException : 인증 저장소에서 사용자 ID를 찾을 수 없거나 사용자 ID에 부여된 권한이 없을 경우 발생한다.
접근권한 부여
자동으로 설정된 Spring Security 필터 체인의 마지막 서블릿 필터는 FilterSecurityInterceptor 이다. 이 필터는 해당 요청의 수락 여부를 결정한다. FilterSecurityInterceptor 가 실행되는 시점에는 이미 사용자가 인증되어 있을 것이므로 유효한 사용자인지도 알 수 있다. Authentication 인터페이스에는 List<GrantedAuthority> getAuthorities() 라는 메소드가 있다는 것을 상기해 보자. 이 메소드는 사용자 아이디에 대한 권한 목록을 리턴한다. 권한처리시에 이 메소드가 제공하는 권한정보를 참조해서 해당 요청의 승인 여부를 결정하게 된다.
Access Decision Manager 라는 컴포넌트가 인증 확인을 처리한다. AccessDecisionManager 인터페이스는 인증 확인을 위해 두 가지 메소드를 제공한다.
- supports : AccessDecisionManager 구현체는 현재 요청을 지원하는지의 여부를 판단하는 두개의 메소드를 제공한다. 하나는 java.lang.Class 타입을 파라미터로 받고 다른 하나는 ConfigAttribute 타입을 파라미터로 받는다.
- decide : 이 메소드는 요청 컨텍스트와 보안 설정을 참조하여 접근 승인여부를 결정한다. 이 메소드에는 리턴값이 없지만 접근 거부를 의미하는 예외를 던져 요청이 거부되었음을 알려준다.
인증과정에서 발생할 수 있는 예상 가능한 에러를 처리하는 AuthenticationException 과 하위 클래스를 사용했던 것처럼 특정 타입의 예외 클래스들을 사용하면 권한처리를 하는 애플리케이션의 동작을 좀더 세밀하게 제어할 수 있다.
AccessDecisionManager 는 표준 스프링 빈 바인딩과 레퍼런스로 완벽히 설정할 수 있다.디폴트 AccessDecisionManager 구현체는 AccessDecisionVoter 와 Vote 취합기반 접근 승인 방식을 제공한다.
Voter 는 권한처리 과정에서 다음 중 하나 또는 전체를 평가한다.
- 보호된 리소스에 대한 요청 컨텍스트 (URL 을 접근하는 IP 주소)
- 사용자가 입력한 비밀번호
- 접근하려는 리소스
- 시스템에 설정된 파라미터와 리소스
AccessDecisionManager 는 요청된 리소스에 대한 access 어트리뷰트 설정을 보터에게 전달하는 역할도 하므로 보터는 웹 URL 관련 access 어트리뷰트 설정 정보를 가지게 된다.
Voter는 사용할 수 있는 정보를 사용해서 사용자의 리소스에 대한 접근 허가 여부를 판단한다. 보터는 접근 허가 여부에 대해서 세 가지 중 한 가지로 결정하는데, 각 결정은 AccessDecisionVoter 인터페이스에 다음과 같이 상수로 정의되어 있다.
- Grant(ACCESS_GRANTED) : Voter 가 리소스에 대한 접근 권한을 허가하도록 권장한다.
- Deny(ACCESS_DENIED) : Voter 가 리소스에 대한 접근 권한을 거부하도록 권장한다.
- Abstain(ACCESS_ABSTAIN) : Voter 는 리소스에 대한 접근권한 결정을 보류한다. 이 결정 보류는 다음과 같은 경우에 발생할 수 있다.
1. Voter 가 접근권한 판단에 필요한 결정적인 정보를 가지고 있지 않은 경우
2.Voter 가 해당 타입의 요청에 대해 결정을 내릴 수 없는 경우
Java Config 기반 코드 설명
|
1
2
3
4
5
6
7
8
9
10
11
12
13
14
15
16
17
18
19
20
21
22
23
24
25
26
27
28
29
30
31
32
33
34
35
36
37
38
39
40
41
42
43
44
45
46
47
48
49
50
51
52
53
54
55
56
57
58
59
60
61
62
63
64
65
66
67
68
69
70
71
72
73
74
75
76
77
78
79
80
81
82
83
84
85
86
87
88
89
90
91
92
93
94
95
96
97
98
99
100
101
102
103
104
105
106
107
108
109
110
111
112
113
114
115
116
117
118
119
120
121
122
123
124
125
126
127
128
129
130
131
132
133
134
135
136
137
138
139
140
141
142
143
144
145
146
147
148
|
/**
*
* @author yun-yeoseong
*
*/
@EnableWebSecurity
public class SpringSecurityConfig extends WebSecurityConfigurerAdapter{
// private UserDetailsService userDetailsService;
// private PasswordEncoder passwordEncoder;
private AuthenticationProvider authenticationProvider;
public SpringSecurityConfig(/*UserDetailsService userDetailsService,
PasswordEncoder passwordEncoder,*/
AuthenticationProvider authenticationProvider) {
// this.userDetailsService = userDetailsService;
// this.passwordEncoder = passwordEncoder;
this.authenticationProvider = authenticationProvider;
}
/*
* 스프링 시큐리티가 사용자를 인증하는 방법이 담긴 객체.
*/
@Override
protected void configure(AuthenticationManagerBuilder auth) throws Exception {
/*
* AuthenticationProvider 구현체
*/
auth.authenticationProvider(authenticationProvider);
// auth.userDetailsService(userDetailsService).passwordEncoder(passwordEncoder);
}
/*
* 스프링 시큐리티 룰을 무시하게 하는 Url 규칙.
*/
@Override
public void configure(WebSecurity web) throws Exception {
web.ignoring()
.antMatchers("/resources/**")
.antMatchers("/css/**")
.antMatchers("/vendor/**")
.antMatchers("/js/**")
.antMatchers("/favicon*/**")
.antMatchers("/img/**")
;
}
/*
* 스프링 시큐리티 룰.
*/
@Override
protected void configure(HttpSecurity http) throws Exception {
http.authorizeRequests()
.antMatchers("/login*/**").permitAll()
.antMatchers("/logout/**").permitAll()
.antMatchers("/chatbot/**").permitAll()
.anyRequest().authenticated()
.and().logout()
.logoutUrl("/logout")
.logoutSuccessHandler(logoutSuccessHandler())
.and().csrf()
.disable()
.addFilter(jwtAuthenticationFilter())
.addFilter(jwtAuthorizationFilter())
.exceptionHandling()
.accessDeniedHandler(accessDeniedHandler())
.authenticationEntryPoint(authenticationEntryPoint())
// .and().sessionManagement()
// .sessionCreationPolicy(SessionCreationPolicy.STATELESS)
;
}
/*
* SuccessHandler bean register
*/
@Bean
public AuthenticationSuccessHandler authenticationSuccessHandler() {
CustomAuthenticationSuccessHandler successHandler = new CustomAuthenticationSuccessHandler();
successHandler.setDefaultTargetUrl("/index");
return successHandler;
}
/*
* FailureHandler bean register
*/
@Bean
public AuthenticationFailureHandler authenticationFailureHandler() {
CustomAuthenticationFailureHandler failureHandler = new CustomAuthenticationFailureHandler();
failureHandler.setDefaultFailureUrl("/loginPage?error=error");
return failureHandler;
}
/*
* LogoutSuccessHandler bean register
*/
@Bean
public LogoutSuccessHandler logoutSuccessHandler() {
CustomLogoutSuccessHandler logoutSuccessHandler = new CustomLogoutSuccessHandler();
logoutSuccessHandler.setDefaultTargetUrl("/loginPage?logout=logout");
return logoutSuccessHandler;
}
/*
* AccessDeniedHandler bean register
*/
@Bean
public AccessDeniedHandler accessDeniedHandler() {
CustomAccessDeniedHandler accessDeniedHandler = new CustomAccessDeniedHandler();
accessDeniedHandler.setErrorPage("/error/403");
return accessDeniedHandler;
}
/*
* AuthenticationEntryPoint bean register
*/
@Bean
public AuthenticationEntryPoint authenticationEntryPoint() {
return new CustomAuthenticationEntryPoint("/loginPage?error=e");
}
/*
* Form Login시 걸리는 Filter bean register
*/
@Bean
public JwtAuthenticationFilter jwtAuthenticationFilter() throws Exception {
JwtAuthenticationFilter jwtAuthenticationFilter = new JwtAuthenticationFilter(authenticationManager());
jwtAuthenticationFilter.setFilterProcessesUrl("/login");
jwtAuthenticationFilter.setUsernameParameter("username");
jwtAuthenticationFilter.setPasswordParameter("password");
jwtAuthenticationFilter.setAuthenticationSuccessHandler(authenticationSuccessHandler());
jwtAuthenticationFilter.setAuthenticationFailureHandler(authenticationFailureHandler());
jwtAuthenticationFilter.afterPropertiesSet();
return jwtAuthenticationFilter;
}
/*
* Filter bean register
*/
@Bean
public JwtAuthorizationFilter jwtAuthorizationFilter() throws Exception {
JwtAuthorizationFilter jwtAuthorizationFilter = new JwtAuthorizationFilter(authenticationManager());
return jwtAuthorizationFilter;
}
}
|
cs |
우선 @EnableWebSecurity 어노테이션을 통해 스프링 시큐리티를 사용하겠다라고 선언한다. 그리고 해당 클래스는 WebSecurityConfigurerAdapter를 상속받는다. 첫번째 AuthenticationManagerBuilder를 인자로 받는 configure 메소드는 인증을 담당할 프로바이더 구현체를 설정하는 메소드이다. 현재는 Custom한 Provider를 직접구현하였지만, 밑에 주석에서 보이듯 UserDetailsService 구현체와 PasswordEncoder 구현체만 설정하여서 기본 DaoAuthenticationProvider를 사용하게 할 수도 있다. 그리고 위에서도 설명했듯 AuthenticationProvider는 여러개를 등록가능하다. 두번째 WebSecurity를 인자로 받는 configure 메소드는 스프링 시큐리티 필터에서 제외될 URI를 설정하는 메소드이다. 세번째 HttpSecurity를 인자로 받는 configure메소드가 가장 중요하다. 해당 메소드에는 요청 URI에 대한 권한 설정, 특정 기능 결과에 대한 Handler 등록, Custom Filter 등록(ex. AuthenticationFilter 재정의) 그리고 예외 핸들러 등을 등록 하는 메소드이다. 사실 여기에 왠만한 설정들이 다 들어간다고 해도 무방하다. 가장 중요한 만큼 세번째 메소드 설정은 짚고 넘어갈 것이다.
- 53~57 Line : 보호된 리소스 URI에 접근할 수 있는 권한을 설정해주는 설정이다. AccessDecisionManager에 설정되는 access 정보이다. 이 설정들은 추후 FilterSecurityInterceptor에서 권한 인증에 사용될 정보들이다.
- 58~60 Line : 로그아웃 기능에 대한 설명이다. logoutUrl()을 통해 로그아웃 기능에 대한 RequestUri정보를 전달한다. 그리고 .logoutSuccessHandler()를 통해 로그아웃이 성공적으로 끝나면 수행될 핸들러를 등록해준다.
- 61~62 Line : csrf().disable()을 통하여 csrf 보안 설정을 비활성화한다.(해당 기능을 사용하기 위해서는 프론트에서 csrf토큰값을 보내주어야함. 예제라 생략)
- 63 Line : Form Login에 사용되는 custom AuthenticationFilter 구현체를 등록해준다.
- 64 Line : Header 인증에 사용되는 BasicAuthenticationFilter 구현체를 등록해준다.(다음 포스팅에서 JWT Token 기반 인증에 본격적으로 사용될 필터이다.)
- 65~ Line : 예외 핸들러를 등록해주는 설정이다. accessDeniedHandler()는 권한 체크에서 실패할 때 수행되는 핸들러를 등록하고, authenticationEntryPoint()는 현재 인증된 사용자가 없는데(SecurityContext에 인증사용자가 담기지 않음) 인증되지 않은 사용자가 보호된 리소스에 접근하였을 때, 수행되는 핸들러(EntryPoint)를 등록해준다.
- 124~137 Line : AuthenticationFilter 설정이다. 우선 위에서 말했듯 AuthenticationFilter는 AuthenticationManager에게 위임한다했다. 그렇기 때문에 AuthenticationManager를 생성자로 전달한다. 그리고 setFilterProcessesUrl()을 통해 로그인 요청 URI를 정의해준다.(스프링이 제공하므로 따로 컨트롤러 등록할 필요가 없다. logout URI도 똑같이 스프링에서 제공한다. 하지만 SuccessHandler나 FailureHandler,EntryPoint는 컨트롤러에 등록된 URI로 설정해야한다.) setUsernameParameter(),setPasswordParameter()를 통해 폼으로 넘어오는 사용자 아이디,패스워드 변수값을 설정한다.(<input>의 name속성이라고 생각하면된다.) setAuthenticationSuccess,FailureHandler()를 통해 결과에 대해 수행할 핸들러를 등록한다.
나머지 밑의 빈등록을 위한 메소드들은 직접 custom하게 구현한 클래스들이다. 사실 직접 구현하지 않아도 될 것까지 구현할 것들도 있지만, 직접 구현함으로써 "아~ 이런 클래스가 이런 역할을 하는구나"를 이해하기 위해(디버깅 혹은 행동 재정의) 직접 구현체를 생성해주었다.
- AuthenticationSuccessHandler : Form Login(AuthenticationFilter)에서 인증이 성공했을 때 수행될 핸들러이다. 예제에서는 SimpleUrlAuthenticationSuccessHandler를 상속한 SavedRequestAwareAuthenticationSuccessHandler를 다시 상속한 CustomAuthenticationSuccessHandler를 등록해주었다. 이것은 현재 단순히 성공시 index 페이지로 리다이렉트 하는 역할을 수행한다.
|
1
2
3
4
5
6
7
8
9
10
11
12
13
14
15
16
17
18
19
20
21
22
23
24
25
26
|
/**
* 실패시 행동을 재정의할 클래스(추상 클래스가 아닌 인터페이스를 구현해도 된다.)
* Or Interface - AuthenticationSuccessHandler
* @author yun-yeoseong
*
*/
@Slf4j
public class CustomAuthenticationSuccessHandler extends SavedRequestAwareAuthenticationSuccessHandler implements ExceptionProcessor{
@Override
public void onAuthenticationSuccess(HttpServletRequest request, HttpServletResponse response,
Authentication authentication) throws ServletException, IOException {
log.debug("CustomAuthenticationSuccessHandler.onAuthenticationSuccess ::::");
/*
* 쿠키에 인증 토큰을 넣어준다.
*/
super.onAuthenticationSuccess(request, response, authentication);
}
@Override
public void makeExceptionResponse(HttpServletRequest request, HttpServletResponse response,
Exception exception) {
}
}
|
cs |
- AuthenticationFailureHandler : Form Login 실패시 수행되는 핸들러이다. SimpleUrlAuthenticationFailureHandler를 상속한 CustomAuthenticationFailureHandler를 등록해주었다. 이 또한 단순히 실패시 로그인 페이지로 리다이렉트 하는 역할을 수행한다.
|
1
2
3
4
5
6
7
8
9
10
11
12
13
14
15
16
17
18
19
20
21
22
23
|
/**
* 실패시 행동을 재정의할 클래스(추상 클래스가 아닌 인터페이스를 구현해도 된다.)
* Or Interface - AuthenticationFailureHandler
* @author yun-yeoseong
*
*/
@Slf4j
public class CustomAuthenticationFailureHandler extends SimpleUrlAuthenticationFailureHandler implements ExceptionProcessor{
@Override
public void onAuthenticationFailure(HttpServletRequest request, HttpServletResponse response,
AuthenticationException exception) throws IOException, ServletException {
log.debug("CustomAuthenticationFailureHandler.onAuthenticationFailure ::::");
super.onAuthenticationFailure(request, response, exception);
}
@Override
public void makeExceptionResponse(HttpServletRequest request, HttpServletResponse response,
Exception exception) {
}
}
|
cs |
- LogoutSuccessHandler : 로그아웃에 성공했을 시 수행되는 핸들러이다. SimpleUrlLogoutSuccessHandler를 상속한 CustomLogoutSuccessHandler를 등록해주었다. 역시 성공시 로그인 페이지로 리다이렉트 하는 역할을 수행한다.
|
1
2
3
4
5
6
7
8
9
10
11
|
@Slf4j
public class CustomLogoutSuccessHandler extends SimpleUrlLogoutSuccessHandler{
@Override
public void onLogoutSuccess(HttpServletRequest request, HttpServletResponse response, Authentication authentication)
throws IOException, ServletException {
log.debug("CustomLogoutSuccessHandler.onLogoutSuccess ::::");
super.onLogoutSuccess(request, response, authentication);
}
}
|
cs |
-
AccessDeniedHandler : 권한 체크 실패시 수행되는 핸들러이다.AccessDeniedHandlerImpl를 상속한 CustomAccessDeniedHandler를 등록하였다. 권한 체크 실패시 적절한 에러코드와 메시지를 HttpServletResponse에 담아서 반환하는 역할을 한다.
|
1
2
3
4
5
6
7
8
9
10
11
12
13
14
15
16
17
18
19
20
21
22
23
24
25
|
/**
* AccessDenied시 행동을 재정의하는 핸들러 클래스이다.(구현체가 아니라 인터페이스를 직접 구현해도된다.)
* Or Interface - AccessDeniedHandler
* @author yun-yeoseong
*
*/
@Slf4j
public class CustomAccessDeniedHandler extends AccessDeniedHandlerImpl implements ExceptionProcessor{
@Override
public void handle(HttpServletRequest request, HttpServletResponse response,
AccessDeniedException accessDeniedException) throws IOException, ServletException {
log.debug("CustomAccessDeniedHandler.handle");
this.makeExceptionResponse(request, response, accessDeniedException);
}
@Override
public void makeExceptionResponse(HttpServletRequest request, HttpServletResponse response,
Exception exception) throws IOException {
log.debug("CustomAccessDeniedHandler.makeExceptionResponse :::: {}",exception.getMessage());
response.sendError(HttpServletResponse.SC_UNAUTHORIZED, exception.getMessage());
}
}
|
cs |
AuthenticationEntryPoint : 인증된 사용자가 SecurityContext에 존재하지도 않고, 어떠한 인증되지 않은 익명의 사용자가 보호된 리소스에 접근하였을 때, 수행되는 EntryPoint 핸들러이다. LoginUrlAuthenticationEntryPoint를 상속한 CustomAuthenticationEntryPoint를 등록하였다.
|
1
2
3
4
5
6
7
8
9
10
11
12
13
14
15
|
@Slf4j
public class CustomAuthenticationEntryPoint extends LoginUrlAuthenticationEntryPoint{
public CustomAuthenticationEntryPoint(String loginFormUrl) {
super(loginFormUrl);
}
@Override
public void commence(HttpServletRequest request, HttpServletResponse response,
AuthenticationException authException) throws IOException, ServletException {
log.debug("CustomAuthenticationEntryPoint.commence ::::");
super.commence(request, response, authException);
}
}
|
cs |
- JwtAuthenticationFilter : Form Login시 걸리는 Filter이다. UsernamePasswordAuthenticationFilter를 상속한 JwtAuthenticationFilter을 등록하였다. 이 필터는 HttpServletRequest에서 사용자가 Form으로 입력한 로그인 정보를 인터셉트해서 AuthenticationManager에게 Authentication 객체를 넘겨준다.
|
1
2
3
4
5
6
7
8
9
10
11
12
13
14
15
16
17
18
19
20
21
22
23
24
25
26
27
28
29
30
31
32
33
34
35
36
37
38
39
40
41
42
43
44
45
46
47
48
49
50
51
52
|
/**
*
* @author yun-yeoseong
*
*/
@Slf4j
public class JwtAuthenticationFilter extends UsernamePasswordAuthenticationFilter{
private boolean postOnly = true;
public JwtAuthenticationFilter(AuthenticationManager authenticationManager) {
super.setAuthenticationManager(authenticationManager);
}
/*
* 해당 필터에서 인증 프로세스 이전에 요청에서 사용자 정보를 가져와서
* Authentication 객체를 인증 프로세스 객체에게 전달하는 역할
*/
@Override
public Authentication attemptAuthentication(HttpServletRequest request, HttpServletResponse response)
throws AuthenticationException {
log.debug("JwtAuthentication.attemptAuthentication ::::");
/*
* POST로 넘어왔는지 체크
*/
if(postOnly && !request.getMethod().equals("POST")) {
throw new AuthenticationServiceException(
"Authentication method not supported: " + request.getMethod());
}
String username = obtainUsername(request);
String password = obtainPassword(request);
if(StringUtils.isEmpty(username)) {
username = "";
}
if(StringUtils.isEmpty(password)) {
password = "";
}
username = username.trim();
UsernamePasswordAuthenticationToken authRequest = new UsernamePasswordAuthenticationToken(username, password);
setDetails(request, authRequest);
return this.getAuthenticationManager().authenticate(authRequest);
}
}
|
cs |
- JwtAuthorizationFilter : Form Login에서 인증된 이후의 요청에 대해 Header 인증을 담당할 Filter이다. BasicAuthenticationFilter를 상속한 JwtAuthorizationFilter를 등록하였다. 이번 포스팅은 아니고 다음 포스팅에서 다룰 JWT 기반 인증에서 실제 JWT 토큰의 인증이 이루어질 필터 부분이다.
|
1
2
3
4
5
6
7
8
9
10
11
12
13
14
15
16
17
18
19
20
21
22
23
24
25
26
27
28
29
30
31
32
33
34
35
36
37
38
39
40
41
42
43
44
45
46
47
48
49
50
|
/**
* HTTP 기본 인증 헤더를 감시하고 이를 처리하는 역할의 필터이다.
* @author yun-yeoseong
*
*/
@Slf4j
public class JwtAuthorizationFilter extends BasicAuthenticationFilter{
public JwtAuthorizationFilter(AuthenticationManager authenticationManager) {
super(authenticationManager);
// TODO Auto-generated constructor stub
}
@Override
protected void doFilterInternal(HttpServletRequest request, HttpServletResponse response, FilterChain chain)
throws IOException, ServletException {
log.debug("JwtAuthorizationFilter.doFilterInternal ::::");
/*
* 쿠키 인증 토큰을 검사한다.
* 만약 토큰 및 헤더에 대한 검사에 실패한다면,
* AuthenticationEntryPoint에 위임하거나 혹은 HttpResponse에 적절한
* 상태코드와 메시지를 담아서 리턴해준다.
*/
super.doFilterInternal(request, response, chain);
}
/*
* 성공시 처리 메소드
*/
@Override
protected void onSuccessfulAuthentication(HttpServletRequest request, HttpServletResponse response,
Authentication authResult) throws IOException {
// TODO Auto-generated method stub
super.onSuccessfulAuthentication(request, response, authResult);
}
/*
* 실패시 처리 메소드
*/
@Override
protected void onUnsuccessfulAuthentication(HttpServletRequest request, HttpServletResponse response,
AuthenticationException failed) throws IOException {
// TODO Auto-generated method stub
super.onUnsuccessfulAuthentication(request, response, failed);
}
}
|
cs |
- UserDetailsService : AuthenticationProvider 구현체에서 인증에 사용할 사용자 인증정보를 DB에서 가져오는 역할을 하는 클래스이다. UserDetailsService를 구현한 UserDetailsServiceImpl를 사용한다.
- PasswordEncoder : 실제 DB에는 비밀번호가 적절한 암호화 알고리즘으로 암호화되 저장되어있다. 폼에서 넘어오는 평문의 사용자 입력정보를 이용해 인증을 하려면 DB에 저장한 암호화 알고리즘 엔코더가 필요하다. 해당 역할을 하는 클래스이다. PasswordEncoder를 구현한 ShaPasswordEncoder를 사용한다.
|
1
2
3
4
5
6
7
8
9
10
11
12
13
14
15
16
17
18
19
20
21
22
23
24
25
26
27
28
29
30
31
32
33
34
35
36
37
38
39
40
41
|
@Slf4j
@Component
public class UserDetailsServiceImpl implements UserDetailsService{
@Autowired private ChatbotUserService userService;
@Override
public UserDetails loadUserByUsername(String username) throws UsernameNotFoundException {
log.debug("UserDetailsServiceImpl.loadUserByUsername :::: {}",username);
ChatbotUserDto userDto = userService.findByUsername(username);
if(ObjectUtils.isEmpty(userDto)) {
throw new UsernameNotFoundException("Invalid username");
}
userDto.setAuthorities(AuthoritiesUtils.createAuthorities(userDto));
return userDto;
}
}
@Slf4j
@Component
public class ShaPasswordEncoder implements PasswordEncoder{
@Override
public String encode(CharSequence rawPassword) {
log.debug("ShaPasswordEncoder.encode :::: {}",rawPassword);
return Crypto.sha256(rawPassword.toString());
}
@Override
public boolean matches(CharSequence rawPassword, String encodedPassword) {
log.debug("ShaPasswordEncoder.matches :::: {} <-> {}",rawPassword,encodedPassword);
return Crypto.sha256(rawPassword.toString()).equals(encodedPassword);
}
}
|
cs |
- AuthenticationProvider : 실제 인증이 일어나는 클래스이다. AuthenticationManager(ProviderManager)는 실제로 많은 AuthenticationProvider 구현체들을 가질 수 있다고 이야기 했듯 저 AuthenticationProvider를 가지고 ProviderManager는 인증 로직을 태우게된다. AuthenticationProvider를 구현한 CustomAuthenticationProvider를 사용한다. 해당 클래스 내부적으로는 UserDetailsService에게 입력받은 사용자 아이디를 넘겨 DB에서 사용자 인증 정보를 받고 암호화된 패스워드를 비교하기 위하여 PasswordEncoder에게 사용자가 입력한 평문 패스워드를 전달해 암호화된 형태로 받아서 암호화<->암호화 형태로 비밀번호를 비교한다(평문<->평문 아님). 만약 인증이 완료되면 Authentication객체를 구현한 UsernamePasswordAuthenticationToken객체를 반환한다.
|
1
2
3
4
5
6
7
8
9
10
11
12
13
14
15
16
17
18
19
20
21
22
23
24
25
26
27
28
29
30
31
32
33
34
35
36
37
38
39
40
41
42
43
44
45
46
47
48
49
50
51
52
53
54
55
56
57
58
|
/**
* 이걸 사용해도 되고 시큐리티에서 기본적으로 제공해주는 DaoAuthenticationProvider를 사용해도 무방.
* @author yun-yeoseong
*
*/
@Slf4j
@Component
public class CustomAuthenticationProvider implements AuthenticationProvider{
private UserDetailsService userDetailsService;
private PasswordEncoder encoder;
public CustomAuthenticationProvider(UserDetailsService userDetailsService,PasswordEncoder encoder) {
this.userDetailsService = userDetailsService;
this.encoder = encoder;
}
@Override
public Authentication authenticate(Authentication authentication) throws AuthenticationException {
log.debug("CustomUserAuthenticationProvider.authenticate :::: {}",authentication.toString());
UsernamePasswordAuthenticationToken token = (UsernamePasswordAuthenticationToken)authentication;
String userId = token.getName();
ChatbotUserDto user = null;
if(!StringUtils.isEmpty(userId)) {
user = (ChatbotUserDto) userDetailsService.loadUserByUsername(userId);
}
if(ObjectUtils.isEmpty(user)) {
throw new UsernameNotFoundException("Invalid username");
}
user.setUsername(user.getUsername());
user.setPassword(user.getPassword());
String password = user.getPassword();
if(!StringUtils.equals(password, encoder.encode(String.valueOf(token.getCredentials())))) {
throw new BadCredentialsException("Invalid password");
}
return new UsernamePasswordAuthenticationToken(user, password, user.getAuthorities());
}
@Override
public boolean supports(Class<?> authentication) {
// TODO Auto-generated method stub
log.debug("CustomUserAuthenticationProvider.supports ::::");
return UsernamePasswordAuthenticationToken
.class.equals(authentication);
}
}
|
cs |
4-4. access
- hasRole(Role) : 해당 Role 을 갖고있는 사용자 허용
- hasAnyRole(Role1, Role2, ...) : 해당 Role 중에 1개이상 갖고있는 사용자 허용
- anonymous : 익명 사용자 허용
- authenticated : 인증된 사용자 허용
- permitAll : 모든 사용자 허용
- denyAll : 모든 사용자 차단
5. 유용한 annotation
- @Secured : 각 요청경로에 따른 권한 설정은 위의 xml에서도 할 수 있지만, 메소드레벨에서 @Secured 를 통해서도 할 수 있다. @EnableGlobalMethodSecurity(securedEnabled=true) 를 추가하면 된다.
- - @Secured("ROLE_ADMIN") , @Secured({"ROLE_ADMIN","ROLE_USER"})
- - 비인가자 접근 시 AccessDeniedException 던짐
- @PreAuthorize : 위와 비슷하지만 spEL 을 사용할 수 있다. @EnableGlobalMethodSecurity(prePostEnabled=true)를 설정한다.
- - @PreAuthorize("hasRole('ADMIN')")
- @PostAuthorize : 위와 동일
- @AuthenticationPrincipal : 컨트롤러단에서 세션의 정보들에 접근하고 싶을 때 파라미터에 선언해준다.
- - public ModelAndView userInfo(@AuthenticationPrincipal User user)
- - 이거 안쓰고 확인하려면 (User) SecurityContextHolder.getContext().getAuthentication().getPrincipal(); 이런식으로 써야한다.
- - 4.x 부터는 org.springframework.security.core.annotation.AuthenticationPrincipal 을 import 해야한다.
- - mvc:annotation-driven.mvc:argument-resolvers 에 bean 으로 org.springframework.security.web.method.annotation.AuthenticationPrincipalArgumentResolver 를 등록한다.
여기까지 폼로그인 기반 스프링 시큐리티 예제였다. 다음 포스팅에서는 해당 코드를 이어서 JWT 토큰기반 인증을 다루어볼 예정이다. 혹시 틀린점이나 부족한 점이 있으면 꼭 코멘트를 부탁합니다.
<소스코드>
yoonyeoseong/spring-security
Contribute to yoonyeoseong/spring-security development by creating an account on GitHub.
github.com