
'단위 테스트'에 해당되는 글 4건
- 2019.09.10 :: TDD - 테스트 주도 개발(Test Driven Development) 1
- 2019.09.09 :: TDD - 단위 테스트 목(Mock)객체 사용
- 2019.09.06 :: TDD - 단위 테스트, 무엇을 테스트 해야할까? Right-BICEP 1
- 2019.09.05 :: TDD - 좋은 단위 테스트 작성하는 방법(FIRST 속성)
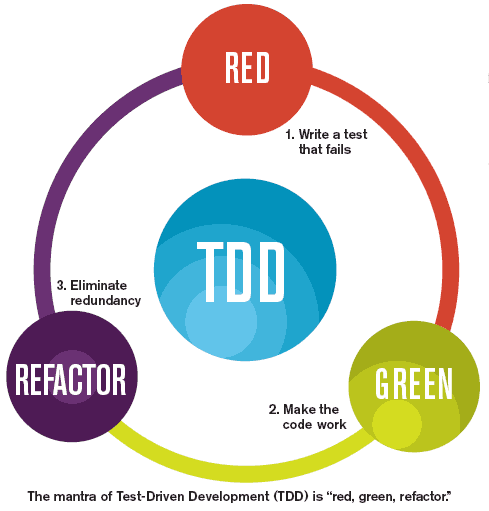
작성하려는 코드가 있다면 항상 먼저 어떻게 그 코드를 테스트할지 고민해야한다. 코드를 작성한 후에 어떻게 테스트할지 고민하기보다 작성할 코드를 묘사하는 테스트를 설계해야 한다. 이것이 테스트 주도 개발(TDD, Test Driven Development)에 기반을 둔 단위 테스트 전략의 핵심이다.
TDD에서 단위 테스트를 시스템의 모양을 잡고 통제하는 도구로 활용해야 한다. 단위 테스트는 종종 잘 선별한 후 한쪽에 치워 놓고 나중에 반영하려는 코드가 될 수 있는데, 단위 테스트는 소프트웨어를 어떻게 만들어야 할지에 관한 잘 훈련된 사이클의 핵심적인 부분이다. 따라서 TDD를 채택하면 소프트웨어 설계는 달라지고, 아마 훨씬 더 좋은 설계의 코드가 될 것이다.
TDD의 주된 이익
단위 테스트를 사후에 작성하여 얻을 수 있는 가장 분명하고 명확한 이익은 "코드가 예상한 대로 동작한다는 자신감을 얻는 것" 이다. TDD에서도 역시 동일한 이익과 그 이상을 얻을 수 있다.
코드를 깨끗하게 유지하도록 치열하게 싸우지 않으면 시스템은 점점 퇴화한다. 코드를 재빠르게 추가할 수는 있지만 처음에는 좋은 코드라기보다는 그다지 위대하지 않은 코드일 가능성이 높다. 보통은 개발 초기부터 나쁜 코드를 여러 가지 이유로 정리하지 않고는 한다.
TDD에서는 코드가 변경될 것이라는 두려움을 지울 수 있다. 정말로 리팩토링은 위험 부담이 있는 일이기도 하고 우리는 위험해보이지 않는 코드를 변경할 때도 실수를 하곤 한다. 하지만 TDD를 잘 따른다면 구현하는 실질적인 모든 사례에 대해 단위 테스트를 작성하게 된다. 이러한 단위 테스트는 코드를 지속적으로 발전시킬 수 있는 자유를 준다.
TDD는 세 부분의 사이클로 구성된다.
- 실패하는 테스트 코드 작성하기
- 테스트 통과하기
- 이전 두 단계에서 추가되거나 변경된 코드 개선하기
첫 번째 단계는 시스템에 추가하고자 하는 동작을 정의하는 테스트 코드를 작성하는 것이다.
우리는 이미 이전 포스팅에서 이미 다루어봤던 Profile이라는 클래스를 새로 만들 것이다. 가장 단순한 사례로, Profile 클래스 자체를 만들기 전에 먼저 테스트 코드를 아래와 같이 작성해보자.
|
1
2
3
4
5
6
|
public class ProfileTest {
@Test
public void matchesNothingWhenProfileEmpty() {
new Profile();
}
}
|
cs |
Profile이라는 클래스가 존재하지 않기 때문에 컴파일 에러가 발생할 것이다. 또한 IDEA는 Profile이라는 클래스가 없으므로 클래스를 생성해달라 할 것이다. Profile 클래스를 Quick Fix 기능으로 생성하면 컴파일에러는 해결될 것이다. 사실 이러한 작은 테스트는 컴파일되는 것만으로 충분한 테스트가 되기 때문에 굳이 테스트를 실행시킬 필요는 없다.
|
1
2
3
4
5
6
7
8
9
10
11
12
13
14
15
16
17
18
19
|
public class ProfileTest {
@Test
public void matchesNothingWhenProfileEmpty() {
Profile profile = new Profile();
Question question = new BooleanQuestion(1, "Relocation package?");
Criterion criterion =
new Criterion(new Answer(question, Bool.TRUE), Weight.DontCare);
boolean result = profile.matches(criterion);
assertFalse(result);
}
}
public class Profile {
public boolean matches(Criterion criterion) {
return true;
}
}
|
cs |
컴파일 에러를 해결하며 위와 같이 작은 테스트 단위로 하나씩 코드를 증가시켜가며 작성해준다. 여기까지 메서드 내부를 세부적으로 구현하지 않고 단순히 true를 리턴하는 메서드를 작성하므로써 실패하는 테스트 코드를 작성하였다. 그리고 테스트 성공을 위해 assertTrue(result)로 변경하여 테스트를 성공시킨다.
여기까지 우리는 Profile 클래스의 한 작은 부분을 만들었고 그것이 동작함을 알게되었다. 여기까지 소스를 작성하였다면 Git과 같은 VCS에 커밋할 차례이다. TDD를 하면서 작은 코드를 커밋하는 것은 필요할 때 백업하거나 방향을 반대로 돌리기 수월해진다. 만약 큼지막한 단위로 커밋한다면 롤백은 그만큼 힘든 작업이 된다.
다음 작성할 테스트 코드는 Profile이 갖고 있는 Answer 객체와 Criterion이 가지고 있는 Answer 객체를 매칭시키는 테스트이다.
|
1
2
3
4
5
6
7
8
9
10
11
12
13
14
15
16
17
18
19
20
21
22
23
24
25
26
|
public class ProfileTest {
@Test
public void matchesNothingWhenProfileEmpty() {
Profile profile = new Profile();
Question question = new BooleanQuestion(1, "Relocation package?");
Criterion criterion =
new Criterion(new Answer(question, Bool.TRUE), Weight.DontCare);
boolean result = profile.matches(criterion);
assertFalse(result);
}
@Test
public void matchesWhenProfileContainsMatchingAnswer() {
Profile profile = new Profile();
Question question = new BooleanQuestion(1, "Relocation package?");
Answer answer = new Answer(question, Bool.TRUE);
profile.add(answer);
Criterion criterion = new Criterion(answer, Weight.Important);
boolean result = profile.matches(criterion);
assertTrue(result);
}
}
|
cs |
위와 같이 profile.matches()를 테스트 코드로 추가한다. 하지만 matches()는 세부적인 구현이 이루어지지 않은 상태이므로 아래와 같이 Profile에 matches()를 수정한다.
|
1
2
3
4
5
6
7
8
9
10
11
|
public class Profile {
private Answer answer;
public boolean matches(Criterion criterion) {
return answer != null;
}
public void add(Answer answer) {
this.answer = answer;
}
}
|
cs |
이제 Profile이 Answer 객체만 가지고 있다면 true를 리턴할 것이다.
여기까지 테스트 코드를 작성하였다면 이제는 테스트 코드를 조금은 정리할 필요가 있습니다. 두 개의 테스트만 보더라도 중복되는 코드 라인이 보이기 때문에 @Before 메서드로 중복된 초기화 코드를 분리해줍니다.
|
1
2
3
4
5
6
7
8
9
10
11
12
13
14
15
16
17
18
19
20
21
22
23
24
25
26
27
28
29
30
31
32
33
34
35
36
37
38
39
|
public class ProfileTest {
private Profile profile;
private BooleanQuestion questionIsThereRelocation;
private Answer answerThereIsRelocation;
@Before
public void createProfile() {
profile = new Profile();
}
@Before
public void createQuestionAndAnswer() {
questionIsThereRelocation =
new BooleanQuestion(1, "Relocation package?");
answerThereIsRelocation =
new Answer(questionIsThereRelocation, Bool.TRUE);
}
@Test
public void matchesNothingWhenProfileEmpty() {
Criterion criterion =
new Criterion(answerThereIsRelocation, Weight.DontCare);
boolean result = profile.matches(criterion);
assertFalse(result);
}
@Test
public void matchesWhenProfileContainsMatchingAnswer() {
profile.add(answerThereIsRelocation);
Criterion criterion =
new Criterion(answerThereIsRelocation, Weight.Important);
boolean result = profile.matches(criterion);
assertTrue(result);
}
}
|
cs |
테스트 코드의 리팩토링 과정에서 프로덕 코드의 변경은 없었고 물론 테스트도 통과할 것이다. 하지만 분명한 필드이름과 중복된 코드의 제거로 더욱 깔끔한 테스트코드가 되었다.
여기서 자칫하면 "어? 여러개의 @Test 메서드가 동일한 필드들을 공유하는데, 테스트 결과가 잘못 나오는 거 아니야?"라고 질문을 던질 수 있다. 하지만 이전 포스팅에서 얘기 햇듯이 @Test 마다 새로운 ProfileTest 인스턴스를 생성하기 때문에 매 테스트마다 인스턴스 변수는 독립적으로 사용한다.
다음 테스트는 Profile 인스턴스가 매칭되는 Answer 객체가 없을 때, matches() 메서드가 false를 반환하는 테스트이다.
|
1
2
3
4
5
6
7
8
9
10
11
12
13
14
15
16
17
18
19
20
21
22
23
24
25
26
27
28
29
30
31
32
33
34
35
36
37
38
39
40
41
42
43
44
45
46
47
48
49
50
51
52
53
54
55
|
public class ProfileTest {
private Answer answerThereIsNotRelocation;
// ...
private Profile profile;
private BooleanQuestion questionIsThereRelocation;
private Answer answerThereIsRelocation;
@Before
public void createProfile() {
profile = new Profile();
}
@Before
public void createQuestionAndAnswer() {
questionIsThereRelocation =
new BooleanQuestion(1, "Relocation package?");
answerThereIsRelocation =
new Answer(questionIsThereRelocation, Bool.TRUE);
answerThereIsNotRelocation =
new Answer(questionIsThereRelocation, Bool.FALSE);
}
// ...
@Test
public void matchesNothingWhenProfileEmpty() {
Criterion criterion =
new Criterion(answerThereIsRelocation, Weight.DontCare);
boolean result = profile.matches(criterion);
assertFalse(result);
}
@Test
public void matchesWhenProfileContainsMatchingAnswer() {
profile.add(answerThereIsRelocation);
Criterion criterion =
new Criterion(answerThereIsRelocation, Weight.Important);
boolean result = profile.matches(criterion);
assertTrue(result);
}
@Test
public void doesNotMatchWhenNoMatchingAnswer() {
profile.add(answerThereIsNotRelocation);
Criterion criterion =
new Criterion(answerThereIsRelocation, Weight.Important);
boolean result = profile.matches(criterion);
assertFalse(result);
}
}
|
cs |
테스트가 통과하려면 matches() 메서드는 Profile 객체가 들고 있는 단일 Answer 객체가 Criterion 객체에 저장된 응답과 매칭되는 지 결정해야 한다. Answer 클래스를 보면 어떻게 응답들을 비교하는지 알 수 있다.
|
1
2
3
4
5
6
7
8
9
10
11
12
13
14
15
16
17
18
19
20
21
22
23
24
25
26
27
28
29
30
31
32
33
34
35
36
37
38
39
|
public class Answer {
// ...
private int i;
private Question question;
public Answer(Question question, int i) {
this.question = question;
this.i = i;
}
public Answer(Question question, String matchingValue) {
this.question = question;
this.i = question.indexOf(matchingValue);
}
public String getQuestionText() {
return question.getText();
}
@Override
public String toString() {
return String.format("%s %s",
question.getText(), question.getAnswerChoice(i));
}
public boolean match(int expected) {
return question.match(expected, i);
}
public boolean match(Answer otherAnswer) {
// ...
return question.match(i, otherAnswer.i);
}
// ...
public Question getQuestion() {
return question;
}
}
|
cs |
이제 match 메서드를 이용하여 테스트를 통과하는 matches() 메서드 내의 단일 조건문을 추가한다.
|
1
2
3
4
5
6
7
8
9
10
11
12
13
|
public class Profile {
private Answer answer;
public boolean matches(Criterion criterion) {
return answer != null &&
answer.match(criterion.getAnswer());
}
// ...
public void add(Answer answer) {
this.answer = answer;
}
}
|
cs |
TDD로 성공하러면 테스트 시나리오를 테스트로 만들고 각 테스트를 통과하게 만드는 코드 증분을 최소화하는 순으로 코드를 작성한다.
이제 Profile 클래스가 다수의 Answer 객체를 갖도록 수정할 것이다. 다수의 Answer 객체를 Profile 클래스는 Map으로 갖도록 설계하였다.(key,value)
|
1
2
3
4
5
6
7
8
9
10
11
12
13
14
15
16
17
18
19
20
21
22
23
24
25
26
27
28
29
30
31
32
33
34
35
36
37
38
39
40
41
42
43
44
45
46
47
48
49
50
51
52
53
54
55
56
57
58
59
60
61
62
63
64
65
66
67
68
69
70
71
|
public class ProfileTest {
private Profile profile;
private BooleanQuestion questionIsThereRelocation;
private Answer answerThereIsRelocation;
private Answer answerThereIsNotRelocation;
private BooleanQuestion questionReimbursesTuition;
private Answer answerDoesNotReimburseTuition;
@Before
public void createProfile() {
profile = new Profile();
}
@Before
public void createQuestionsAndAnswers() {
questionIsThereRelocation =
new BooleanQuestion(1, "Relocation package?");
answerThereIsRelocation =
new Answer(questionIsThereRelocation, Bool.TRUE);
answerThereIsNotRelocation =
new Answer(questionIsThereRelocation, Bool.FALSE);
questionReimbursesTuition = new BooleanQuestion(1, "Reimburses tuition?");
answerDoesNotReimburseTuition =
new Answer(questionReimbursesTuition, Bool.FALSE);
}
@Test
public void matchesNothingWhenProfileEmpty() {
Criterion criterion =
new Criterion(answerThereIsRelocation, Weight.DontCare);
boolean result = profile.matches(criterion);
assertFalse(result);
}
@Test
public void matchesWhenProfileContainsMatchingAnswer() {
profile.add(answerThereIsRelocation);
Criterion criterion =
new Criterion(answerThereIsRelocation, Weight.Important);
boolean result = profile.matches(criterion);
assertTrue(result);
}
@Test
public void doesNotMatchWhenNoMatchingAnswer() {
profile.add(answerThereIsNotRelocation);
Criterion criterion =
new Criterion(answerThereIsRelocation, Weight.Important);
boolean result = profile.matches(criterion);
assertFalse(result);
}
@Test
public void matchesWhenContainsMultipleAnswers() {
profile.add(answerThereIsRelocation);
profile.add(answerDoesNotReimburseTuition);
Criterion criterion =
new Criterion(answerThereIsRelocation, Weight.Important);
boolean result = profile.matches(criterion);
assertTrue(result);
}
}
|
cs |
먼저 Profile이 다수의 Answer 객체를 가지는 테스트 코드를 작성한다.(matchesWhenContainsMultipleAnswers)
|
1
2
3
4
5
6
7
8
9
10
11
12
13
14
15
16
17
|
public class Profile {
private Map<String,Answer> answers = new HashMap<>();
private Answer getMatchingProfileAnswer(Criterion criterion) {
return answers.get(criterion.getAnswer().getQuestionText());
}
public boolean matches(Criterion criterion) {
Answer answer = getMatchingProfileAnswer(criterion);
return answer != null &&
answer.match(criterion.getAnswer());
}
public void add(Answer answer) {
answers.put(answer.getQuestionText(), answer);
}
}
|
cs |
테스트 통과를 위한 Profile 클래스를 수정한다. 테스트 통과를 위해 matches() 메서드의 일부로 getMatchingProfileAnswer() 메서드를 호출하여 반환값이 null인지 여부를 확인한다. 하지만 이러한 널 체크 구문을 다른 곳으로 숨기고 싶다. 그래서 Answer 클래스의 match() 메서드로 널체크를 보낼 것이다.
그렇다면 이전에 matches의 리턴문이 answer.match(criterion.getAnswer()) 였다면 아래와 같이 코드는 수정될 것이다.
|
1
2
3
4
5
6
7
8
9
10
11
12
13
14
15
16
17
18
19
20
|
public class Profile {
private Map<String,Answer> answers = new HashMap<>();
private Answer getMatchingProfileAnswer(Criterion criterion) {
return answers.get(criterion.getAnswer().getQuestionText());
}
public boolean matches(Criteria criteria) {
return false;
}
public boolean matches(Criterion criterion) {
Answer answer = getMatchingProfileAnswer(criterion);
return criterion.getAnswer().match(answer);
}
public void add(Answer answer) {
answers.put(answer.getQuestionText(), answer);
}
}
|
cs |
또한 Answer의 match()에는 null을 체크하는 구문이 추가된다.
|
1
2
3
4
5
6
7
8
9
10
11
12
13
14
|
public class Answer {
private int i;
private Question question;
...
public boolean match(Answer otherAnswer) {
if (otherAnswer == null) return false;
// ...
return question.match(i, otherAnswer.i);
}
...
}
|
cs |
하지만 여기서 끝이 아니다. 바로 위의 Answer를 수정하기 전에 아래와 같은 테스트코드가 작성되어야한다.
|
1
2
3
4
5
6
7
|
public class AnswerTest {
@Test
public void matchAgainstNullAnswerReturnsFalse() {
assertFalse(new Answer(new BooleanQuestion(0, ""), Bool.TRUE)
.match(null));
}
}
|
cs |
TDD를 할 때 다른 코드를 전혀 건드리지 않고 Profile 클래스만 변경할 필요는 없다. 필요한 사항이 있다면 설계를 변경하여 다른 클래스로 너어가도 된다.(Answer 클래스)
이제는 조금 코드를 확장할 것이다. 단일 Criterion 객체로만 매칭하는 것이 아니라 다수의 Criterion 객체를 가지는 Criteria 객체를 인수로 받아 매칭하는 코드로 변화 시킬 것이다.
|
1
2
3
4
5
6
7
8
9
10
11
12
13
14
15
16
17
18
19
20
21
22
23
24
25
26
27
28
29
30
31
32
33
34
35
36
37
38
39
40
41
42
43
44
|
public class ProfileTest {
private Profile profile;
private BooleanQuestion questionIsThereRelocation;
private Answer answerThereIsRelocation;
private Answer answerThereIsNotRelocation;
private BooleanQuestion questionReimbursesTuition;
private Answer answerDoesNotReimburseTuition;
private Answer answerReimbursesTuition;
@Before
public void createProfile() {
profile = new Profile();
}
@Before
public void createQuestionsAndAnswers() {
questionIsThereRelocation =
new BooleanQuestion(1, "Relocation package?");
answerThereIsRelocation =
new Answer(questionIsThereRelocation, Bool.TRUE);
answerThereIsNotRelocation =
new Answer(questionIsThereRelocation, Bool.FALSE);
questionReimbursesTuition = new BooleanQuestion(1, "Reimburses tuition?");
answerDoesNotReimburseTuition =
new Answer(questionReimbursesTuition, Bool.FALSE);
answerReimbursesTuition =
new Answer(questionReimbursesTuition, Bool.TRUE);
}
...
@Test
public void doesNotMatchWhenNoneOfMultipleCriteriaMatch() {
profile.add(answerDoesNotReimburseTuition);
Criteria criteria = new Criteria();
criteria.add(new Criterion(answerThereIsRelo, Weight.Important));
criteria.add(new Criterion(answerReimbursesTuition, Weight.Important));
boolean result = profile.matches(criteria);
assertFalse(result);
}
}
|
cs |
이제는 Profile 객체가 Criteria 객체를 받아 매칭하는 테스트 코드를 작성하였다. 결과를 통과 시키기 위해서 Profile 클래스에 Criteria를 인자로 받는 하드 코딩한 메서드를 추가한다.
|
1
2
3
4
5
6
7
8
9
10
11
12
13
14
15
16
17
18
19
20
|
public class Profile {
private Map<String,Answer> answers = new HashMap<>();
private Answer getMatchingProfileAnswer(Criterion criterion) {
return answers.get(criterion.getAnswer().getQuestionText());
}
public boolean matches(Criteria criteria) {
return false;
}
public boolean matches(Criterion criterion) {
Answer answer = getMatchingProfileAnswer(criterion);
return criterion.getAnswer().match(answer);
}
public void add(Answer answer) {
answers.put(answer.getQuestionText(), answer);
}
}
|
cs |
그리고 빠르게 다음 테스트를 작성한다. 단순히 true를 리턴하는 메서드에서 Criteria 객체를 순회하며 하나씩 꺼낸 Criterion 객체를 매치하는 메서드로 수정한다.
|
1
2
3
4
5
6
7
8
9
10
11
12
13
14
15
16
17
18
19
20
21
22
23
|
public class Profile {
private Map<String,Answer> answers = new HashMap<>();
private Answer getMatchingProfileAnswer(Criterion criterion) {
return answers.get(criterion.getAnswer().getQuestionText());
}
public boolean matches(Criteria criteria) {
for (Criterion criterion: criteria)
if (matches(criterion))
return true;
return false;
}
public boolean matches(Criterion criterion) {
Answer answer = getMatchingProfileAnswer(criterion);
return criterion.getAnswer().match(answer);
}
public void add(Answer answer) {
answers.put(answer.getQuestionText(), answer);
}
}
|
cs |
여기서 Criteria 객체를 로컬 변수로 매번 새롭게 생성하는데, 이것을 @Before 메서드를 활용하여 초기화하는 코드로 변경하면 더 깔끔한 코드가 된다.
이제 이 단계에서 여러 특별한 사례를 추가한다. Criterion의 MustMatch에 해당 되는 질문이 Profile 객체가 가지고 있지 않다면 실패하는 테스트 코드를 작성한다.
|
1
2
3
4
5
6
7
8
9
10
11
12
13
14
15
16
17
18
19
20
21
22
23
24
25
26
27
28
29
30
31
32
33
34
35
36
37
38
39
40
41
42
43
44
45
46
47
48
49
50
51
52
53
54
55
56
57
58
59
60
61
62
63
64
65
66
67
68
69
70
71
72
73
74
75
76
77
78
79
80
|
public class ProfileTest {
// ...
private Profile profile;
private BooleanQuestion questionIsThereRelocation;
private Answer answerThereIsRelocation;
private Answer answerThereIsNotRelocation;
private BooleanQuestion questionReimbursesTuition;
private Answer answerDoesNotReimburseTuition;
private Answer answerReimbursesTuition;
private Criteria criteria;
@Before
public void createCriteria() {
criteria = new Criteria();
}
// ...
@Before
public void createProfile() {
profile = new Profile();
}
@Before
public void createQuestionsAndAnswers() {
questionIsThereRelocation =
new BooleanQuestion(1, "Relocation package?");
answerThereIsRelocation =
new Answer(questionIsThereRelocation, Bool.TRUE);
answerThereIsNotRelocation =
new Answer(questionIsThereRelocation, Bool.FALSE);
questionReimbursesTuition = new BooleanQuestion(1, "Reimburses tuition?");
answerDoesNotReimburseTuition =
new Answer(questionReimbursesTuition, Bool.FALSE);
answerReimbursesTuition =
new Answer(questionReimbursesTuition, Bool.TRUE);
}
...
@Test
public void doesNotMatchWhenAnyMustMeetCriteriaNotMet() {
profile.add(answerThereIsRelo);
profile.add(answerDoesNotReimburseTuition);
criteria.add(new Criterion(answerThereIsRelo, Weight.Important));
criteria.add(new Criterion(answerReimbursesTuition, Weight.MustMatch));
assertFalse(profile.matches(criteria));
}
}
public class Profile {
private Map<String,Answer> answers = new HashMap<>();
private Answer getMatchingProfileAnswer(Criterion criterion) {
return answers.get(criterion.getAnswer().getQuestionText());
}
public boolean matches(Criteria criteria) {
boolean matches = false;
for (Criterion criterion: criteria) {
if (matches(criterion))
matches = true;
else if (criterion.getWeight() == Weight.MustMatch)
return false;
}
return matches;
}
public boolean matches(Criterion criterion) {
Answer answer = getMatchingProfileAnswer(criterion);
return criterion.getAnswer().match(answer);
}
public void add(Answer answer) {
answers.put(answer.getQuestionText(), answer);
}
}
|
cs |
테스트를 통과시키기 위해 Profile matches 메서드로 들어오고 Profile 객체의 Answer 중 매치되지 않은 질문의 weight이 MustMatch라면 false를 반환하는 코드로 작성한다.(즉, MustMatch는 반드시 매칭되어야 하는 필수조건인 것이다. 나머지가 다 맞고 MustMatch 하나만 안맞아도 매치는 false를 날린다.)
이런식으로 TDD를 이용하여 코드를 작성한다. 마지막으로 코드가 완성되었다면 테스트 클래스의 메서드의 이름들은 어떠한 코드의 명세서가 될 수 있다. 오늘 다루어본 TDD는 사실 두서없이 기본만 다루어본 내용이다. 사실 필자로 TDD에 익숙치 않은 개발자이기 때문에 TDD가 무엇인가 정도만 습득했어도 성공이라고 생각했다. 추후에는 실제 웹개발 코드를 작성할때 TDD를 이용한 개발 등의 포스팅을 할 예정이다.
사실 노력없는 결실은 없는 것 같다. 꾸준히 TDD로 개발하다보면 언젠간 적응되고 더 좋은 코드를 개발하는 날이 오지 않을까?
앞으로 더욱 많은 TDD 관련 포스팅을 할 예정이며, 현재까지 작성된 포스팅은 아래 책을 기반으로 작성하였다.

'Web > TDD' 카테고리의 다른 글
| TDD - 테스트(단위 테스트) 리팩토링 (0) | 2019.09.10 |
|---|---|
| TDD - 단위 테스트 목(Mock)객체 사용 (0) | 2019.09.09 |
| TDD - 단위 테스트, 무엇을 테스트 해야할까? Right-BICEP (1) | 2019.09.06 |
| TDD - 좋은 단위 테스트 작성하는 방법(FIRST 속성) (0) | 2019.09.05 |
| TDD - JUnit 테스트 코드 구성 방법.(테스트 코드 조직) (0) | 2019.09.04 |

이번 포스팅에서는 목(Mock) 객체를 사용하여 테스트하기 힘든, 혹은 외부환경과 의존성을 끊는 테스트를 하기 위한 방법을 간단하게 다루어 볼 것이다. 여기서 다루는 목(Mock)객체는 정말 단순한 수준의 예제이다. 결과적으로 이번 포스팅의 목적은 목객체는 무엇이고 왜 사용하는 지에 대한 내용이 될 것 같다.
지금 진행할 예제는 크게 코드 내용 자체를 알필요?는 없을 것 같다. 이 말은 우리가 개발하며 테스트를 작성할 때, 코드의 내용을 몰라도 된다는 말이 아니다. 테스트 작성은 당연히 코드의 내용을 빠삭히 알고 작성해야 하는 테스크이기 때문이다. 필자가 말하는 "알 필요는 없다"라는 것은 이번 포스팅은 독자들과 같이 애플리케이션을 개발하며 테스트를 작성하는 포스팅이 아니고 어느 순간에 목객체를 사용해야하냐를 다루는 문제이기 때문이다.
<위도경도를 이용한 주소정보 받아오기>
아래의 코드는 제목그대로 위도경도를 받아 특정 API를 호출해 해당 위도경도에 위치한 위치정보를 받아오는 코드이다.(효율적인 코드라고는 말할 수 없다. 그냥 흐름만 보자.)
|
1
2
3
4
5
6
7
8
9
10
11
12
13
14
15
16
17
18
19
20
21
22
23
24
|
public class AddressRetriever {
public Address retrieve(double latitude, double longitude)
throws IOException, ParseException {
String parms = String.format("lat=%.6flon=%.6f", latitude, longitude);
String response = new HttpImpl().get(
"http://open.mapquestapi.com/nominatim/v1/reverse?format=json&"
+ parms);
JSONObject obj = (JSONObject)new JSONParser().parse(response);
JSONObject address = (JSONObject)obj.get("address");
String country = (String)address.get("country_code");
if (!country.equals("us"))
throw new UnsupportedOperationException(
"cannot support non-US addresses at this time");
String houseNumber = (String)address.get("house_number");
String road = (String)address.get("road");
String city = (String)address.get("city");
String state = (String)address.get("state");
String zip = (String)address.get("postcode");
return new Address(houseNumber, road, city, state, zip);
}
}
|
cs |
위와 같은 코드가 있다. 간단히 코드내용을 설명하면, retrieve 메소드에 위도와 경도 인자를 받아서 해당 인자를 이용하여 특정 API를 호출하고 위치에 대한 정보를 받아오고 있다. 만약 이 메소드를 단위 테스트하기 위해 걸리는 사항이 있나? 필자는 여기서 하나를 꼽자면 "외부 서버에 위치한 API를 호출하는 부분"를 얘기하고 싶다. 이런 부분은 우리가 통제할 수 있는 환경이 아니다. 즉, 우리의 테스트 코드와는 상관없이 API 트래픽이 높아 결과를 받아오는데 시간이 걸릴 수 있고, 최악으로는 API서버가 다운되고 API호출 결과로 예외가 발생할 수 있는 등의 우리가 통제할 수 없는 문제가 발생할 수 있다.
테스트 관점에서 보면, API에서 적절한 결과값을 받아오는 것을 테스트할 수 있지만 "우리가 개발한 로직이 과연 기대한대로 동작하는 가?"를 테스트 해볼 수 있다. 물론 전자는 직접 API를 호출하여 결과값을 받아오는 테스트 코드를 작성할 수 있지만 후자는 굳이 API호출 동작 자체가 필요하지 않을 수 있다.
그렇다면 직접 API를 호출할 필요가 없는 테스트지만 특정 API를 호출하고 있는 로직이 존재하는 코드를 테스트하기 위해서는 어떻게 할까?
이럴때 이용하는 것이 목(Mock) 객체이다. 일종의 스텁객체라고도 볼 수 있을 것 같다. 이러한 객체를 사용하면서 생기는 이점은 무엇일까?
- 외부환경을 신경쓸 필요가 없이 비지니스로직의 성공유무를 테스트할 수 있다.
- 외부환경에 따라 테스트가 빨리 끝날 수도 있지만, 외부환경이 갑자기 트래픽이 몰리는 시간이라면 테스트가 느리게 끝날 수도 있다. 하지만 목(Mock)객체를 사용한다면 직접 API를 호출하여 결과를 받아오는 것이 아니기 때문에 빠른 테스트 시간을 유지할 수 있다.
- 테스트의 복잡도를 낮춰준다.
하지만 목객체를 이용하기 전에 위의 코드는 조금 문제점이 있다. API를 호출하는 객체(HttpImpl클래스)가 메서드 내부에서 초기화되고 있다는 것이다. 이것은 목객체를 이용한 테스트 코드를 작성할 수 없다. 우리는 "의존주입"이라는 것을 이용하여 목객체를 이용할 것이기 때문에 간단하게 프로덕 코드의 설계를 변경할 것이다.
"의존주입"을 이용하게 되면 생기는 장점은 아래와 같다.
- 해당 클래스의 메서드는 실제 비지니스로직을 수행하는 HttpClient 객체가 목객체인지 혹은 실제 API를 호출하는 객체인지를 알 필요가 없어진다.
특정 오브젝트와의 결합도를 인터페이스(Http라는 인터페이스)를 이용하여 낮춰버렸기 때문에 이 인터페이스의 구현체로 Mock객체를 주입하던 실제 API를 호출하게 되는 HttpClient(HttpImpl 클래스) 객체를 넣던 해당 클래스는 신경쓸 필요가 없어진다.
|
1
2
3
4
5
6
7
8
9
10
11
12
13
14
15
16
17
18
19
20
21
22
23
24
25
26
27
|
public class AddressRetriever {
private Http http;
public AddressRetriever(Http http) {
this.http = http;
}
public Address retrieve(double latitude, double longitude) throws IOException, ParseException {
String parms = String.format("lat=%.6f&lon=%.6f", latitude, longitude);
String response = http.get("http://open.mapquestapi.com/nominatim/v1/reverse?format=json&" + parms);
JSONObject obj = (JSONObject)new JSONParser().parse(response);
JSONObject address = (JSONObject)obj.get("address");
String country = (String)address.get("country_code");
if (!country.equals("us"))
throw new UnsupportedOperationException(
"cannot support non-US addresses at this time");
String houseNumber = (String)address.get("house_number");
String road = (String)address.get("road");
String city = (String)address.get("city");
String state = (String)address.get("state");
String zip = (String)address.get("postcode");
return new Address(houseNumber, road, city, state, zip);
}
}
|
cs |
위 코드와 같이 특정 API 호출을 담당하는 객체를 인스턴스 변수로 선언하고 생성자에서 의존주입을 하고 있다.
|
1
2
3
4
5
6
7
8
9
10
11
12
13
14
15
16
17
18
19
20
21
22
23
24
25
26
27
28
29
30
31
32
33
34
35
36
37
38
39
40
41
42
43
44
45
46
47
48
49
50
51
|
public class AddressRetrieverTest {
@Test
public void answersAppropriateAddressForValidCoordinates()
throws IOException, ParseException {
Http http = (String url) ->
"{\"address\":{"
+ "\"house_number\":\"324\","
+ "\"road\":\"North Tejon Street\","
+ "\"city\":\"Colorado Springs\","
+ "\"state\":\"Colorado\","
+ "\"postcode\":\"80903\","
+ "\"country_code\":\"us\"}"
+ "}";
AddressRetriever retriever = new AddressRetriever(http);
Address address = retriever.retrieve(38.0,-104.0);
assertThat(address.houseNumber, equalTo("324"));
assertThat(address.road, equalTo("North Tejon Street"));
assertThat(address.city, equalTo("Colorado Springs"));
assertThat(address.state, equalTo("Colorado"));
assertThat(address.zip, equalTo("80903"));
}
@Test
public void returnsAppropriateAddressForValidCoordinates()
throws IOException, ParseException {
Http http = new Http() {
@Override
public String get(String url) throws IOException {
return "{\"address\":{"
+ "\"house_number\":\"324\","
+ "\"road\":\"North Tejon Street\","
// ...
+ "\"city\":\"Colorado Springs\","
+ "\"state\":\"Colorado\","
+ "\"postcode\":\"80903\","
+ "\"country_code\":\"us\"}"
+ "}";
}};
AddressRetriever retriever = new AddressRetriever(http);
Address address = retriever.retrieve(38.0,-104.0);
assertThat(address.houseNumber, equalTo("324"));
assertThat(address.road, equalTo("North Tejon Street"));
assertThat(address.city, equalTo("Colorado Springs"));
assertThat(address.state, equalTo("Colorado"));
assertThat(address.zip, equalTo("80903"));
}
}
|
cs |
우리는 설계를 변경한 클래스 테스트 작성을 위와 같이 할 수 있다. (포스팅에 올리지는 않았지만 Http 인터페이스는 get라는 메서드 선언을 하고 있는 FunctionalInterface이다.)
테스트에서는 스텁 객체(Http)를 이용해 retrieve 메서드를 테스트하고 있다. 또 다른 방법으로 Mokito라이브러리를 이용한 Mock(목) 객체를 이용하여 테스트를 작성할 수도 있다.
|
1
2
3
4
5
6
7
8
9
10
11
12
13
14
15
16
17
18
19
20
21
22
23
24
25
26
27
|
public class AddressRetrieverTest {
@Test
public void answersAppropriateAddressForValidCoordinates()
throws IOException, ParseException {
Http http = mock(Http.class);
when(http.get(contains("lat=38.000000&lon=-104.000000"))).thenReturn(
"{\"address\":{"
+ "\"house_number\":\"324\","
// ...
+ "\"road\":\"North Tejon Street\","
+ "\"city\":\"Colorado Springs\","
+ "\"state\":\"Colorado\","
+ "\"postcode\":\"80903\","
+ "\"country_code\":\"us\"}"
+ "}");
AddressRetriever retriever = new AddressRetriever(http);
Address address = retriever.retrieve(38.0,-104.0);
assertThat(address.houseNumber, equalTo("324"));
// ...
assertThat(address.road, equalTo("North Tejon Street"));
assertThat(address.city, equalTo("Colorado Springs"));
assertThat(address.state, equalTo("Colorado"));
assertThat(address.zip, equalTo("80903"));
}
}
|
cs |
목 객체를 이용하면 스텁객체를 사용하는 것보다 더 쉽게 메서드 인자 검사등을 수행할 수 있기 때문에 더 정교하고 똑똑한 일회성 객체를 만들 수 있다.
목객체를 이용한 테스트는 비단 외부API를 호출하는 것에만 국한되지 않는다. 기타 비용이 큰 로직에 대해서도 목객체를 이용하여 효율적인 테스트 코드작성, 혹은 비즈니스 로직에 집중된 테스트 코드를 작성할 수 있게된다.
하지만 목(Mock) 객체를 이용하기 위해서 중요한 것이 있습니다.
- 목을 사용한 테스트는 진행하길 원하는 내용을 분명하게 기술해야 한다.(메서드 이름등을 명확히 짓는다.)
- 목이 프로덕 코드의 동작을 올바르게 묘사하고 있는가를 살펴보자.
- 혹시나 목 객체가 실제 프로덕코드를 실행하고 있지는 않은가?(임시로 프로덕코드에 throw문을 넣어 예외가 발생하는지 테스트 해볼 수 있다.)
- 프로덕 코드를 직접 적으로 테스트하고 있지 않는 다는 것을 기억하자. 목을 도입하면 테스트 커버리지에서 간극을 형성할 수 있음을 인지하고 실제 클래스의 종단 간 사용성을 보여주는 상위 테스트가 있는지 확인하자.
여기까지 간단하게 목객체를 사용하는 이유중 한가지를 다루어봤습니다. 실제 모키토를 이용하여 기술적으로 목객체를 이용하는 방법등을 포스팅 내용에 없기 때문에 별도 자료로 찾아봐야합니다.
'Web > TDD' 카테고리의 다른 글
| TDD - 테스트 주도 개발(Test Driven Development) (1) | 2019.09.10 |
|---|---|
| TDD - 테스트(단위 테스트) 리팩토링 (0) | 2019.09.10 |
| TDD - 단위 테스트, 무엇을 테스트 해야할까? Right-BICEP (1) | 2019.09.06 |
| TDD - 좋은 단위 테스트 작성하는 방법(FIRST 속성) (0) | 2019.09.05 |
| TDD - JUnit 테스트 코드 구성 방법.(테스트 코드 조직) (0) | 2019.09.04 |

우리가 직접 작성한 코드라고 하더라도 단순히 메서드, 클래스 코드를 보면서 숨어 있는 버그를 찾아내는 것은 거의 불가능하다. 물론 코드를 살펴보는 것도 하나의 버그를 찾아내는 행위이긴 하다. 하지만 효율적인 단위 테스트를 통해 숨어있는 버그를 찾아내는 것이 훨씬 더 효율적인 방안일 듯하다. 그렇다면 테스트를 수행하는 것 만큼 중요한 것은 무엇일까? 아니, 올바르고 더 효율적인 테스트를 수행하기 위해 받침이 되는 행위가 무엇일까? 바로 테스트 케이스! 무엇을 테스트 해야할까를 고민하는 것은 아주 중요하고 여기서 그치는 것이 아니라 정말 중요한 테스트 케이스를 찾아 테스트에 적용해야한다.
Right-BICEP는 우리에게 무엇을 테스트할지에 대해 쉽게 선별하게 한다.
- Right : 결과가 올바른가?
- B : 경계 조건은 맞는가?
- I : 역 관계를 검사할 수 있는가?
- C : 다른 수단을 활용하여 교차 검사할 수 있는가?
- E : 오류 조건을 강제로 일어나게 할 수 있는가?
- P : 성능 조건은 기준에 부합하는가?
1)Right : 결과가 올바른가?
테스트 코드는 무엇보다도 먼저 기대한 결과(단언,assert)를 선출하는지 검증할 수 있어야한다. 이 말은 무엇이냐? 어떠한 코드가 있고 "해당 코드가 정상적으로 동작한다면 어떠한 입력이 들어오더라도 정상적으로 출력되는 결과를 알수 있나?"를 답할 수 있어야 한다는 말이다. 만약 어떠한 코드가 어떤 정상적인 결과를 낼것이다라는 것도 모르고 테스트 코드를 작성하는 것은 옳지 않은 방법이다. 이럴때에는 추가 개발을 잠시 보류하는 것이 좋다. 하지만 무작정 개발을 보류하는 것이 아니라 최선의 판단을 통한 보류를 해야한다는 것이다.
결론적으로 우리가 해당 코드의 올바른 출력을 이해하고 예상가능 해야할 때, 테스트 코드를 작성해야 한다는 것이다. 이것은 단순하고 당연하면서도 아주 중요한 질문이 된다.
2)B : 경계 조건은 맞는가?
보통 개발자는 테스트 코드에 assert 구문을 작성할 때, 예상가능한 입력값 등으로 작성을 하게 된다. 하지만 이러한 입력값은 테스트 시나리오의 경계 조건에 해당하는 테스트 케이스가 아닐 수 있다. 우리가 대부분 마주치는 수많은 결함은 경계 조건에 해당하는 테스트 케이스에서 많이 나오기 때문에 모서리 사례(corner case, 경계조건)를 처리해야 한다.
많이 생각할 수 있는 경계조건은 아래와 같다.
- 모호하고 일관성 없는 입력 값. 예를 들어 특수 문자("!*:\&/$>#@ 등)가 포함된 파일 이름
- 잘못된 양식의 데이터. 예를 들어 최상위 도메인이 빠진 이메일 주소
- 수치적 오버플로를 일으키는 계산
- 비거나 빠진 값. 예를 들어 0, 0.0, "" 혹은 Null
- 이성적인 기댓값을 훨씬 벗어나는 값. 예를 들어 200세의 나이
- 교실의 당번표처럼 중복을 허용해서는 안 되는 목록에 중복 값이 있는 경우
- 정렬이 안 된 정렬 리스트 혹은 그 반대. 예를 들어 사용중인 정렬 알고리즘이 퀵소트인데, 역순으로 정렬된 데이터가 들어오는 경우
- 시간 순이 맞지 않은 경우. 예를 들어 HTTP 서버가 OPTIONS 메서드의 결과를 POST 메서드보다 먼저 반환해야 하지만 그 후에 반환하는 경우
이전 포스팅에서 다루어봤던 예제 코드로 경계 조건을 살펴보자.
|
1
2
3
4
5
6
7
8
9
10
11
12
13
14
15
16
17
18
19
|
public class ScoreCollection {
private List<Scoreable> scores = new ArrayList<>();
public void add(Scoreable scoreable) {
scores.add(scoreable);
}
public int arithmeticMean() {
int total = scores.stream().mapToInt(Scoreable::getScore).sum();
return total / scores.size();
}
}
@FunctionalInterface
public interface Scoreable {
int getScore();
}
|
cs |
위와 같은 코드가 있고 해당 코드들의 테스트 코드를 아래와 같이 경계 조건 몇몇을 포함하여 작성했다.
|
1
2
3
4
5
6
7
8
9
10
11
12
13
14
15
16
17
18
19
20
21
22
23
24
25
26
27
28
29
30
31
32
33
34
35
36
|
public class ScoreCollectionTest {
private ScoreCollection collection;
@Before
public void create() {
collection = new ScoreCollection();
}
@Test
public void answersArithmeticMeanOfTwoNumbers() {
collection.add(() -> 5);
collection.add(() -> 7);
int actualResult = collection.arithmeticMean();
assertThat(actualResult, equalTo(6));
}
@Test(expected=IllegalArgumentException.class)
public void throwsExceptionWhenAddingNull() {
collection.add(null);
}
@Test
public void answersZeroWhenNoElementsAdded() {
assertThat(collection.arithmeticMean(), equalTo(0));
}
@Test
public void dealsWithIntegerOverflow() {
collection.add(() -> Integer.MAX_VALUE);
collection.add(() -> 1);
assertThat(collection.arithmeticMean(), equalTo(1073741824));
}
}
|
cs |
첫번째 테스트 코드는 어느 개발자가 넣을 수 있는 예상가능한 입력 값이다. 하지만 그 다음부터 입력 값이 null일때, 혹은 계산을 수행하기 위한 Scorable 객체가 하나도 존재하지 않을때, 자료형의 최대값을 넘어섰을 경우 등의 경계 조건을 테스트 코드로 넣었다. 물론 해당 테스트 코드를 작성하고 실제 프로덕 코드에 아무런 조치를 하지 않는 다면, 두번째는 NullPointerException, 세번째는 ArithmeticException 등이 발생할 것이다. 이러한 것들을 방지하기 위해 프로덕 코드에 보호절을 넣어 입력 범위를 분명하게 해야한다.
|
1
2
3
4
5
6
7
8
9
10
11
12
13
14
15
16
|
public class ScoreCollection {
private List<Scoreable> scores = new ArrayList<>();
public void add(Scoreable scoreable) {
if (scoreable == null) throw new IllegalArgumentException();
scores.add(scoreable);
}
public int arithmeticMean() {
if (scores.size() == 0) return 0;
// ...
long total = scores.stream().mapToLong(Scoreable::getScore).sum();
return (int)(total / scores.size());
}
}
|
cs |
경계 조건을 설정한 테스트 코드를 작성하고 수행하므로써 경계 조건에 해당 하는 입력 값에 대한 보호절을 프로덕 코드에 적용할 수 있었다. 이렇게 항상 성공하는 테스트 케이스만 작성하는 것이 아니라, 경계조건에 해당하는 테스트 케이스도 고려해야 건강한 코드가 될 수 있다.(네번째 테스트 케이스는 다운 캐스팅으로 코드를 변경하므로써 해결하였다.)
만약 클래스가 외부에서 호출하는 API이고 클라이언트를 완전히 믿을 수 없다면 이러한 나쁜 데이터에 대한 보호가 더욱 필요하게 된다.
이러한 잠재적인 경계 조건을 뽑아내는데 CORRECT 약어는 많은 도움을 우리에게 준다.
- Conformance(준수) : 값이 기대한 양식을 준수하고 있는가?
- Ordering(순서) : 값의 집합이 적절하게 정렬되거나 정렬되지 않았나?
- Range(범위) : 이성적인 최소값과 최대값 안에 있는가?
- Reference(참조) : 코드 자체에서 통제할 수 없는 어떤 외부 참조를 포함하고 있는가?
- Existence(존재) : 값이 존재하는가(널이 아니거나, 0이 아니거나, 집합에 존재하는가 등)?
- Cardinality(기수) : 정확히 충분한 값들이 있는가?
- Time(절대적 혹은 상대적 시간) : 모든 것이 순서대로 일어나는가? 정확한 시간에? 정시에?
해당 내용에 대해서는 다음 포스팅에서 다루어볼 것이다.
3)I : 역 관계를 검사할 수 있는가?
테스트할때 때때로 논리적인 역 관계를 적용하여 행동을 검사할 수 있다. 종종 수학 계산에서 사용하기도 한다. 예를 들면 곱셈으로 나눗셈을 검증하고 뺄셈으로 덧겜을 검증하는 것이다.
그래서 우리는 테스트케이스를 검사할 때, 원래의 테스트케이스의 역 관계를 이용하여(프레디케이트의 보어) 테스트를 해 긍정 사례 답변들과 역 답변을 합하면 전체가 되는 테스트를 수행할 수 있다.
4)C : 다른 수단을 활용하여 교차 검사할 수 있는가?
예를 들면, 제곱근을 구하는 메서드가 있다면 우리는 자바의 Math.sqrt()를 이용해 결과가 동일한지 테스트할 수도 있지만 다른 수단을 이용해 조금은 정확도가 떨어지는 제곱근 자바 라이브러리를 이용해서도 테스트할 수 있다. 물론 동일한 결과를 내는지 확인해야한다. 이렇게 어떠한 상황에서든지 동일한 테스트 결과를 낼수 있어야한다.
5)E : 오류 조건을 강제로 일어나게 할 수 있는가?
행복 경로가 있다는 것은 반대로 불행한 경로도 있다는 것을 의미한다. 오류가 절대로 발생할 수 없다고 생각할 수도 있지만, 디스크가 꽉 차거나, 네트워크 오류, 이메일이 블랙홀에 빠지고 프로그램이 중단될 수 있다. 우리는 테스트 코드를 작성할 때 이러한 모든 실전 문제를 우아하고 이성적인 방식으로 다루어야 한다. 그렇게 하기 위해서는 테스트도 오류들을 강제로 발생시켜야한다.
유효하지 않은 인자들을 다루는 등의 일은 쉽지만 특정 네트워크 오류를 시뮬레이션하려면 특별한 기법이 필요하다. 다음은 환경적인 제약 사항들을 담은 오류상황이다.
- 메모리가 가득 찰 때
- 디스크 공간이 가득 찰 때
- 벽시계 시간에 관한 문제들(서버와 클라이언트 간 시간이 달라서 발생하는 문제)
- 네트워크 가용성 및 오류들
- 시스템 로드
이러한 상황을 다루는 테스트 코드는 추후 포스팅에서 다루어볼 것이다.
6)P : 성능 조건은 기준에 부합하는가?
구글의 롭 파이크는 "병목 지점은 놀라운 곳에서 일어납니다. 따라서 실제로 병목이 어디인지 증명되기 전까지는 미리 잠직하여 코드를 난도질하지 마세요"라고 말한다. 사실 필자도 예전에는 그랬었지만, 프로그래머는 성능 문제가 어디에 있으며 최적의 해법이 무엇인지 추측한다.
사실 추측만으로 성능 문제에 바로 대응하기보다는 단위 테스트를 설계하여 진짜 문제가 어디에 있으며 예상한 변경 사항으로 어떤 차이가 생겼는지 파악해야 한다.
|
1
2
3
4
5
6
7
8
9
10
11
12
13
14
15
16
17
18
19
20
21
22
23
24
25
26
27
28
29
30
31
32
33
|
public class ScoreCollection {
...
private long run(int times, Runnable func) {
long start = System.nanoTime();
for (int i = 0; i < times; i++)
func.run();
long stop = System.nanoTime();
return (stop - start) / 1000000;
}
@Test
public void findAnswers() {
int dataSize = 5000;
for (int i = 0; i < dataSize; i++)
profile.add(new Answer(
new BooleanQuestion(i, String.valueOf(i)), Bool.FALSE));
profile.add(
new Answer(
new PercentileQuestion(
dataSize, String.valueOf(dataSize), new String[] {}), 0));
int numberOfTimes = 1000;
long elapsedMs = run(numberOfTimes,
() -> profile.find(
a -> a.getQuestion().getClass() == PercentileQuestion.class));
assertTrue(elapsedMs < 1000);
}
...
}
|
cs |
위오 같이 코드 수행 시간을 체크하는 성능 테스트가 있다고 생각해보자. 과연 유용한 테스트 코드 일까?
우선 수행시간과 같이 성능에 대한 테스트를 할 경우 아래와 같은 사항들을 주의해야한다.
- 전형적으로 코드 덩어리를 충분한 횟수만큼 실행해야한다. 이렇게 타이밍과 CPU 클록 주기에 관한 이슈를 제거한다.
- 반복하는 코드 부분을 자바(JVM)가 최적화하지 못하는지 확인해야 한다.
- 최적화되지 않은 테스트는 한 번에 수 밀리초가 걸리는 일반적인 테스트 코드들보다 매우 느리다. 느린 테스트들은 빠른 것과 분리한다.
- 동일한 머신이라도 실행 시간은 시스템 로드처럼 잡다한 요소에 따라 달라질 수 있다.
우선 앞선 코드에서는 검색 동작이 1초 안에 1000번 실행 가능한지 단언한다. 하지만 1초라는 것은 매우 주관적인 수치이다. 거대한 서버에서 테스트를 실행하면 충분히 빠르겠지만 사양이 형편없는 데스크탑에서 실행하면 그다지 빠르지 않을 것이다. 유일한 해법은 테스트 환경을 프로덕 환경과 가장 유사한 환경(머신)에서 실행하는 것이다.
그리고 초당 1000번의 조건은 객관적이지 못하다. 성능 요구 사항은 보통 종단 간(end-to-end) 기능을 기반으로 하지만 앞선 테스트는 단위 수준으로 검증하고 있다.
테스트하는 메서드가 사용자에게 보여지는 진입점이 아니라면 마치 사과와 오렌지를 비교하는 것과 같은 수준이다.
단위 성능 측정을 활용하는 방안은 변경 사항을 만들 때, 기준점으로 활용하는 것이다. 어떠한 메서드가 최적화되지 못하는 코드라고 가정하면 성능이 향상되는지 확인하기 위해 로직을 교체할 것이다. 최적화를 하기 전에 먼저 이전 코드로 기준점(실행 경과 시간)을 잡고 이후 변경된 로직의 실행 경과 시간을 계산해 성능 결과를 비교한다.(한번의 실행이 아닌 다수의 실행으로 평균 실행 경과 시간을 구해야한다. 실제로 처음 실행되는 코드는 클래스가 로드되고 캐시되지 않은 데이터가 많기에 느리다.)
*모든 성능 최적화 시도는 실제 데이터로 해야 하며 추측을 기반으로 해서는 안된다.
사실 성능이 핵심 고려 사항이라면 단위 테스트보다는 더 고수준으로 JMeter 도구 등을 이용한 테스트를 하는 것이 나을 수도 있다.
'Web > TDD' 카테고리의 다른 글
| TDD - 테스트(단위 테스트) 리팩토링 (0) | 2019.09.10 |
|---|---|
| TDD - 단위 테스트 목(Mock)객체 사용 (0) | 2019.09.09 |
| TDD - 좋은 단위 테스트 작성하는 방법(FIRST 속성) (0) | 2019.09.05 |
| TDD - JUnit 테스트 코드 구성 방법.(테스트 코드 조직) (0) | 2019.09.04 |
| TDD - JUnit assert(단언,assertThat,assertEqual,assertTrue,asserrtFalse,is..) 예제 (0) | 2019.09.04 |

단위 테스트를 작성하는데 있어서 FIRST 속성을 지킨다면 더 좋은 단위테스트를 작성할 수 있다. 그렇다면 FIRST 속성이란 무엇일까?
- Fast : 빠른
- Isolated : 고립된
- Repeatable : 반복 가능한
- Self-validating : 스스로 검증 가능한
- Timely : 적시의
일반적인 단위 테스트를 작성하던 TDD 개발 방법론을 이용하던 FIRST 원리를 고수하면 더 나은 테스트 코드를 작성하는 데 도움이 된다.
1)Fast : 빠르게
테스트 코드를 느린 로직에 의존하지 않고 테스트를 빠르게 유지한다. 조금더 클린한 객체지향 설계에 맞춰 애플리케이션이 설계된다면 조금더 나은 테스트 코드를 작성하기 좋아진다.
|
1
2
3
4
5
6
7
8
9
10
11
12
13
14
15
16
17
18
19
20
21
22
23
24
25
26
27
28
29
30
31
32
33
34
35
36
37
38
39
40
41
42
43
44
45
46
47
48
49
50
51
52
53
54
55
56
57
58
|
public class StatCompiler {
static Question q1 = new BooleanQuestion("Tuition reimbursement?");
static Question q2 = new BooleanQuestion("Relocation package?");
class QuestionController {
Question find(int id) {
if (id == 1)
return q1;
else
return q2;
}
}
private QuestionController controller = new QuestionController();
public Map<String, Map<Boolean, AtomicInteger>> responsesByQuestion(
List<BooleanAnswer> answers) {
Map<Integer, Map<Boolean, AtomicInteger>> responses = new HashMap<>();
answers.stream().forEach(answer -> incrementHistogram(responses, answer));
return convertHistogramIdsToText(responses);
}
private Map<String, Map<Boolean, AtomicInteger>> convertHistogramIdsToText(
Map<Integer, Map<Boolean, AtomicInteger>> responses) {
Map<String, Map<Boolean, AtomicInteger>> textResponses = new HashMap<>();
responses.keySet().stream().forEach(id ->
textResponses.put(controller.find(id).getText(), responses.get(id)));
return textResponses;
}
private void incrementHistogram(
Map<Integer, Map<Boolean, AtomicInteger>> responses,
BooleanAnswer answer) {
Map<Boolean, AtomicInteger> histogram =
getHistogram(responses, answer.getQuestionId());
histogram.get(Boolean.valueOf(answer.getValue())).getAndIncrement();
}
private Map<Boolean, AtomicInteger> getHistogram(
Map<Integer, Map<Boolean, AtomicInteger>> responses, int id) {
Map<Boolean, AtomicInteger> histogram = null;
if (responses.containsKey(id))
histogram = responses.get(id);
else {
histogram = createNewHistogram();
responses.put(id, histogram);
}
return histogram;
}
private Map<Boolean, AtomicInteger> createNewHistogram() {
Map<Boolean, AtomicInteger> histogram;
histogram = new HashMap<>();
histogram.put(Boolean.FALSE, new AtomicInteger(0));
histogram.put(Boolean.TRUE, new AtomicInteger(0));
return histogram;
}
}
|
cs |
위와 같은 코드가 있고 우리는 responsesByQuestion() 이라는 어떠한 메소드(행위)를 테스트 한다고 가정해보자. 해당 메서드는 다른 메서드를 다수 호출하고 있는 어떠한 행위이다. 그중 마지막 convertHistogramIdsToText()를 호출하고 있는데, 해당 메서드는 controller.find(id)로 데이터베이스를 액세스해서 id값에 해당되는 question text 값을 가져오고 있다. 만약 테스트할 개수가 아주 많다면 그만큼 데이터 액세스하는 속도가 줄어버릴 것이다. 그리고 해당 클래스를 테스트하는 것 말고, 다른 테스트 코드도 이렇게 데이터 베이스를 액세스하고 있다면? 전체적인 테스트 속도는 느려질 것이다. 이러한 문제점을 작은 설계 변경으로 해결할 수 있다!
|
1
2
3
4
5
6
7
8
9
10
11
12
13
14
15
16
17
18
19
20
21
22
23
24
25
26
27
28
29
30
31
32
33
34
35
36
37
38
39
40
41
42
43
44
45
46
47
48
49
50
51
52
53
54
55
|
public class StatCompiler {
private QuestionController controller = new QuestionController();
public Map<Integer,String> questionText(List<BooleanAnswer> answers) {
Map<Integer,String> questions = new HashMap<>();
answers.stream().forEach(answer -> {
if (!questions.containsKey(answer.getQuestionId()))
questions.put(answer.getQuestionId(),
controller.find(answer.getQuestionId()).getText()); });
return questions;
}
public Map<String, Map<Boolean, AtomicInteger>> responsesByQuestion(
List<BooleanAnswer> answers, Map<Integer,String> questions) {
Map<Integer, Map<Boolean, AtomicInteger>> responses = new HashMap<>();
answers.stream().forEach(answer -> incrementHistogram(responses, answer));
return convertHistogramIdsToText(responses, questions);
}
private Map<String, Map<Boolean, AtomicInteger>> convertHistogramIdsToText(
Map<Integer, Map<Boolean, AtomicInteger>> responses,
Map<Integer,String> questions) {
Map<String, Map<Boolean, AtomicInteger>> textResponses = new HashMap<>();
responses.keySet().stream().forEach(id ->
textResponses.put(questions.get(id), responses.get(id)));
return textResponses;
}
private void incrementHistogram(
Map<Integer, Map<Boolean, AtomicInteger>> responses, BooleanAnswer answer) {
Map<Boolean, AtomicInteger> histogram =
getHistogram(responses, answer.getQuestionId());
histogram.get(Boolean.valueOf(answer.getValue())).getAndIncrement();
}
private Map<Boolean, AtomicInteger> getHistogram(
Map<Integer, Map<Boolean, AtomicInteger>> responses, int id) {
Map<Boolean, AtomicInteger> histogram = null;
if (responses.containsKey(id))
histogram = responses.get(id);
else {
histogram = createNewHistogram();
responses.put(id, histogram);
}
return histogram;
}
private Map<Boolean, AtomicInteger> createNewHistogram() {
Map<Boolean, AtomicInteger> histogram;
histogram = new HashMap<>();
histogram.put(Boolean.FALSE, new AtomicInteger(0));
histogram.put(Boolean.TRUE, new AtomicInteger(0));
return histogram;
}
}
|
cs |
questionText() 메서드가 추가 된 것을 볼 수 있다. BooleanAnswer리스트를 매개변수로 받아서 아이디 값에 대응되는 question text를 가져오는 메서드이다. 그리고 나머지 메서드를 보면 이미 데이터베이스에서 액세스해서 가져온 id대question text 해시맵을 매개변수로 받고 있다. 만약 이렇게 코드 설계를 살짝 변경하였다면 테스트 코드는 어떻게 달라질까?!
|
1
2
3
4
5
6
7
8
9
10
11
12
13
14
15
16
17
18
19
20
21
22
23
24
25
26
27
28
|
public class StatCompilerTest {
@Test
public void responsesByQuestionAnswersCountsByQuestionText() {
StatCompiler stats = new StatCompiler();
List<BooleanAnswer> answers = new ArrayList<>();
answers.add(new BooleanAnswer(1, true));
answers.add(new BooleanAnswer(1, true));
answers.add(new BooleanAnswer(1, true));
answers.add(new BooleanAnswer(1, false));
answers.add(new BooleanAnswer(2, true));
answers.add(new BooleanAnswer(2, true));
Map<Integer,String> questions = new HashMap<>();
questions.put(1, "Tuition reimbursement?");
questions.put(2, "Relocation package?");
Map<String, Map<Boolean,AtomicInteger>> responses =
stats.responsesByQuestion(answers, questions);
assertThat(responses.get("Tuition reimbursement?").
get(Boolean.TRUE).get(), equalTo(3));
assertThat(responses.get("Tuition reimbursement?").
get(Boolean.FALSE).get(), equalTo(1));
assertThat(responses.get("Relocation package?").
get(Boolean.TRUE).get(), equalTo(2));
assertThat(responses.get("Relocation package?").
get(Boolean.FALSE).get(), equalTo(0));
}
}
|
cs |
위와 같이 테스트 코드를 작성할 수 있게 된다. 데이터베이스 액세스하는 로직을 별도의 메서드로 분리하였고, 해당 메서드의 결과를 매개변수로 넘기는 구조로 변경하였기에 테스트 코드를 작성할때는 굳이 데이터베이스를 액세스하지 않고 로컬 메모리 영역 내에서 해결이 가능하게 되었다. 결론적으로 데이터베이스 액세스 시간을 줄이므로써 훨씬 빠른 테스트 코드를 작성할 수 있게 되었다.
2)Isolated : 고립된
좋은 단위 테스트는 검증하려는 작은 양의 코드에 집중한다. 이것이 우리가 단위라고 말하는 정의와 부합한다. 직접적 혹은 간접적으로 테스트 코드와 상호 작용하는 코드가 많아질수록 문제가 발생할 소지가 늘어난다.
테스트 대상 코드는 데이터베이스를 읽는 다른 코드와 상호 작용할 수도 있다. 데이터 의존성은 많은 문제를 만들기도 한다. 궁극적으로 데이터베이스에 의존해야 하는 테스트는 데이터베이스가 올바른 데이터를 가지고 있는지 확인해야 한다. 그리고 데이터 소스를 공유한다면 테스트를 깨드릴 수 있는 외부 변화도 고민해보아야 한다. 외부 저장소와 상호작용하게 된다면, 꼭 테스트가 가용성 혹은 접근성 이슈로 실패할 가능성이 있다는 것을 염두하자.
또 좋은 단위 테스트는 다른 단위 테스트에 의존하지 않는다. 흔히 여러 테스트가 값비싼 초기화 데이터를 재사용하는 방식으로 테스트 순서를 조작하여 전체 테스트의 실행 속도를 높이려 할 수도 있는데, 이러한 의존성은 악순환을 유발할 수 있다. 따라서 테스트 코드는 어떤 순서나 시간에 관계없이 실행할 수 있어야한다.
각 테스트가 작은 양의 동작에만 집중하면 테스트 코드를 집중적이고 독립적으로 유지하기 쉬워진다. 하나의 테스트 메서드에 두 번째 assert 구문을 추가할 때, "이 assert 구문이 단일 동작을 검증하도록 돕는가, 아니면 내가 새로운 테스트 이름으로 기술할 수 있는 어떤 동작을 대표하는가"를 스스로 질문해보고 살펴보자.
객체지향설계에 대한 이야기이지만 테스트 코드에도 동일하게 적용될 수 있는 단일 책임 원칙(SRP)을 따르자 ! 즉, 테스트 코드도 하나의 단일 행동을 테스트하는 코드여야 한다. 혹여나 테스트 메서드가 하나 이상의 이유로 깨진다면 테스트를 분할하는 것도 고려하자.
3)Repeatable : 반복가능한
반복 가능한 테스트는 실행할 때마다 결과가 같아야 한다. 즉, 어떤 상황에서는 성공, 어떤 상황에서는 실패하는 테스트코드를 만들지 말아야한다. 반복가능한 테스트를 만들기 위해서는 직접 통제할 수 없는 외부 환경에 있는 항목들과 격리시켜야 한다. 하지만 시스템은 불가피하게 통제할 수 없는 요소와 상호 작용해야 할 것이다. 예를 들면 현재 시간을 다루어야 하는 테스트 코드는 반복 가능한 테스트를 힘들게 하는 요인이 될 수 있다. 이때는 테스트 대상 코드의 나머지를 격리하고 시간 변화에 독립성을 유지하는 방법으로 목 객체를 사용할 수도 있다.
4)Self-validating : 스스로 검증가능한
테스트는 기대하는 결과가 무엇인지 단언(assert)하지 않으면 올바른 테스트라고 볼 수 없다. 단위 테스트는 오히려 개발 시간을 단축시켜준다. main 메서드 안에 표준출력 등을 이용하여 수동으로 검증하는 것은 시간 소모적인 절차고 테스트 위험의 리스크가 증가할 수 있다. JUnit 같은 스스로 검증 가능한 테스트 코드를 작성하거나 더 큰 규모에서는 젠킨스 등 지속적 통합(CI) 도구를 활용할 수 있다.
5)Timely : 적시의
단위테스트를 뒤로 미루지 말고 적시(즉시)에 작성하자. 단위 테스트를 점점 뒤로 미룰 수록 더욱더 테스트를 작성하기 어려워진다.
'Web > TDD' 카테고리의 다른 글
| TDD - 테스트(단위 테스트) 리팩토링 (0) | 2019.09.10 |
|---|---|
| TDD - 단위 테스트 목(Mock)객체 사용 (0) | 2019.09.09 |
| TDD - 단위 테스트, 무엇을 테스트 해야할까? Right-BICEP (1) | 2019.09.06 |
| TDD - JUnit 테스트 코드 구성 방법.(테스트 코드 조직) (0) | 2019.09.04 |
| TDD - JUnit assert(단언,assertThat,assertEqual,assertTrue,asserrtFalse,is..) 예제 (0) | 2019.09.04 |