
'2019/09/10'에 해당되는 글 4건
- 2019.09.10 :: Spring - Model Validation 방법!(파라미터 Validation),@Valid
- 2019.09.10 :: Spring - @RequestParam, @ModelAttribute의 차이점?
- 2019.09.10 :: TDD - 테스트 주도 개발(Test Driven Development) 1
- 2019.09.10 :: TDD - 테스트(단위 테스트) 리팩토링

우리는 컨트롤러에서 사용자가 넘겨준 파라미터를 전달 받을 때, @ModelAttribute를 붙여서 혹은 생략한 특정 객체로 파라미터를 받게된다. 우리는 이때 2가지 상황을 고려할 수 있다.
- 파라미터 바인딩에 실패(데이터 타입 등이 맞지 않는 경우)
- 파라미터 바인딩은 문제없이 됬으나, 들어온 파라미터가 비즈니스 로직에 맞지 않는 혹은 유효하지 않은 파라미터 일경우
이러한 파라미터를 검증하는 방법은 무엇이 있을까? 크게 2가지 방법이 존재한다.
- 사용자 정의 Validator 구현
- JSR-303 애너테이션
간단히 두가지를 다루어본다.
사용자 정의 Validator
|
1
2
3
4
5
6
7
8
9
10
11
12
13
14
15
16
17
18
19
20
21
22
23
24
25
26
27
28
29
30
31
32
33
34
35
36
37
38
39
40
41
42
43
44
45
46
47
48
49
50
51
52
53
54
55
56
57
58
59
60
61
62
63
64
65
66
67
68
69
70
71
72
|
@Slf4j
@Component
public class UserParamValidator implements Validator {
@Override
public boolean supports(Class<?> aClass) {
//isAssignableFrom은 하위 타입도 적용되게 하는 메서드이다.
return (User.class.isAssignableFrom(aClass));
}
@Override
public void validate(Object o, Errors errors) {
log.info("User Param Validator");
User user = (User)o;
if(StringUtils.isEmpty(user.getFirstName())){
errors.rejectValue("firstName","param.required");
}
}
}
@Slf4j
@RestController
@RequestMapping("/user")
public class UserController {
@Autowired
private UserParamValidator validator;
@InitBinder
public void initBinder(WebDataBinder webDataBinder){
webDataBinder.setValidator(validator);
}
@GetMapping("/find")
public Object findById(@ModelAttribute("findUser") @Valid User user, BindingResult bindingResult){
List<String> resultMessages = new ArrayList<>();
if(bindingResult.hasErrors()){
List<FieldError> fieldsErrors = bindingResult.getFieldErrors();
fieldsErrors.stream().forEach(fieldError->{
log.info("bind error objectName = {}, fieldName = {} ,error code = {}",fieldError.getObjectName(),fieldError.getField(),fieldError.getCode());
});
return resultMessages;
}
if(user.getId() == 1){
user.setLastName("yoon");
user.setAge(28);
user.setLevel(Level.BASIC);
return user;
}
return null;
}
}
@Getter
@Setter
@NoArgsConstructor
@AllArgsConstructor
class User{
private int id;
private String firstName;
private String lastName;
private int age;
private Level level;
}
|
cs |
위와 같이 사용자 정의 Validator 클래스를 정의하고 특정 컨트롤러에서 DI 받은 후, @InitBinder 메서드에 해당 Validator를 등록해준다. 그리고 검증이 실패한 값이 들어온다면 컨트롤러 BindingResult에 검증 실패한 정보가 저장된다. 이러한 검증 실패정보를 로그로 찍고 있는 예제이다.
|
1
2
3
4
5
6
7
8
9
10
11
12
13
14
15
16
17
18
19
20
21
22
23
24
25
26
27
28
29
30
31
32
33
34
35
36
37
38
39
40
41
42
43
44
|
@Slf4j
@RestController
@RequestMapping("/user")
public class UserController {
@GetMapping("/find")
public Object findById(@ModelAttribute("findUser") @Valid User user, BindingResult bindingResult, Locale locale){
List<String> resultMessages = new ArrayList<>();
if(bindingResult.hasErrors()){
List<FieldError> fieldsErrors = bindingResult.getFieldErrors();
fieldsErrors.stream().forEach(fieldError->{
log.info("bind error objectName = {}, fieldName = {} ,error code = {}",fieldError.getObjectName(),fieldError.getField(),fieldError.getCode());
resultMessages.add(messageSource.getMessage(fieldError.getField()+"."+fieldError.getCode(),null, locale));
});
return resultMessages;
}
if(user.getId() == 1){
user.setLastName("yoon");
user.setAge(28);
user.setLevel(Level.BASIC);
return user;
}
return null;
}
}
@Getter
@Setter
@NoArgsConstructor
@AllArgsConstructor
class User{
private int id;
@NotNull
private String firstName;
private String lastName;
private int age;
private Level level;
}
|
cs |
두번째 방법은 직접 엔티티 클래스에 제약조건 애너테이션을 달아주는 방법이다. 그러면 별도의 Validator DI 없이도 BindingResult에 엔티티 클래스에 있는 애너테이션을 이용한 검증을 한 후 검증에 실패하면 정보를 넣어준다.
만약 검증이 아니고 데이터 타입이 잘못넘어와서 바인딩 자체가 실패하면 어떻게 될까?
그렇다면 아래와 같은 errorCode가 발생한다.
FieldName.typeMismatch
좋다 여기까지, 바인딩 오류 혹은 검증이 실패한 결과가 BindResult에 담겼다. 그렇다면 그 이후에는 어떻게 처리하면 좋을까? 보통 이럴때는 MessageSource를 이용해 errorCode에 해당되는 미리 준비된 문자열을 사용자에게 보여준다. 예를 들면 아래와 같은 상황이다.
회원가입을 하는 과정에서 사용자가 userId값을 넘기지 않으면 "ID를 입력해주세요."라는 문구가 뿌려지는데, 이럴 경우 미리 준비된 errorCode에 해당되는 메시지를 준비하여 userId 파라미터가 빈값일때 해당 메시지를 전달해줄 수 있다.
|
1
2
3
4
5
6
7
8
9
10
11
12
13
14
15
16
17
18
19
20
21
22
23
24
25
26
27
28
29
30
31
32
33
34
35
36
37
38
39
40
41
42
43
44
45
46
47
48
49
50
51
52
|
@Configuration
public class WebMvcConfig implements WebMvcConfigurer {
@Autowired
private LocaleChangeInterceptor localeChangeInterceptor;
@Value("${spring.messages.basename}")
String baseName;
@Value("${spring.messages.encoding}")
String defaultEncoding;
@Value("${cookie.locale.param}")
String cookieName;
@Override
public void addInterceptors(InterceptorRegistry registry) {
registry.addInterceptor(localeChangeInterceptor);
}
/*
* MessageSource Bean register
*/
@Bean
public MessageSource messageSource() {
ReloadableResourceBundleMessageSource reloadableResourceBundleMessageSource = new ReloadableResourceBundleMessageSource();
reloadableResourceBundleMessageSource.setBasename(baseName);
reloadableResourceBundleMessageSource.setDefaultEncoding(defaultEncoding);
return reloadableResourceBundleMessageSource;
}
/*
* Locale Resolver Bean register
*/
@Bean
public LocaleResolver localeResolver() {
CookieLocaleResolver cookieLocaleResolver = new CookieLocaleResolver();
cookieLocaleResolver.setCookieName(cookieName);
cookieLocaleResolver.setDefaultLocale(Locale.KOREA);
return cookieLocaleResolver;
}
@Bean
public LocaleChangeInterceptor localeChangeInterceptor() {
LocaleChangeInterceptor localeChangeInterceptor = new LocaleChangeInterceptor();
localeChangeInterceptor.setParamName(cookieName);
return localeChangeInterceptor;
}
}
|
cs |
위와 같이 필요한 빈을 등록해준다.

message.properties 파일들을 생성해준다.
|
1
2
|
firstName.param.required=이름 입력은 필수입니다.
id.typeMismatch=유효하지 않은 유저 아이디 값입니다.
|
cs |
|
1
2
3
4
5
6
7
8
9
10
11
12
13
14
15
16
17
18
19
20
21
22
23
24
25
26
27
28
29
30
31
32
33
34
35
36
37
38
|
@Slf4j
@RestController
@RequestMapping("/user")
public class UserController {
@Autowired
private UserParamValidator validator;
@Autowired
private MessageSource messageSource;
@InitBinder
public void initBinder(WebDataBinder webDataBinder){
webDataBinder.setValidator(validator);
}
@GetMapping("/find")
public Object findById(@ModelAttribute("findUser") @Valid User user, BindingResult bindingResult, Locale locale){
List<String> resultMessages = new ArrayList<>();
if(bindingResult.hasErrors()){
List<FieldError> fieldsErrors = bindingResult.getFieldErrors();
fieldsErrors.stream().forEach(fieldError->{
log.info("bind error objectName = {}, fieldName = {} ,error code = {}",fieldError.getObjectName(),fieldError.getField(),fieldError.getCode());
resultMessages.add(messageSource.getMessage(fieldError.getField()+"."+fieldError.getCode(),null, locale));
});
return resultMessages;
}
if(user.getId() == 1){
user.setLastName("yoon");
user.setAge(28);
user.setLevel(Level.BASIC);
return user;
}
return null;
}
}
|
cs |
바인딩 errorCode에 해당 되는 Message가 생성되는 것을 볼 수 있다.
'Web > Spring' 카테고리의 다른 글
| Springboot - Springboot MVC Test(JUnit) (0) | 2019.10.10 |
|---|---|
| Spring - Spring Cache 추상화(스프링 캐시 추상화),@Cacheable,@CacheEvict,@CachePut (0) | 2019.09.11 |
| Spring - @RequestParam, @ModelAttribute의 차이점? (0) | 2019.09.10 |
| Springboot - Bean Scope(싱글톤, 프로토타입) ? (0) | 2019.08.17 |
| Spring - Field vs Constructor vs Setter Injection 그리고 순환참조(Circular Reference) (3) | 2019.08.17 |

이번 포스팅은 @RequestParam과 @ModelAttribute의 차이점에 대해 다루어볼 것이다. 이번에 다루어볼 내용은 특정 유저관련 컨트롤러 코드를 작성하여 살펴볼 것이다.
작업환경은 MacOS+intelliJ로 구성하였다.
|
1
2
3
4
5
6
7
8
9
10
11
12
13
14
15
16
17
18
19
20
21
22
23
24
25
26
27
28
29
30
31
32
33
34
35
36
37
38
39
40
41
42
43
44
|
@Slf4j
@RestController
@RequestMapping("/user")
public class UserController {
@GetMapping("/insert")
public Object insertUser(@ModelAttribute("findUser") User user, BindingResult bindingResult){
if(bindingResult.hasErrors()){
log.info("binding error");
return "invalidParam";
}
if(user.getId() == 1){
user.setLastName("yoon");
user.setAge(28);
user.setLevel(Level.BASIC);
return user;
}
return null;
}
@GetMapping("/insert2")
public Object insertUser(@RequestParam int id, @RequestParam String firstName, @RequestParam String lastName){
return "RequestParamBinding";
}
}
@Getter
@Setter
@NoArgsConstructor
@AllArgsConstructor
class User{
private int id;
private String firstName;
private String lastName;
private int age;
private Level level;
}
|
cs |
위와 같은 코드가 있다. 세부적인 로직은 제외하고 파라미터를 바인딩하는 부분을 집중해보자. 우선 @RequestParam과 @ModelAttribute의 파라미터 바인딩에는 큰 차이가 있다. 바로 객체로 받는냐, 혹은 쿼리스트링을 하나하나 바인딩 받느냐의 차이이다. 이것은 코드의 가독성에 아주 큰 차이가 있다. 두번째 차이점은 @ModelAttribute는 사용자가 직접 View에 뿌려질 Model객체를 직접 set하지 않아도 된다는 점이다. @ModelAttribute는 스프링이 직접 ModelMap에 객체를 넣어주기 때문이다. 이러한 바인딩 차이점 이외에 한가지 아주 큰 차이점이 있다.
매핑을 보면 @ModelAttribute에는 BindingResult라는 인자가 들어가있는 것을 볼 수 있다. 하지만 @RequestParam은 없다. 과연 무슨 말일까?
@ModelAttribute는 사실 파라미터를 검증할 수 있는 기능을 제공한다. 이 말은 파라미터 바인딩에 예외가 발생하여도 혹은 파라미터 바인딩은 문제없이 됬으나 로직처리에 적합하지 않은 파라미터가 들어오는 등 이러한 파라미터를 검증할 수 있는 기능이 있다. 만약 파라미터 바인딩에 예외가 발생하였을 때, @ModelAttribute와 @RequestParam의 차이점을 보자. 전자는 바인딩 예외를 BindingResult에 담아준다. 즉, 4xx 예외가 발생하지 않는 것이다. 하지만 @RequestParam 같은 경우 바인딩 예외가 발생하는 순간 TypeMisMatch 예외를 발생시켜 사용자에게 4xx status code를 전달한다.
그러면 개발자는 파라미터를 검증하는 로직을 컨트롤러 코드와 따로 분리하여 바인딩된 파라미터의 값의 유효성을 검사할 수 있게 해준다. 만약 @RequestParam이라면 직접 비즈니스 로직내에서 파라미터를 검증하는 코드가 들어가야 할 것이다.
바인딩 예외 처리의 차이점을 간단한 테스트 코드로 테스트 해보았다.
|
1
2
3
4
5
6
7
8
9
10
11
12
13
14
15
16
17
18
19
20
21
22
23
24
25
26
27
28
29
30
31
32
33
34
35
36
37
38
39
|
@SpringBootTest
@RunWith(SpringRunner.class)
public class UserControllerTest {
private static final String FINDBYID_MODELATTRIBUTE_REQUEST_URI = "/user/find";
private static final String FINDBYID_REQUESTPARAM_REQUEST_URI = "/user/find2";
private User validParamForFindByUserId ;
private MockMvc mockMvc;
@Before
public void init(){
this.mockMvc = MockMvcBuilders.standaloneSetup(new UserController()).build();
}
@Before
public void initParam(){
validParamForFindByUserId = new User(1,"yeoseong","yoon",28,Level.valueOf(1));
}
@Test
public void paramVaildationWhenInvalidInputParamWithModelAttribute() throws Exception {
MvcResult createResult = mockMvc.perform(get(FINDBYID_MODELATTRIBUTE_REQUEST_URI+"?id=abc"))
.andDo(print())
.andExpect(content().string("invalidParam"))
.andReturn()
;
}
@Test
public void paramValidationWhenInvalidInputParamWithRequestParam() throws Exception {
MvcResult createResult = mockMvc.perform(get(FINDBYID_REQUESTPARAM_REQUEST_URI+"?id=abc"))
.andDo(print())
.andExpect(status().is4xxClientError())
.andReturn()
;
}
}
|
cs |
위 테스트를 돌려보면 우리가 기대하는 바인딩 예외처리 테스트가 무사히 통과할 것이다.
'Web > Spring' 카테고리의 다른 글
| Spring - Spring Cache 추상화(스프링 캐시 추상화),@Cacheable,@CacheEvict,@CachePut (0) | 2019.09.11 |
|---|---|
| Spring - Model Validation 방법!(파라미터 Validation),@Valid (0) | 2019.09.10 |
| Springboot - Bean Scope(싱글톤, 프로토타입) ? (0) | 2019.08.17 |
| Spring - Field vs Constructor vs Setter Injection 그리고 순환참조(Circular Reference) (3) | 2019.08.17 |
| Springboot - DB Datasource 암호화/복호화(application.properties) (0) | 2019.08.05 |
작성하려는 코드가 있다면 항상 먼저 어떻게 그 코드를 테스트할지 고민해야한다. 코드를 작성한 후에 어떻게 테스트할지 고민하기보다 작성할 코드를 묘사하는 테스트를 설계해야 한다. 이것이 테스트 주도 개발(TDD, Test Driven Development)에 기반을 둔 단위 테스트 전략의 핵심이다.
TDD에서 단위 테스트를 시스템의 모양을 잡고 통제하는 도구로 활용해야 한다. 단위 테스트는 종종 잘 선별한 후 한쪽에 치워 놓고 나중에 반영하려는 코드가 될 수 있는데, 단위 테스트는 소프트웨어를 어떻게 만들어야 할지에 관한 잘 훈련된 사이클의 핵심적인 부분이다. 따라서 TDD를 채택하면 소프트웨어 설계는 달라지고, 아마 훨씬 더 좋은 설계의 코드가 될 것이다.
TDD의 주된 이익
단위 테스트를 사후에 작성하여 얻을 수 있는 가장 분명하고 명확한 이익은 "코드가 예상한 대로 동작한다는 자신감을 얻는 것" 이다. TDD에서도 역시 동일한 이익과 그 이상을 얻을 수 있다.
코드를 깨끗하게 유지하도록 치열하게 싸우지 않으면 시스템은 점점 퇴화한다. 코드를 재빠르게 추가할 수는 있지만 처음에는 좋은 코드라기보다는 그다지 위대하지 않은 코드일 가능성이 높다. 보통은 개발 초기부터 나쁜 코드를 여러 가지 이유로 정리하지 않고는 한다.
TDD에서는 코드가 변경될 것이라는 두려움을 지울 수 있다. 정말로 리팩토링은 위험 부담이 있는 일이기도 하고 우리는 위험해보이지 않는 코드를 변경할 때도 실수를 하곤 한다. 하지만 TDD를 잘 따른다면 구현하는 실질적인 모든 사례에 대해 단위 테스트를 작성하게 된다. 이러한 단위 테스트는 코드를 지속적으로 발전시킬 수 있는 자유를 준다.
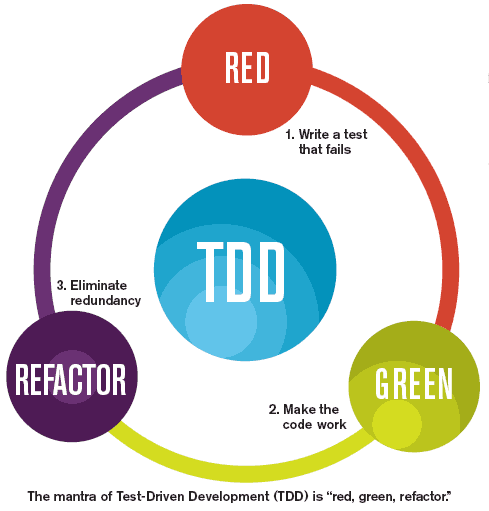
TDD는 세 부분의 사이클로 구성된다.
- 실패하는 테스트 코드 작성하기
- 테스트 통과하기
- 이전 두 단계에서 추가되거나 변경된 코드 개선하기
첫 번째 단계는 시스템에 추가하고자 하는 동작을 정의하는 테스트 코드를 작성하는 것이다.
우리는 이미 이전 포스팅에서 이미 다루어봤던 Profile이라는 클래스를 새로 만들 것이다. 가장 단순한 사례로, Profile 클래스 자체를 만들기 전에 먼저 테스트 코드를 아래와 같이 작성해보자.
|
1
2
3
4
5
6
|
public class ProfileTest {
@Test
public void matchesNothingWhenProfileEmpty() {
new Profile();
}
}
|
cs |
Profile이라는 클래스가 존재하지 않기 때문에 컴파일 에러가 발생할 것이다. 또한 IDEA는 Profile이라는 클래스가 없으므로 클래스를 생성해달라 할 것이다. Profile 클래스를 Quick Fix 기능으로 생성하면 컴파일에러는 해결될 것이다. 사실 이러한 작은 테스트는 컴파일되는 것만으로 충분한 테스트가 되기 때문에 굳이 테스트를 실행시킬 필요는 없다.
|
1
2
3
4
5
6
7
8
9
10
11
12
13
14
15
16
17
18
19
|
public class ProfileTest {
@Test
public void matchesNothingWhenProfileEmpty() {
Profile profile = new Profile();
Question question = new BooleanQuestion(1, "Relocation package?");
Criterion criterion =
new Criterion(new Answer(question, Bool.TRUE), Weight.DontCare);
boolean result = profile.matches(criterion);
assertFalse(result);
}
}
public class Profile {
public boolean matches(Criterion criterion) {
return true;
}
}
|
cs |
컴파일 에러를 해결하며 위와 같이 작은 테스트 단위로 하나씩 코드를 증가시켜가며 작성해준다. 여기까지 메서드 내부를 세부적으로 구현하지 않고 단순히 true를 리턴하는 메서드를 작성하므로써 실패하는 테스트 코드를 작성하였다. 그리고 테스트 성공을 위해 assertTrue(result)로 변경하여 테스트를 성공시킨다.
여기까지 우리는 Profile 클래스의 한 작은 부분을 만들었고 그것이 동작함을 알게되었다. 여기까지 소스를 작성하였다면 Git과 같은 VCS에 커밋할 차례이다. TDD를 하면서 작은 코드를 커밋하는 것은 필요할 때 백업하거나 방향을 반대로 돌리기 수월해진다. 만약 큼지막한 단위로 커밋한다면 롤백은 그만큼 힘든 작업이 된다.
다음 작성할 테스트 코드는 Profile이 갖고 있는 Answer 객체와 Criterion이 가지고 있는 Answer 객체를 매칭시키는 테스트이다.
|
1
2
3
4
5
6
7
8
9
10
11
12
13
14
15
16
17
18
19
20
21
22
23
24
25
26
|
public class ProfileTest {
@Test
public void matchesNothingWhenProfileEmpty() {
Profile profile = new Profile();
Question question = new BooleanQuestion(1, "Relocation package?");
Criterion criterion =
new Criterion(new Answer(question, Bool.TRUE), Weight.DontCare);
boolean result = profile.matches(criterion);
assertFalse(result);
}
@Test
public void matchesWhenProfileContainsMatchingAnswer() {
Profile profile = new Profile();
Question question = new BooleanQuestion(1, "Relocation package?");
Answer answer = new Answer(question, Bool.TRUE);
profile.add(answer);
Criterion criterion = new Criterion(answer, Weight.Important);
boolean result = profile.matches(criterion);
assertTrue(result);
}
}
|
cs |
위와 같이 profile.matches()를 테스트 코드로 추가한다. 하지만 matches()는 세부적인 구현이 이루어지지 않은 상태이므로 아래와 같이 Profile에 matches()를 수정한다.
|
1
2
3
4
5
6
7
8
9
10
11
|
public class Profile {
private Answer answer;
public boolean matches(Criterion criterion) {
return answer != null;
}
public void add(Answer answer) {
this.answer = answer;
}
}
|
cs |
이제 Profile이 Answer 객체만 가지고 있다면 true를 리턴할 것이다.
여기까지 테스트 코드를 작성하였다면 이제는 테스트 코드를 조금은 정리할 필요가 있습니다. 두 개의 테스트만 보더라도 중복되는 코드 라인이 보이기 때문에 @Before 메서드로 중복된 초기화 코드를 분리해줍니다.
|
1
2
3
4
5
6
7
8
9
10
11
12
13
14
15
16
17
18
19
20
21
22
23
24
25
26
27
28
29
30
31
32
33
34
35
36
37
38
39
|
public class ProfileTest {
private Profile profile;
private BooleanQuestion questionIsThereRelocation;
private Answer answerThereIsRelocation;
@Before
public void createProfile() {
profile = new Profile();
}
@Before
public void createQuestionAndAnswer() {
questionIsThereRelocation =
new BooleanQuestion(1, "Relocation package?");
answerThereIsRelocation =
new Answer(questionIsThereRelocation, Bool.TRUE);
}
@Test
public void matchesNothingWhenProfileEmpty() {
Criterion criterion =
new Criterion(answerThereIsRelocation, Weight.DontCare);
boolean result = profile.matches(criterion);
assertFalse(result);
}
@Test
public void matchesWhenProfileContainsMatchingAnswer() {
profile.add(answerThereIsRelocation);
Criterion criterion =
new Criterion(answerThereIsRelocation, Weight.Important);
boolean result = profile.matches(criterion);
assertTrue(result);
}
}
|
cs |
테스트 코드의 리팩토링 과정에서 프로덕 코드의 변경은 없었고 물론 테스트도 통과할 것이다. 하지만 분명한 필드이름과 중복된 코드의 제거로 더욱 깔끔한 테스트코드가 되었다.
여기서 자칫하면 "어? 여러개의 @Test 메서드가 동일한 필드들을 공유하는데, 테스트 결과가 잘못 나오는 거 아니야?"라고 질문을 던질 수 있다. 하지만 이전 포스팅에서 얘기 햇듯이 @Test 마다 새로운 ProfileTest 인스턴스를 생성하기 때문에 매 테스트마다 인스턴스 변수는 독립적으로 사용한다.
다음 테스트는 Profile 인스턴스가 매칭되는 Answer 객체가 없을 때, matches() 메서드가 false를 반환하는 테스트이다.
|
1
2
3
4
5
6
7
8
9
10
11
12
13
14
15
16
17
18
19
20
21
22
23
24
25
26
27
28
29
30
31
32
33
34
35
36
37
38
39
40
41
42
43
44
45
46
47
48
49
50
51
52
53
54
55
|
public class ProfileTest {
private Answer answerThereIsNotRelocation;
// ...
private Profile profile;
private BooleanQuestion questionIsThereRelocation;
private Answer answerThereIsRelocation;
@Before
public void createProfile() {
profile = new Profile();
}
@Before
public void createQuestionAndAnswer() {
questionIsThereRelocation =
new BooleanQuestion(1, "Relocation package?");
answerThereIsRelocation =
new Answer(questionIsThereRelocation, Bool.TRUE);
answerThereIsNotRelocation =
new Answer(questionIsThereRelocation, Bool.FALSE);
}
// ...
@Test
public void matchesNothingWhenProfileEmpty() {
Criterion criterion =
new Criterion(answerThereIsRelocation, Weight.DontCare);
boolean result = profile.matches(criterion);
assertFalse(result);
}
@Test
public void matchesWhenProfileContainsMatchingAnswer() {
profile.add(answerThereIsRelocation);
Criterion criterion =
new Criterion(answerThereIsRelocation, Weight.Important);
boolean result = profile.matches(criterion);
assertTrue(result);
}
@Test
public void doesNotMatchWhenNoMatchingAnswer() {
profile.add(answerThereIsNotRelocation);
Criterion criterion =
new Criterion(answerThereIsRelocation, Weight.Important);
boolean result = profile.matches(criterion);
assertFalse(result);
}
}
|
cs |
테스트가 통과하려면 matches() 메서드는 Profile 객체가 들고 있는 단일 Answer 객체가 Criterion 객체에 저장된 응답과 매칭되는 지 결정해야 한다. Answer 클래스를 보면 어떻게 응답들을 비교하는지 알 수 있다.
|
1
2
3
4
5
6
7
8
9
10
11
12
13
14
15
16
17
18
19
20
21
22
23
24
25
26
27
28
29
30
31
32
33
34
35
36
37
38
39
|
public class Answer {
// ...
private int i;
private Question question;
public Answer(Question question, int i) {
this.question = question;
this.i = i;
}
public Answer(Question question, String matchingValue) {
this.question = question;
this.i = question.indexOf(matchingValue);
}
public String getQuestionText() {
return question.getText();
}
@Override
public String toString() {
return String.format("%s %s",
question.getText(), question.getAnswerChoice(i));
}
public boolean match(int expected) {
return question.match(expected, i);
}
public boolean match(Answer otherAnswer) {
// ...
return question.match(i, otherAnswer.i);
}
// ...
public Question getQuestion() {
return question;
}
}
|
cs |
이제 match 메서드를 이용하여 테스트를 통과하는 matches() 메서드 내의 단일 조건문을 추가한다.
|
1
2
3
4
5
6
7
8
9
10
11
12
13
|
public class Profile {
private Answer answer;
public boolean matches(Criterion criterion) {
return answer != null &&
answer.match(criterion.getAnswer());
}
// ...
public void add(Answer answer) {
this.answer = answer;
}
}
|
cs |
TDD로 성공하러면 테스트 시나리오를 테스트로 만들고 각 테스트를 통과하게 만드는 코드 증분을 최소화하는 순으로 코드를 작성한다.
이제 Profile 클래스가 다수의 Answer 객체를 갖도록 수정할 것이다. 다수의 Answer 객체를 Profile 클래스는 Map으로 갖도록 설계하였다.(key,value)
|
1
2
3
4
5
6
7
8
9
10
11
12
13
14
15
16
17
18
19
20
21
22
23
24
25
26
27
28
29
30
31
32
33
34
35
36
37
38
39
40
41
42
43
44
45
46
47
48
49
50
51
52
53
54
55
56
57
58
59
60
61
62
63
64
65
66
67
68
69
70
71
|
public class ProfileTest {
private Profile profile;
private BooleanQuestion questionIsThereRelocation;
private Answer answerThereIsRelocation;
private Answer answerThereIsNotRelocation;
private BooleanQuestion questionReimbursesTuition;
private Answer answerDoesNotReimburseTuition;
@Before
public void createProfile() {
profile = new Profile();
}
@Before
public void createQuestionsAndAnswers() {
questionIsThereRelocation =
new BooleanQuestion(1, "Relocation package?");
answerThereIsRelocation =
new Answer(questionIsThereRelocation, Bool.TRUE);
answerThereIsNotRelocation =
new Answer(questionIsThereRelocation, Bool.FALSE);
questionReimbursesTuition = new BooleanQuestion(1, "Reimburses tuition?");
answerDoesNotReimburseTuition =
new Answer(questionReimbursesTuition, Bool.FALSE);
}
@Test
public void matchesNothingWhenProfileEmpty() {
Criterion criterion =
new Criterion(answerThereIsRelocation, Weight.DontCare);
boolean result = profile.matches(criterion);
assertFalse(result);
}
@Test
public void matchesWhenProfileContainsMatchingAnswer() {
profile.add(answerThereIsRelocation);
Criterion criterion =
new Criterion(answerThereIsRelocation, Weight.Important);
boolean result = profile.matches(criterion);
assertTrue(result);
}
@Test
public void doesNotMatchWhenNoMatchingAnswer() {
profile.add(answerThereIsNotRelocation);
Criterion criterion =
new Criterion(answerThereIsRelocation, Weight.Important);
boolean result = profile.matches(criterion);
assertFalse(result);
}
@Test
public void matchesWhenContainsMultipleAnswers() {
profile.add(answerThereIsRelocation);
profile.add(answerDoesNotReimburseTuition);
Criterion criterion =
new Criterion(answerThereIsRelocation, Weight.Important);
boolean result = profile.matches(criterion);
assertTrue(result);
}
}
|
cs |
먼저 Profile이 다수의 Answer 객체를 가지는 테스트 코드를 작성한다.(matchesWhenContainsMultipleAnswers)
|
1
2
3
4
5
6
7
8
9
10
11
12
13
14
15
16
17
|
public class Profile {
private Map<String,Answer> answers = new HashMap<>();
private Answer getMatchingProfileAnswer(Criterion criterion) {
return answers.get(criterion.getAnswer().getQuestionText());
}
public boolean matches(Criterion criterion) {
Answer answer = getMatchingProfileAnswer(criterion);
return answer != null &&
answer.match(criterion.getAnswer());
}
public void add(Answer answer) {
answers.put(answer.getQuestionText(), answer);
}
}
|
cs |
테스트 통과를 위한 Profile 클래스를 수정한다. 테스트 통과를 위해 matches() 메서드의 일부로 getMatchingProfileAnswer() 메서드를 호출하여 반환값이 null인지 여부를 확인한다. 하지만 이러한 널 체크 구문을 다른 곳으로 숨기고 싶다. 그래서 Answer 클래스의 match() 메서드로 널체크를 보낼 것이다.
그렇다면 이전에 matches의 리턴문이 answer.match(criterion.getAnswer()) 였다면 아래와 같이 코드는 수정될 것이다.
|
1
2
3
4
5
6
7
8
9
10
11
12
13
14
15
16
17
18
19
20
|
public class Profile {
private Map<String,Answer> answers = new HashMap<>();
private Answer getMatchingProfileAnswer(Criterion criterion) {
return answers.get(criterion.getAnswer().getQuestionText());
}
public boolean matches(Criteria criteria) {
return false;
}
public boolean matches(Criterion criterion) {
Answer answer = getMatchingProfileAnswer(criterion);
return criterion.getAnswer().match(answer);
}
public void add(Answer answer) {
answers.put(answer.getQuestionText(), answer);
}
}
|
cs |
또한 Answer의 match()에는 null을 체크하는 구문이 추가된다.
|
1
2
3
4
5
6
7
8
9
10
11
12
13
14
|
public class Answer {
private int i;
private Question question;
...
public boolean match(Answer otherAnswer) {
if (otherAnswer == null) return false;
// ...
return question.match(i, otherAnswer.i);
}
...
}
|
cs |
하지만 여기서 끝이 아니다. 바로 위의 Answer를 수정하기 전에 아래와 같은 테스트코드가 작성되어야한다.
|
1
2
3
4
5
6
7
|
public class AnswerTest {
@Test
public void matchAgainstNullAnswerReturnsFalse() {
assertFalse(new Answer(new BooleanQuestion(0, ""), Bool.TRUE)
.match(null));
}
}
|
cs |
TDD를 할 때 다른 코드를 전혀 건드리지 않고 Profile 클래스만 변경할 필요는 없다. 필요한 사항이 있다면 설계를 변경하여 다른 클래스로 너어가도 된다.(Answer 클래스)
이제는 조금 코드를 확장할 것이다. 단일 Criterion 객체로만 매칭하는 것이 아니라 다수의 Criterion 객체를 가지는 Criteria 객체를 인수로 받아 매칭하는 코드로 변화 시킬 것이다.
|
1
2
3
4
5
6
7
8
9
10
11
12
13
14
15
16
17
18
19
20
21
22
23
24
25
26
27
28
29
30
31
32
33
34
35
36
37
38
39
40
41
42
43
44
|
public class ProfileTest {
private Profile profile;
private BooleanQuestion questionIsThereRelocation;
private Answer answerThereIsRelocation;
private Answer answerThereIsNotRelocation;
private BooleanQuestion questionReimbursesTuition;
private Answer answerDoesNotReimburseTuition;
private Answer answerReimbursesTuition;
@Before
public void createProfile() {
profile = new Profile();
}
@Before
public void createQuestionsAndAnswers() {
questionIsThereRelocation =
new BooleanQuestion(1, "Relocation package?");
answerThereIsRelocation =
new Answer(questionIsThereRelocation, Bool.TRUE);
answerThereIsNotRelocation =
new Answer(questionIsThereRelocation, Bool.FALSE);
questionReimbursesTuition = new BooleanQuestion(1, "Reimburses tuition?");
answerDoesNotReimburseTuition =
new Answer(questionReimbursesTuition, Bool.FALSE);
answerReimbursesTuition =
new Answer(questionReimbursesTuition, Bool.TRUE);
}
...
@Test
public void doesNotMatchWhenNoneOfMultipleCriteriaMatch() {
profile.add(answerDoesNotReimburseTuition);
Criteria criteria = new Criteria();
criteria.add(new Criterion(answerThereIsRelo, Weight.Important));
criteria.add(new Criterion(answerReimbursesTuition, Weight.Important));
boolean result = profile.matches(criteria);
assertFalse(result);
}
}
|
cs |
이제는 Profile 객체가 Criteria 객체를 받아 매칭하는 테스트 코드를 작성하였다. 결과를 통과 시키기 위해서 Profile 클래스에 Criteria를 인자로 받는 하드 코딩한 메서드를 추가한다.
|
1
2
3
4
5
6
7
8
9
10
11
12
13
14
15
16
17
18
19
20
|
public class Profile {
private Map<String,Answer> answers = new HashMap<>();
private Answer getMatchingProfileAnswer(Criterion criterion) {
return answers.get(criterion.getAnswer().getQuestionText());
}
public boolean matches(Criteria criteria) {
return false;
}
public boolean matches(Criterion criterion) {
Answer answer = getMatchingProfileAnswer(criterion);
return criterion.getAnswer().match(answer);
}
public void add(Answer answer) {
answers.put(answer.getQuestionText(), answer);
}
}
|
cs |
그리고 빠르게 다음 테스트를 작성한다. 단순히 true를 리턴하는 메서드에서 Criteria 객체를 순회하며 하나씩 꺼낸 Criterion 객체를 매치하는 메서드로 수정한다.
|
1
2
3
4
5
6
7
8
9
10
11
12
13
14
15
16
17
18
19
20
21
22
23
|
public class Profile {
private Map<String,Answer> answers = new HashMap<>();
private Answer getMatchingProfileAnswer(Criterion criterion) {
return answers.get(criterion.getAnswer().getQuestionText());
}
public boolean matches(Criteria criteria) {
for (Criterion criterion: criteria)
if (matches(criterion))
return true;
return false;
}
public boolean matches(Criterion criterion) {
Answer answer = getMatchingProfileAnswer(criterion);
return criterion.getAnswer().match(answer);
}
public void add(Answer answer) {
answers.put(answer.getQuestionText(), answer);
}
}
|
cs |
여기서 Criteria 객체를 로컬 변수로 매번 새롭게 생성하는데, 이것을 @Before 메서드를 활용하여 초기화하는 코드로 변경하면 더 깔끔한 코드가 된다.
이제 이 단계에서 여러 특별한 사례를 추가한다. Criterion의 MustMatch에 해당 되는 질문이 Profile 객체가 가지고 있지 않다면 실패하는 테스트 코드를 작성한다.
|
1
2
3
4
5
6
7
8
9
10
11
12
13
14
15
16
17
18
19
20
21
22
23
24
25
26
27
28
29
30
31
32
33
34
35
36
37
38
39
40
41
42
43
44
45
46
47
48
49
50
51
52
53
54
55
56
57
58
59
60
61
62
63
64
65
66
67
68
69
70
71
72
73
74
75
76
77
78
79
80
|
public class ProfileTest {
// ...
private Profile profile;
private BooleanQuestion questionIsThereRelocation;
private Answer answerThereIsRelocation;
private Answer answerThereIsNotRelocation;
private BooleanQuestion questionReimbursesTuition;
private Answer answerDoesNotReimburseTuition;
private Answer answerReimbursesTuition;
private Criteria criteria;
@Before
public void createCriteria() {
criteria = new Criteria();
}
// ...
@Before
public void createProfile() {
profile = new Profile();
}
@Before
public void createQuestionsAndAnswers() {
questionIsThereRelocation =
new BooleanQuestion(1, "Relocation package?");
answerThereIsRelocation =
new Answer(questionIsThereRelocation, Bool.TRUE);
answerThereIsNotRelocation =
new Answer(questionIsThereRelocation, Bool.FALSE);
questionReimbursesTuition = new BooleanQuestion(1, "Reimburses tuition?");
answerDoesNotReimburseTuition =
new Answer(questionReimbursesTuition, Bool.FALSE);
answerReimbursesTuition =
new Answer(questionReimbursesTuition, Bool.TRUE);
}
...
@Test
public void doesNotMatchWhenAnyMustMeetCriteriaNotMet() {
profile.add(answerThereIsRelo);
profile.add(answerDoesNotReimburseTuition);
criteria.add(new Criterion(answerThereIsRelo, Weight.Important));
criteria.add(new Criterion(answerReimbursesTuition, Weight.MustMatch));
assertFalse(profile.matches(criteria));
}
}
public class Profile {
private Map<String,Answer> answers = new HashMap<>();
private Answer getMatchingProfileAnswer(Criterion criterion) {
return answers.get(criterion.getAnswer().getQuestionText());
}
public boolean matches(Criteria criteria) {
boolean matches = false;
for (Criterion criterion: criteria) {
if (matches(criterion))
matches = true;
else if (criterion.getWeight() == Weight.MustMatch)
return false;
}
return matches;
}
public boolean matches(Criterion criterion) {
Answer answer = getMatchingProfileAnswer(criterion);
return criterion.getAnswer().match(answer);
}
public void add(Answer answer) {
answers.put(answer.getQuestionText(), answer);
}
}
|
cs |
테스트를 통과시키기 위해 Profile matches 메서드로 들어오고 Profile 객체의 Answer 중 매치되지 않은 질문의 weight이 MustMatch라면 false를 반환하는 코드로 작성한다.(즉, MustMatch는 반드시 매칭되어야 하는 필수조건인 것이다. 나머지가 다 맞고 MustMatch 하나만 안맞아도 매치는 false를 날린다.)
이런식으로 TDD를 이용하여 코드를 작성한다. 마지막으로 코드가 완성되었다면 테스트 클래스의 메서드의 이름들은 어떠한 코드의 명세서가 될 수 있다. 오늘 다루어본 TDD는 사실 두서없이 기본만 다루어본 내용이다. 사실 필자로 TDD에 익숙치 않은 개발자이기 때문에 TDD가 무엇인가 정도만 습득했어도 성공이라고 생각했다. 추후에는 실제 웹개발 코드를 작성할때 TDD를 이용한 개발 등의 포스팅을 할 예정이다.
사실 노력없는 결실은 없는 것 같다. 꾸준히 TDD로 개발하다보면 언젠간 적응되고 더 좋은 코드를 개발하는 날이 오지 않을까?
앞으로 더욱 많은 TDD 관련 포스팅을 할 예정이며, 현재까지 작성된 포스팅은 아래 책을 기반으로 작성하였다.

'Web > TDD' 카테고리의 다른 글
| TDD - 테스트(단위 테스트) 리팩토링 (0) | 2019.09.10 |
|---|---|
| TDD - 단위 테스트 목(Mock)객체 사용 (0) | 2019.09.09 |
| TDD - 단위 테스트, 무엇을 테스트 해야할까? Right-BICEP (1) | 2019.09.06 |
| TDD - 좋은 단위 테스트 작성하는 방법(FIRST 속성) (0) | 2019.09.05 |
| TDD - JUnit 테스트 코드 구성 방법.(테스트 코드 조직) (0) | 2019.09.04 |

단위 테스트, 혹은 여느 테스트 코드를 작성하는 일은 상당한 투자와 비용이 드는 작업이다. 하지만 테스트는 프로덕 코드의 결함을 최소화하고 리팩토링으로 프로덕 시스템을 깔끔하게 유지시켜준다. 그렇지만 역시 지속적인 비용을 의미하는 것은 부정할 수 없다. 시스템이 변경됨에 따라 테스트 코드도 다시 들여다보아야한다. 때때로 변경 사항들을 생겨나고 그 결과로 수많은 테스트 케이스가 깨져 테스트 코드를 수정해야 한다.
그렇다면 만약 테스크 코드가 굉장히 복잡하고 지저분하다면 어떻게 될까? 새로운 변경사항이 생겨날 때마다 테스트 코드를 수정하는 일은 더욱 더 힘든 일이 될 것이다. 그래서 이번 포스팅에서는 테스트 코드를 리팩토링하여 유지보수가 쉬운 테스트 코드를 만드는 것을 간단하게 소개할 것이다. 이번 포스팅의 목표는 리팩토링의 대상이 프로덕 코드만이 아니라 테스트 코드도 되어야한다라는 것을 알기 위한 글이다.
검색 기능에 대한 테스트 코드가 아래와 같이 있다. 하지만 해당 테스트 코드를 보면 이 테스트 코드가 어떠한 것을 검증하고 증명하려하는지 한눈에 파악하기 힘든 코드이다. 더군다나 우리는 Search 하는 클래스가 정확히 어떤 일을 하는 지도 모른다.
|
1
2
3
4
5
6
7
8
9
10
11
12
13
14
15
16
17
18
19
20
21
22
23
24
25
26
27
28
29
30
31
32
33
34
35
36
37
38
39
40
41
|
public class SearchTest {
@Test
public void testSearch() {
try {
String pageContent = "There are certain queer times and occasions "
+ "in this strange mixed affair we call life when a man "
+ "takes this whole universe for a vast practical joke, "
+ "though the wit thereof he but dimly discerns, and more "
+ "than suspects that the joke is at nobody's expense but "
+ "his own.";
byte[] bytes = pageContent.getBytes();
ByteArrayInputStream stream = new ByteArrayInputStream(bytes);
// search
Search search = new Search(stream, "practical joke", "1");
Search.LOGGER.setLevel(Level.OFF);
search.setSurroundingCharacterCount(10);
search.execute();
assertFalse(search.errored());
List<Match> matches = search.getMatches();
assertThat(matches, is(notNullValue()));
assertTrue(matches.size() >= 1);
Match match = matches.get(0);
assertThat(match.searchString, equalTo("practical joke"));
assertThat(match.surroundingContext,
equalTo("or a vast practical joke, though t"));
stream.close();
// negative
URLConnection connection =
new URL("http://bit.ly/15sYPA7").openConnection();
InputStream inputStream = connection.getInputStream();
search = new Search(inputStream, "smelt", "http://bit.ly/15sYPA7");
search.execute();
assertThat(search.getMatches().size(), equalTo(0));
stream.close();
} catch (Exception e) {
e.printStackTrace();
fail("exception thrown in test" + e.getMessage());
}
}
}
|
cs |
이 테스트 코드의 문제점 몇 가지를 찾아보자.
- 테스트 이름인 testSearch는 어떤 유용한 정보도 제공하지 못한다.
- 몇 줄의 주석은 우리에게 어떠한 도움도 주지 못한다.
- 다수의 단언(assert)가 존재해 무엇을 증명하고 검증하려고 하는지 이해하지 못한다.
더 많은 냄새가 나지만 일단 위와 같은 문제점들이 딱 눈에 보인다. 우리는 이 코드를 깔끔하게 리팩토링 해볼 것이다.
1)불필요한 테스트 코드
위 테스트 코드에 크게 감싸고 있는 try/catch 구문은 사실 크게 이점이 없는 코드 블록이다. 현재 테스트 코드에서 해당 블록이 하는 역할은 예외가 발생하면 스택 트레이서를 출력하고 테스트를 실패시키며 예외 메시지를 뿌려주는 역할을 한다. 하지만 사실 try/catch 구문이 없더라도 JUnit은 발생한 예외를 잡아 스택 트레이서를 뿌려주고 테스트에 오류가 발생함을 알려주기 때문에 위의 try/catch는 불필요하다.(무조건 테스트에서 try/catch구문이 필요없다는 것이 아니다.)
두번째는 20Line에 있는 notNullValue() 부분이다. 바로 21Line에는 matchs의 사이즈가 1보다 크거나 같음을 이미 테스트하고 있다. 또한 널을 체크하는 구문이 없더라도 만약 matches가 널이라면 21Line에서 테스트 실패가 날것이므로 굳이 널 체크 단언을 넣을 필요가 없다. 물론 프로덕 코드에서는 널 체크하는 구문이 아주 큰 역할을 할 수는 있다. 하지만 이 테스크 코드에서는 크게 이점이 없는 코드구문이다.
|
1
2
3
4
5
6
7
8
9
10
11
12
13
14
15
16
17
18
19
20
21
22
23
24
25
26
27
28
29
30
31
32
33
34
35
36
|
public class SearchTest {
@Test
public void testSearch() throws IOException {
String pageContent = "There are certain queer times and occasions "
+ "in this strange mixed affair we call life when a man "
+ "takes this whole universe for a vast practical joke, "
+ "though the wit thereof he but dimly discerns, and more "
+ "than suspects that the joke is at nobody's expense but "
+ "his own.";
byte[] bytes = pageContent.getBytes();
// ...
ByteArrayInputStream stream = new ByteArrayInputStream(bytes);
// search
Search search = new Search(stream, "practical joke", "1");
Search.LOGGER.setLevel(Level.OFF);
search.setSurroundingCharacterCount(10);
search.execute();
assertFalse(search.errored());
List<Match> matches = search.getMatches();
assertTrue(matches.size() >= 1);
Match match = matches.get(0);
assertThat(match.searchString, equalTo("practical joke"));
assertThat(match.surroundingContext, equalTo(
"or a vast practical joke, though t"));
stream.close();
// negative
URLConnection connection =
new URL("http://bit.ly/15sYPA7").openConnection();
InputStream inputStream = connection.getInputStream();
search = new Search(inputStream, "smelt", "http://bit.ly/15sYPA7");
search.execute();
assertThat(search.getMatches().size(), equalTo(0));
stream.close();
}
}
|
cs |
위의 문제점을 고쳐 위와 같은 테스트 코드로 리팩토링하였다. 하지만 여전히 지저분해보이는 코드이다.
2)추상화 누락
위 코드에서는 다수의 단언(assert)가 존재한다. 이 중에서 20,22,23Line의 단언은 사실 하나의 개념을 구체화하고 있는 단언이다. 하나의 개념을 구체화하고 있다는 뜻은 하나의 assert 문으로도 충분히 테스트할 수 있는 케이스라는 뜻이다. 우리는 여기에서 사용자 정의 매처를 생성하여 위의 3개의 단언문을 하나의 단언으로 리팩토링할 것이다.
|
1
2
3
4
5
6
7
8
9
10
11
12
13
14
15
16
17
18
19
20
21
22
23
24
25
26
27
28
29
30
31
32
|
public class ContainsMatches extends TypeSafeMatcher<List<Match>> {
private Match[] expected;
public ContainsMatches(Match[] expected) {
this.expected = expected;
}
@Override
public void describeTo(Description description) {
description.appendText("<" + expected.toString() + ">");
}
private boolean equals(Match expected, Match actual) {
return expected.searchString.equals(actual.searchString)
&& expected.surroundingContext.equals(actual.surroundingContext);
}
@Override
protected boolean matchesSafely(List<Match> actual) {
if (actual.size() != expected.length)
return false;
for (int i = 0; i < expected.length; i++)
if (!equals(expected[i], actual.get(i)))
return false;
return true;
}
@Factory
public static <T> Matcher<List<Match>> containsMatches(Match[] expected) {
return new ContainsMatches(expected);
}
}
|
cs |
위 코드와 같이 사용자 정의 매처를 생성한다. 사용자 정의 매처는 햄크레스트의 TypeSafeMatcher<T>를 상속하여 구현할 수 있다. 첫번째 오버라이드하는 메서드 describeTo는 테스트 실패시 우리가 기대한 값을 출력하기 위한 메서드이다. 두번째 matchesSafely는 실제 expected값과 actual 값 비교를 위한 메서드이다. 마지막 containsMatches는 JUnit 코드에서 사용되는 팩토리 메소드이다.
|
1
2
3
4
5
6
7
8
9
10
11
12
13
14
15
16
17
18
19
20
21
22
23
24
25
26
27
28
29
30
31
32
33
34
|
public class SearchTest {
@Test
public void testSearch() throws IOException {
String pageContent = "There are certain queer times and occasions "
// ...
+ "in this strange mixed affair we call life when a man "
+ "takes this whole universe for a vast practical joke, "
+ "though the wit thereof he but dimly discerns, and more "
+ "than suspects that the joke is at nobody's expense but "
+ "his own.";
byte[] bytes = pageContent.getBytes();
ByteArrayInputStream stream = new ByteArrayInputStream(bytes);
// search
Search search = new Search(stream, "practical joke", "1");
Search.LOGGER.setLevel(Level.OFF);
search.setSurroundingCharacterCount(10);
search.execute();
assertFalse(search.errored());
assertThat(search.getMatches(), containsMatches(new Match[] {
new Match("1", "practical joke",
"or a vast practical joke, though t") }));
stream.close();
// ...
// negative
URLConnection connection =
new URL("http://bit.ly/15sYPA7").openConnection();
InputStream inputStream = connection.getInputStream();
search = new Search(inputStream, "smelt", "http://bit.ly/15sYPA7");
search.execute();
assertTrue(search.getMatches().isEmpty());
stream.close();
}
}
|
cs |
우리는 사용자 정의 매처를 만들어서 위와 같이 3개의 assert를 하나의 assert 구문으로 바꾸는 마법을 부릴 수 있게 되었다. 한편으로는 "테스트 몇 줄을 줄이기 위해 사용자 정의 매처를 만드는 수고를 해야되?"라고 생각할 수는 있지만 이 사용자 정의 매처는 여러 테스트 코드에서 재활용될 수 있기에 충분한 가치가 있다.
그리고 마지막의 단언이였던 search.getMatches의 크기가 equalsTo(0)인가라는 단언은 위와 같이 .isEmpty()로 바꾸어서 조금 더 사실적인 정보를 줄 수 있다.
3)부절절한 정보
잘 추상화된 테스트는 코드를 이해하는 데 중요한 것을 부각시켜 주고 그렇지 않은 것은 보이지 않게 해준다. 테스트에 사용되는 데이터는 어떠한 테스트 시나리오를 설명할 수 있게 도움을 주어야 한다.
때때로 테스트에는 부적절하지만, 당장 컴파일 에러를 피하기 위해 데이터를 넣기도 한다. 예를 들어 메서드가 테스트에는 어떤 영향도 없는 부가적인 인수를 취하기도 한다.
테스트는 그 의미가 불분명한 "매직 리터럴"들을 포함하고 있다.
매직 리터럴 - 프로그래밍에서 상수로 선언하지 않은 숫자 리터럴을 "매직 넘버"라고 하며, 코드에는 되도록 사용하면 안된다.
|
1
2
3
4
5
6
7
8
9
|
...
Search search = new Search(stream, "practical joke", "1");
assertThat(search.getMatches(), containsMatches(new Match[] {
new Match("1", "practical joke",
"or a vast practical joke, though t") }));
...
|
cs |
위 코드를 보면 상수 "1"이 무슨 역할을 하는지 확신할 수 없다. 따라서 그 의미를 파악하기 위해서는 Search와 Match 클래스를 까봐야한다.(실제 코드 내부적으로는 "1"이 검색 제목을 의미하며 실제로 검색에 사용되지 않는 필드 값이다.)
"1"을 포함한 매직 리터럴은 불필요한 질문을 유발한다. 또한 이 값이 테스트에서 어떠한 영향을 미치는 지 소스를 파느라 시간을 낭비하게 될 것이다.
|
1
2
3
4
|
URLConnection connection =
new URL("http://bit.ly/15sYPA7").openConnection();
InputStream inputStream = connection.getInputStream();
search = new Search(inputStream, "smelt", "http://bit.ly/15sYPA7");
|
cs |
또한 위의 URL 값은 어떻게 보면 위의 URL과 연관성이 있어 보이지만, 실제로는 무관한 값이다. 이렇게 "1"과 URL 값 같이 의미가 불분명하거나 혼란스러운 상황을 유발하는 리터럴 같은 경우는 의미파악이 쉬운 상수로 대체하면 의미를 분명히 전달할 수 있게 된다.
|
1
2
3
4
5
6
7
8
9
10
11
12
13
14
15
16
17
18
19
20
21
22
23
24
25
26
27
28
29
30
31
32
33
|
public class SearchTest {
private static final String A_TITLE = "1";
@Test
public void testSearch() throws IOException {
String pageContent = "There are certain queer times and occasions "
+ "in this strange mixed affair we call life when a man "
+ "takes this whole universe for a vast practical joke, "
+ "though the wit thereof he but dimly discerns, and more "
+ "than suspects that the joke is at nobody's expense but "
+ "his own.";
byte[] bytes = pageContent.getBytes();
ByteArrayInputStream stream = new ByteArrayInputStream(bytes);
// search
Search search = new Search(stream, "practical joke", A_TITLE);
Search.LOGGER.setLevel(Level.OFF);
search.setSurroundingCharacterCount(10);
search.execute();
assertFalse(search.errored());
assertThat(search.getMatches(), containsMatches(new Match[]
{ new Match(A_TITLE, "practical joke",
"or a vast practical joke, though t") }));
stream.close();
// negative
URLConnection connection =
new URL("http://bit.ly/15sYPA7").openConnection();
InputStream inputStream = connection.getInputStream();
search = new Search(inputStream, "smelt", A_TITLE);
search.execute();
assertTrue(search.getMatches().isEmpty());
stream.close();
}
}
|
cs |
혹은 빈 문자열 등을 인자로 넘겨 테스트와는 무관한 값임을 표현하는 것도 하나의 방법이 될 수 있다.
4)부푼 생성
테스트 코드를 보면 Search 생성자에 InputStream 객체를 넘기고 있다. 또한 이 InputStream를 만들기 위해서 3개의 라인을 차지 하고 있다. 이러한 생성 관련된 코드를 하나의 메서드로 분리하면 여러 코드에서도 재활용가능하다.
|
1
2
3
4
5
6
7
8
9
10
11
12
13
14
15
16
17
18
19
20
21
22
23
24
25
26
27
28
29
30
31
32
33
34
35
36
37
38
|
public class SearchTest {
private static final String A_TITLE = "1";
@Test
public void testSearch() throws IOException {
InputStream stream =
streamOn("There are certain queer times and occasions "
+ "in this strange mixed affair we call life when a man "
+ "takes this whole universe for a vast practical joke, "
+ "though the wit thereof he but dimly discerns, and more "
+ "than suspects that the joke is at nobody's expense but "
+ "his own.");
// search
Search search = new Search(stream, "practical joke", A_TITLE);
// ...
Search.LOGGER.setLevel(Level.OFF);
search.setSurroundingCharacterCount(10);
search.execute();
assertFalse(search.errored());
assertThat(search.getMatches(), containsMatches(new Match[]
{ new Match(A_TITLE, "practical joke",
"or a vast practical joke, though t") }));
stream.close();
// negative
URLConnection connection =
new URL("http://bit.ly/15sYPA7").openConnection();
InputStream inputStream = connection.getInputStream();
search = new Search(inputStream, "smelt", A_TITLE);
search.execute();
assertTrue(search.getMatches().isEmpty());
stream.close();
}
private InputStream streamOn(String pageContent) {
return new ByteArrayInputStream(pageContent.getBytes());
}
}
|
cs |
5)다수의 단언문(assert)
하나의 단위 테스트는 하나의 단언문으로 가는 것이 좋다. 때때로 단일 테스트에 다수의 단언문이 필요하긴 하지만 너무 많은 단언문을 가진다면 테스트 케이스를 두 개 이상을 포함하고 있는지 의심해봐야한다.
위 테스트에서는 어떠한 입력값에 대한 테스트와 어떠한 매칭도 되지 않는 테스트를 하나의 메서드 내에 작성하였음으로 두 개의 테스트로 분리 가능하다.
|
1
2
3
4
5
6
7
8
9
10
11
12
13
14
15
16
17
18
19
20
21
22
23
24
25
26
27
28
29
30
31
32
33
34
35
36
37
38
39
40
41
42
|
public class SearchTest {
private static final String A_TITLE = "1";
@Test
public void returnsMatchesShowingContextWhenSearchStringInContent()
throws IOException {
InputStream stream =
streamOn("There are certain queer times and occasions "
+ "in this strange mixed affair we call life when a man "
+ "takes this whole universe for a vast practical joke, "
+ "though the wit thereof he but dimly discerns, and more "
+ "than suspects that the joke is at nobody's expense but "
+ "his own.");
// search
Search search = new Search(stream, "practical joke", A_TITLE);
Search.LOGGER.setLevel(Level.OFF);
search.setSurroundingCharacterCount(10);
search.execute();
assertFalse(search.errored());
assertThat(search.getMatches(), containsMatches(new Match[]
{ new Match(A_TITLE, "practical joke",
"or a vast practical joke, though t") }));
stream.close();
}
@Test
public void noMatchesReturnedWhenSearchStringNotInContent()
throws MalformedURLException, IOException {
URLConnection connection =
new URL("http://bit.ly/15sYPA7").openConnection();
InputStream inputStream = connection.getInputStream();
Search search = new Search(inputStream, "smelt", A_TITLE);
search.execute();
assertTrue(search.getMatches().isEmpty());
inputStream.close();
}
// ...
private InputStream streamOn(String pageContent) {
return new ByteArrayInputStream(pageContent.getBytes());
}
}
|
cs |
6)테스트와 무관한 세부 사항들
위에서는 테스트와 부관한 로그를 끄는 코드, 스트림을 사용 후에 닫은 코드등 종단 관심이 아닌 횡단 관심에 해당되는 코드가 산재되어 있다. 이러한 코드는 @Before,@After 등과 같은 메서드로 분리가능하다.
|
1
2
3
4
5
6
7
8
9
10
11
12
13
14
15
16
17
18
19
20
21
22
23
24
25
26
27
28
29
30
31
32
33
34
35
36
37
38
39
40
41
42
43
44
45
46
|
public class SearchTest {
private static final String A_TITLE = "1";
private InputStream stream;
@Before
public void turnOffLogging() {
Search.LOGGER.setLevel(Level.OFF);
}
@After
public void closeResources() throws IOException {
stream.close();
}
@Test
public void returnsMatchesShowingContextWhenSearchStringInContent() {
stream = streamOn("There are certain queer times and occasions "
+ "in this strange mixed affair we call life when a man "
+ "takes this whole universe for a vast practical joke, "
+ "though the wit thereof he but dimly discerns, and more "
+ "than suspects that the joke is at nobody's expense but "
+ "his own.");
Search search = new Search(stream, "practical joke", A_TITLE);
search.setSurroundingCharacterCount(10);
search.execute();
assertThat(search.getMatches(), containsMatches(new Match[]
{ new Match(A_TITLE, "practical joke",
"or a vast practical joke, though t") }));
}
@Test
public void noMatchesReturnedWhenSearchStringNotInContent()
throws MalformedURLException, IOException {
URLConnection connection =
new URL("http://bit.ly/15sYPA7").openConnection();
stream = connection.getInputStream();
Search search = new Search(stream, "smelt", A_TITLE);
search.execute();
assertTrue(search.getMatches().isEmpty());
}
// ...
private InputStream streamOn(String pageContent) {
return new ByteArrayInputStream(pageContent.getBytes());
}
}
|
cs |
7)잘못된 조직
테스트에서 어느 부분들이 준비(Arrange), 실행(Act), 단언(Assert) 부분인지 아는 것은 테스트를 빠르게 인지할 수 있게 한다. 이 조직은 "AAA"조직이라 불린다. 보통 이러한 블럭은 개행으로 분리한다.
|
1
2
3
4
5
6
7
8
9
10
11
12
13
14
15
16
17
18
19
20
21
22
23
24
25
26
27
28
29
30
31
32
33
34
35
36
37
38
39
40
41
42
43
44
45
46
47
48
49
50
|
public class SearchTest {
private static final String A_TITLE = "1";
private InputStream stream;
@Before
public void turnOffLogging() {
Search.LOGGER.setLevel(Level.OFF);
}
@After
public void closeResources() throws IOException {
stream.close();
}
@Test
public void returnsMatchesShowingContextWhenSearchStringInContent() {
stream = streamOn("There are certain queer times and occasions "
+ "in this strange mixed affair we call life when a man "
+ "takes this whole universe for a vast practical joke, "
+ "though the wit thereof he but dimly discerns, and more "
+ "than suspects that the joke is at nobody's expense but "
+ "his own.");
Search search = new Search(stream, "practical joke", A_TITLE);
search.setSurroundingCharacterCount(10);
search.execute();
assertThat(search.getMatches(), containsMatches(new Match[]
{ new Match(A_TITLE, "practical joke",
"or a vast practical joke, though t") }));
}
@Test
public void noMatchesReturnedWhenSearchStringNotInContent()
throws MalformedURLException, IOException {
URLConnection connection =
new URL("http://bit.ly/15sYPA7").openConnection();
stream = connection.getInputStream();
Search search = new Search(stream, "smelt", A_TITLE);
search.execute();
assertTrue(search.getMatches().isEmpty());
}
private InputStream streamOn(String pageContent) {
return new ByteArrayInputStream(pageContent.getBytes());
}
}
|
cs |
TDD - JUnit 테스트 코드 구성 방법.(테스트 코드 조직)
이번 포스팅에서 다루어볼 내용은 테스트 코드를 잘 조직하고 구조화 할 수 있는 JUnit 기능을 살펴볼 것이다. 포스팅에서 다룰 내용은 아래와 같다. 준비-실행-단언을 사용하여 테스트를 가시적이고 일관성 있게..
coding-start.tistory.com
8)암시적 의미
각 테스트가 분명하게 대답해야 할 가장 큰 질문은 "왜 그러한 결과를 기대하는 가?"이다. 테스트 코드를 보는 누군가에게 테스트 준비와 단언 부분을 상호 연관 지을 수 있게 해야한다. 단언이 기대하는 이유가 분명하지 않다면 코드를 읽는 사람들은 그 해답을 얻기 위해 다른 코드를 뒤져 가며 시간을 낭비할 것이다.
returnsMatchesShowingContextWhenSearchStringInContent 테스트는 이름만 딱 봐도 특정 컨텐츠 안에 특정 문자열이 포함되있다면 컨텍스트를 가지는 Matches를 리턴한다라는 것을 파악할 수 있다. 하지만 단언의 결과는 테스트 코드를 보는 사람들로 하여금 이해하기 힘들며 직접 하나하나 따져봐야하는 결과이다.("or a vast practical joke, though t")
우리는 의미없는 문장을 넣어 이해하기 쉬운 기대 결과값을 만들어 낼 수 있다. 또한 URLConnection은 비용이 어느정도 있는 객체이기 때문에 굳이 사용할 필요가 없이, 외부환경과 분리해서 임의의 텍스트를 넣어 초기화하였다.
|
1
2
3
4
5
6
7
8
9
10
11
12
13
14
15
16
17
18
19
20
21
22
23
24
25
26
27
28
29
30
31
32
33
34
35
36
37
38
39
40
41
42
43
44
|
public class SearchTest {
private static final String A_TITLE = "1";
private InputStream stream;
@Before
public void turnOffLogging() {
Search.LOGGER.setLevel(Level.OFF);
}
@After
public void closeResources() throws IOException {
stream.close();
}
@Test
public void returnsMatchesShowingContextWhenSearchStringInContent() {
stream = streamOn("rest of text here"
+ "1234567890search term1234567890"
+ "more rest of text");
Search search = new Search(stream, "search term", A_TITLE);
search.setSurroundingCharacterCount(10);
search.execute();
assertThat(search.getMatches(), containsMatches(new Match[]
{ new Match(A_TITLE,
"search term",
"1234567890search term1234567890") }));
}
@Test
public void noMatchesReturnedWhenSearchStringNotInContent() {
stream = streamOn("any text");
Search search = new Search(stream, "text that doesn't match", A_TITLE);
search.execute();
assertTrue(search.getMatches().isEmpty());
}
private InputStream streamOn(String pageContent) {
return new ByteArrayInputStream(pageContent.getBytes());
}
}
|
cs |
여기까지 간단히 테스트 코드에 대한 리팩토링을 다루어봤다. 사실 리팩토링 능력은 경험의 차이가 아주 큰 것 같다. 테스트 코드를 짜는 습관을 들이다 보면 나도 리팩토링을 잘하는 날이 오겠지..
'Web > TDD' 카테고리의 다른 글
| TDD - 테스트 주도 개발(Test Driven Development) (1) | 2019.09.10 |
|---|---|
| TDD - 단위 테스트 목(Mock)객체 사용 (0) | 2019.09.09 |
| TDD - 단위 테스트, 무엇을 테스트 해야할까? Right-BICEP (1) | 2019.09.06 |
| TDD - 좋은 단위 테스트 작성하는 방법(FIRST 속성) (0) | 2019.09.05 |
| TDD - JUnit 테스트 코드 구성 방법.(테스트 코드 조직) (0) | 2019.09.04 |